Backyard Goals Worth Actually Having Right Now

There is something about a beautiful backyard that makes you feel like you have really figured out life. Not because it is expensive or over the top, but because it shows that you thought about how you want to live outside your four walls. A great backyard is not about square footage or a massive budget. It is about designing a space that works for how you actually spend your time, whether that means hosting dinner parties under string lights, soaking in a hot tub after a long week, or simply sitting with a cup of coffee and staring at something green.
Luxury, when it comes to outdoor spaces, is less about price tags and more about intention. It is choosing materials that age beautifully. It is layering light so the space looks just as good at 9 p.m. as it does at noon. It is adding a water feature not because everyone else has one, but because the sound of moving water genuinely helps you relax. These are the details that separate a backyard that looks nice in photos from one that you actually live in.
This article covers 27 ideas across five lifestyle themes, from resort-style entertaining to quiet garden retreats. Each one is packed with specific details on layout, materials, planting, lighting, and furniture so you can actually take action on what inspires you. Whether you are starting from a blank slate or refreshing what you already have, there is something here worth stealing.
Zone 1: The Entertainer’s Backyard
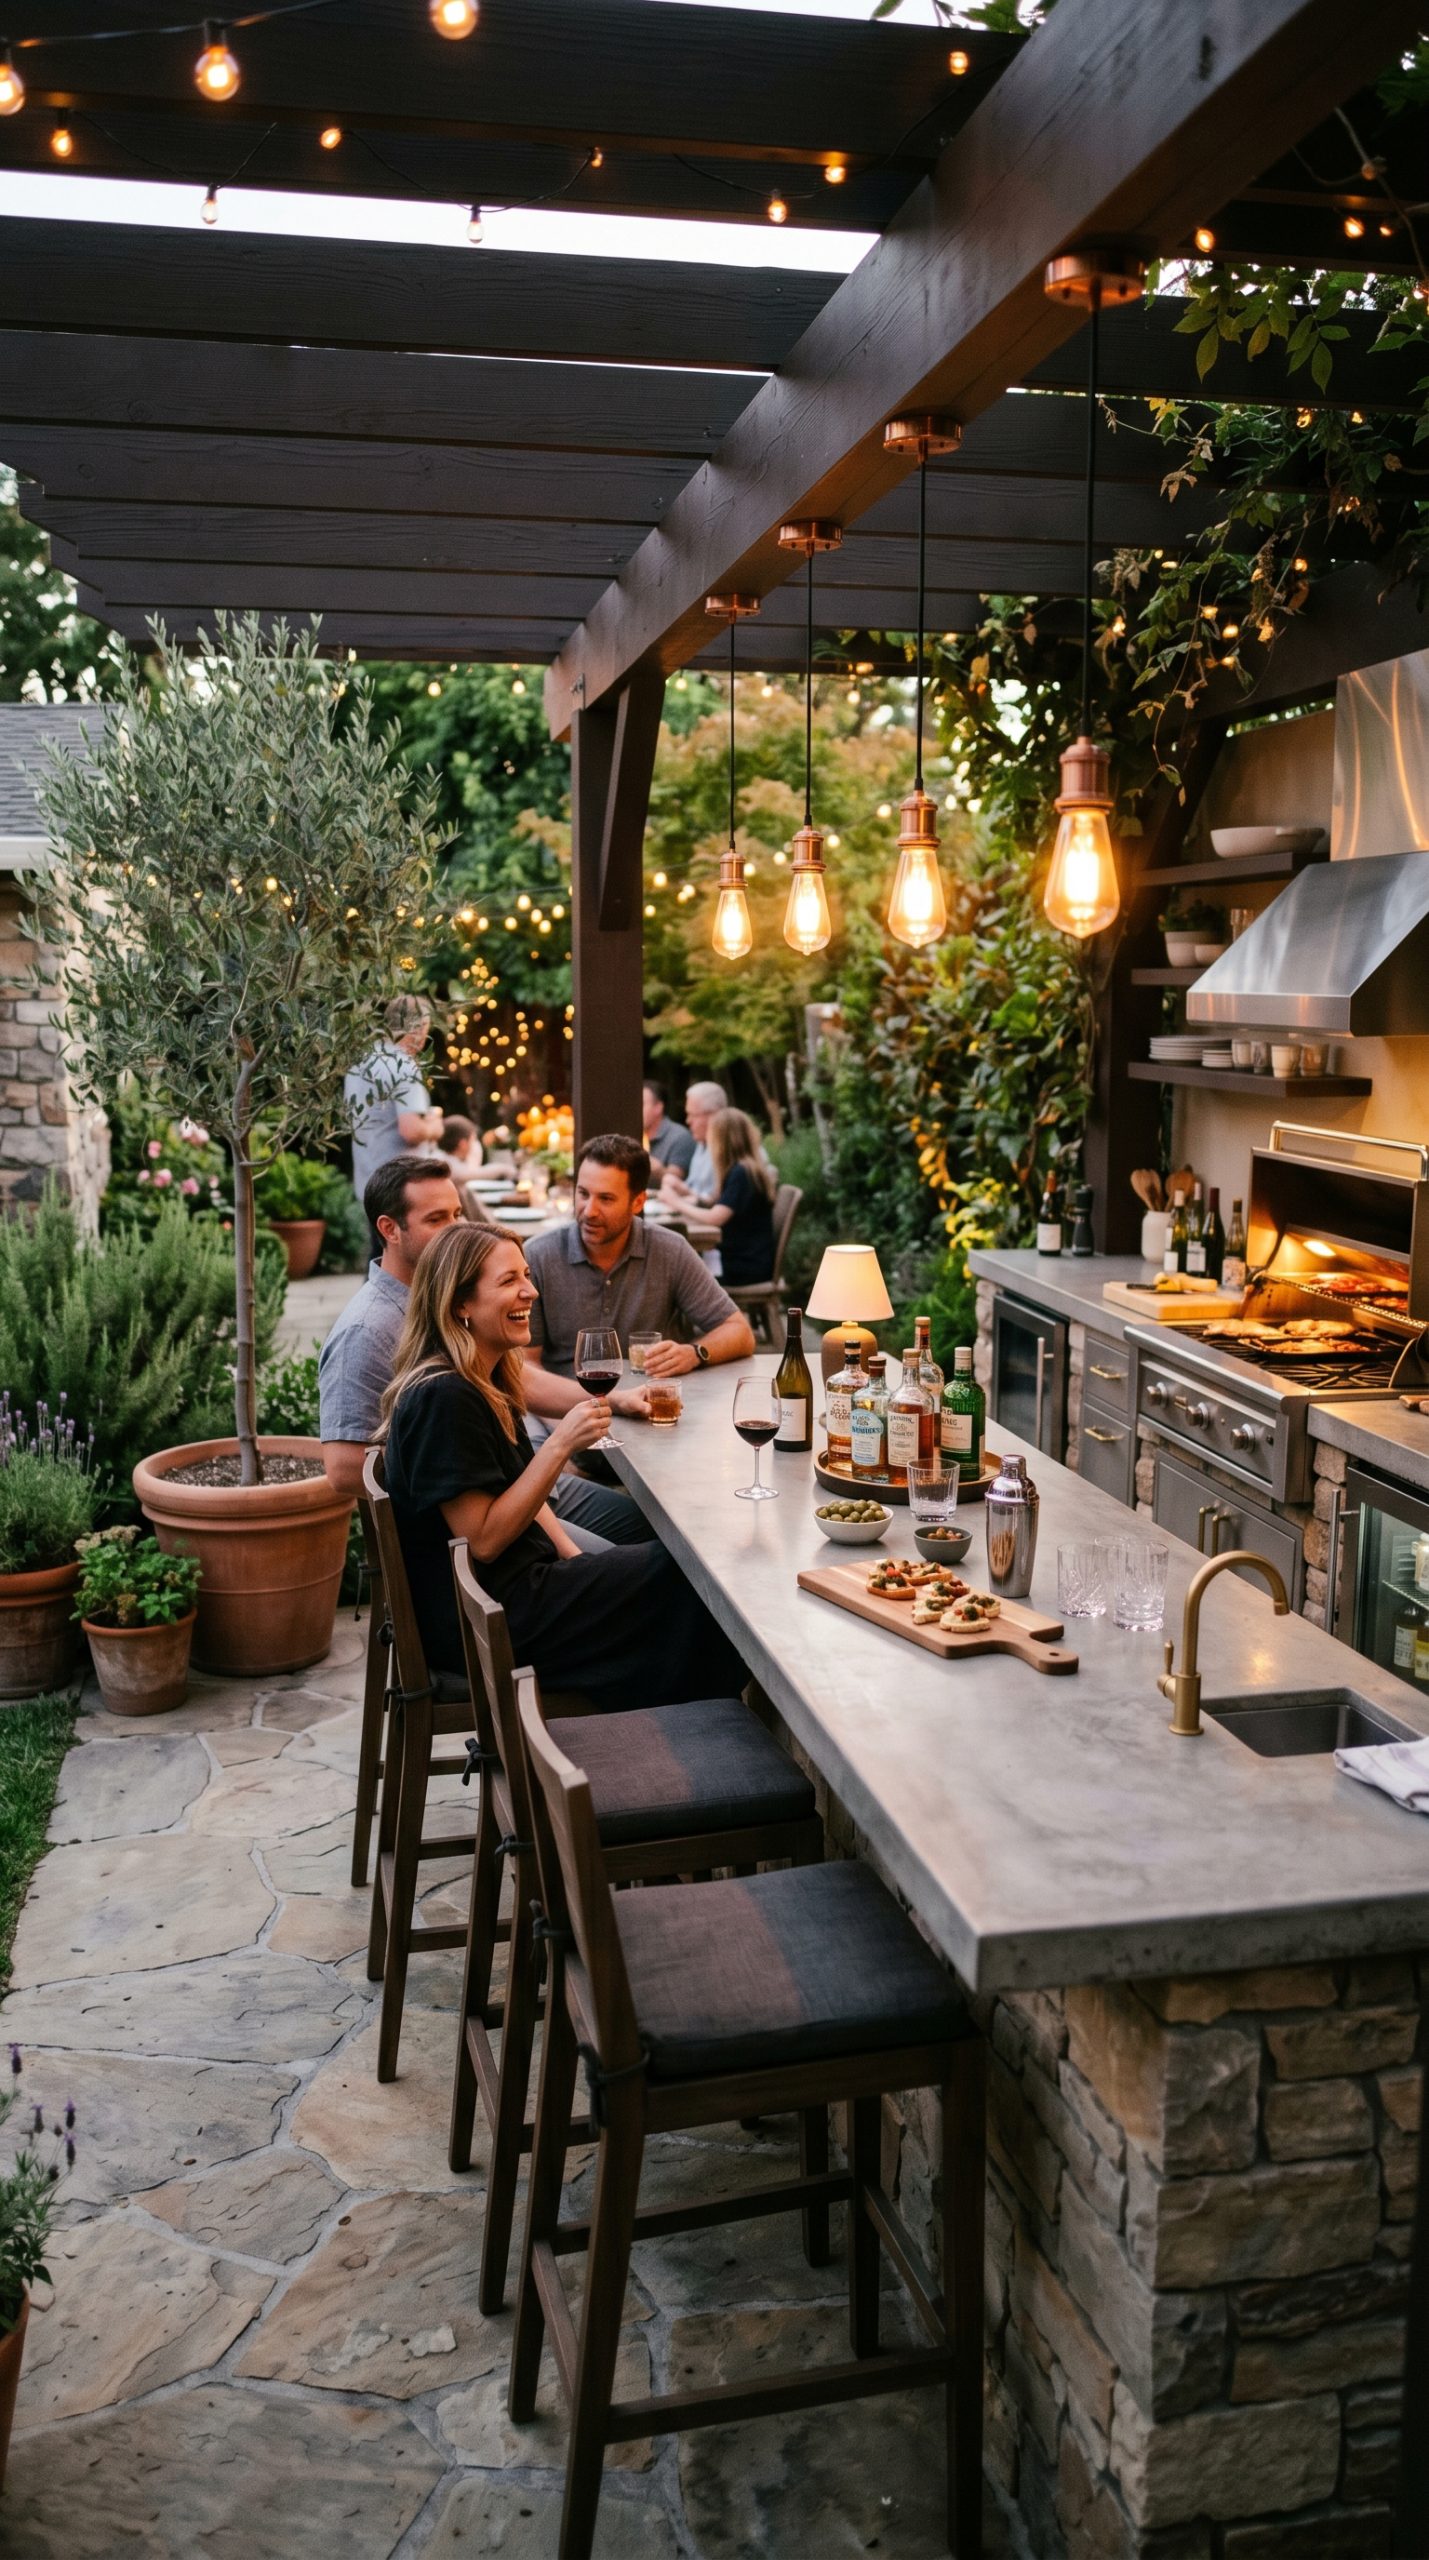
The Outdoor Kitchen and Bar Setup
If you spend any real time hosting people, an outdoor kitchen is the single upgrade that changes everything. The key is treating it like a proper room rather than just a grill on a deck. Start with a built-in gas or charcoal grill flanked by countertops made from porcelain tile, granite, or concrete. These materials handle heat, rain, and UV exposure without warping or staining, which is more than you can say for most outdoor surfaces.
Add a bar section with a mini fridge, a sink, and bar stools with weather-resistant cushions in a neutral linen or fade-proof canvas. Pendant lights over the bar area create the right kind of atmosphere once the sun goes down. For cabinetry, marine-grade polymer or stainless steel are your best options since they will not rust or crack in changing temperatures.
Keep your color palette grounded in natural tones: charcoal, warm grey, warm white, or soft slate. You want the kitchen to feel like an extension of your home rather than a separate structure plopped in the yard. String Edison bulbs overhead or add recessed lighting under the countertop overhang for layered evening illumination.
Designer Advice: Build your outdoor kitchen on a raised platform or use a slightly elevated slab to visually anchor it from the rest of the lawn. This makes the kitchen feel intentional rather than incidental.

The Al Fresco Dining Room
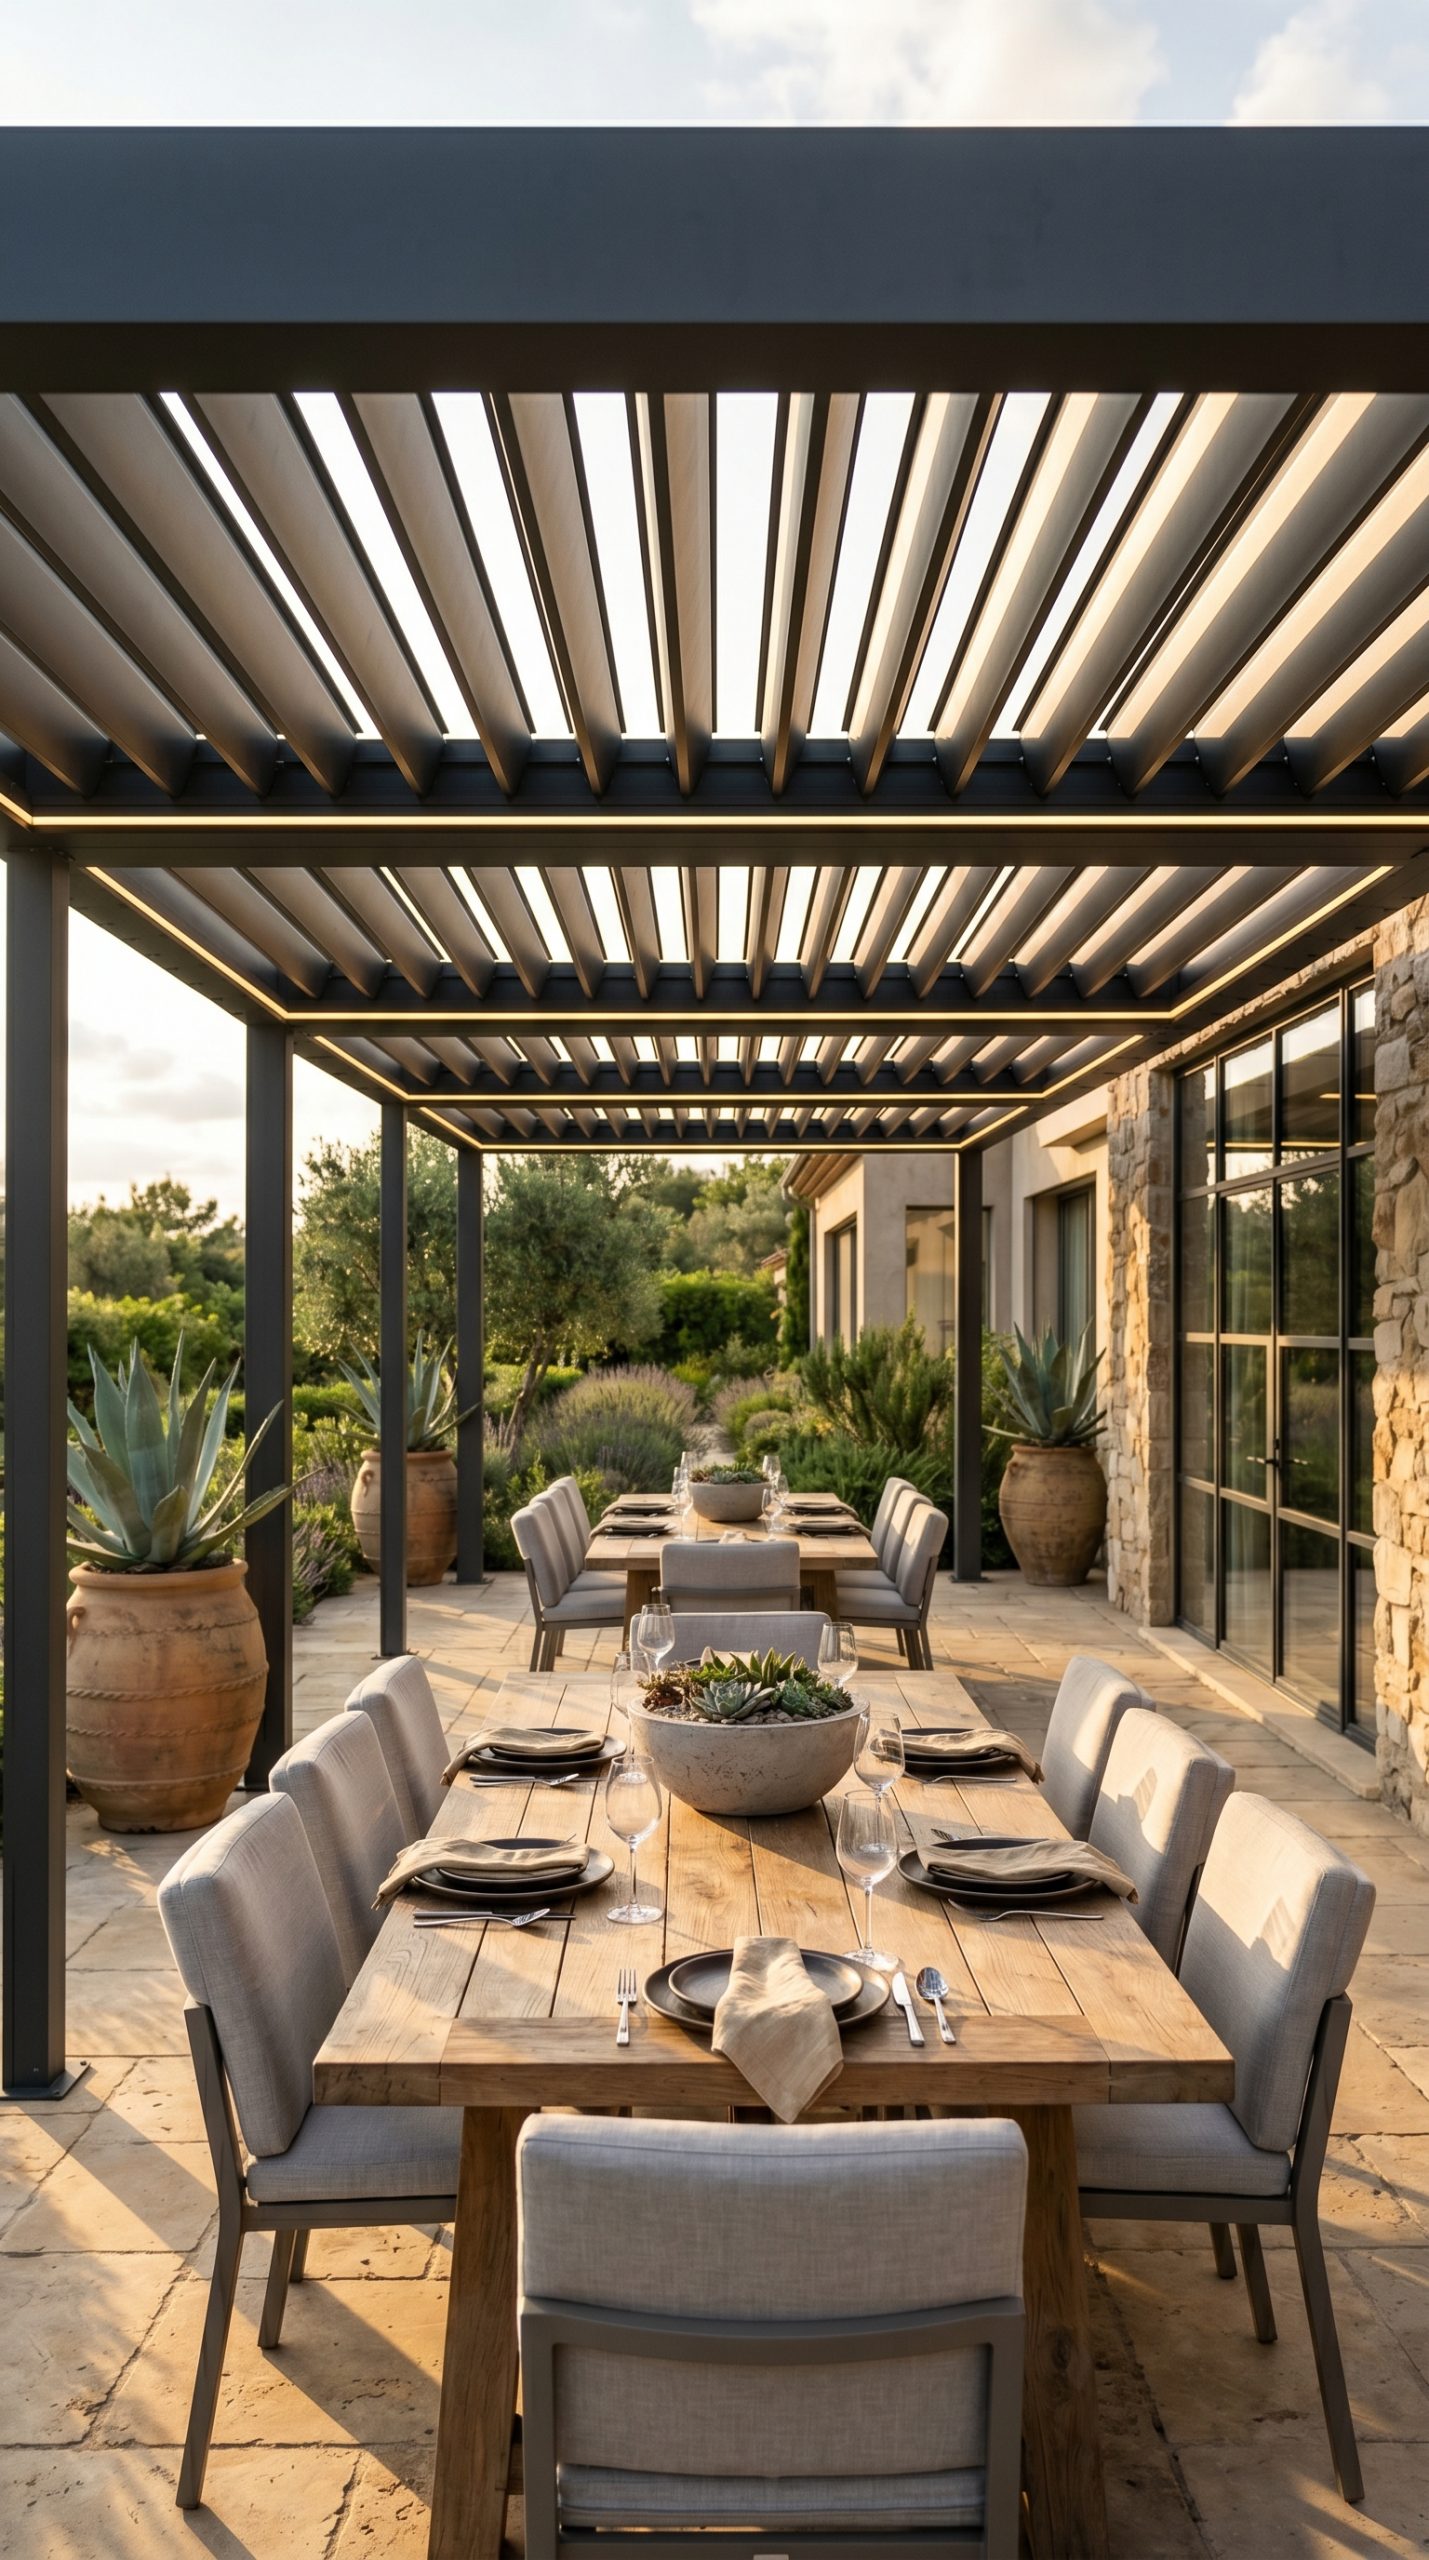
Outdoor dining done right feels like eating at a really good restaurant, except the view is your garden. The foundation is a long, solid dining table in teak, powder-coated aluminum, or brushed concrete. Pair it with chairs that have proper back support and seat cushions thick enough to actually sit on comfortably for more than twenty minutes.
Overhead structure matters a lot here. A pergola with retractable shade cloth or a motorized louvered roof lets you control sun and rain without boxing yourself in. Add a chandelier or a cluster of pendant lights on a dimmer so you can shift the mood from afternoon lunch to late evening dinner easily.
Surround the dining area with large planters filled with something fragrant, rosemary, lavender, or white jasmine work beautifully and add a sensory layer that makes outdoor eating feel special. A low hedge on one or two sides provides just enough enclosure to make the space feel intimate without blocking airflow.
Designer Advice: Lay down a large outdoor rug under the dining set. It pulls the space together visually, defines the zone, and adds softness underfoot that makes bare concrete or wood decking feel much more inviting.
The Fire Pit Lounge
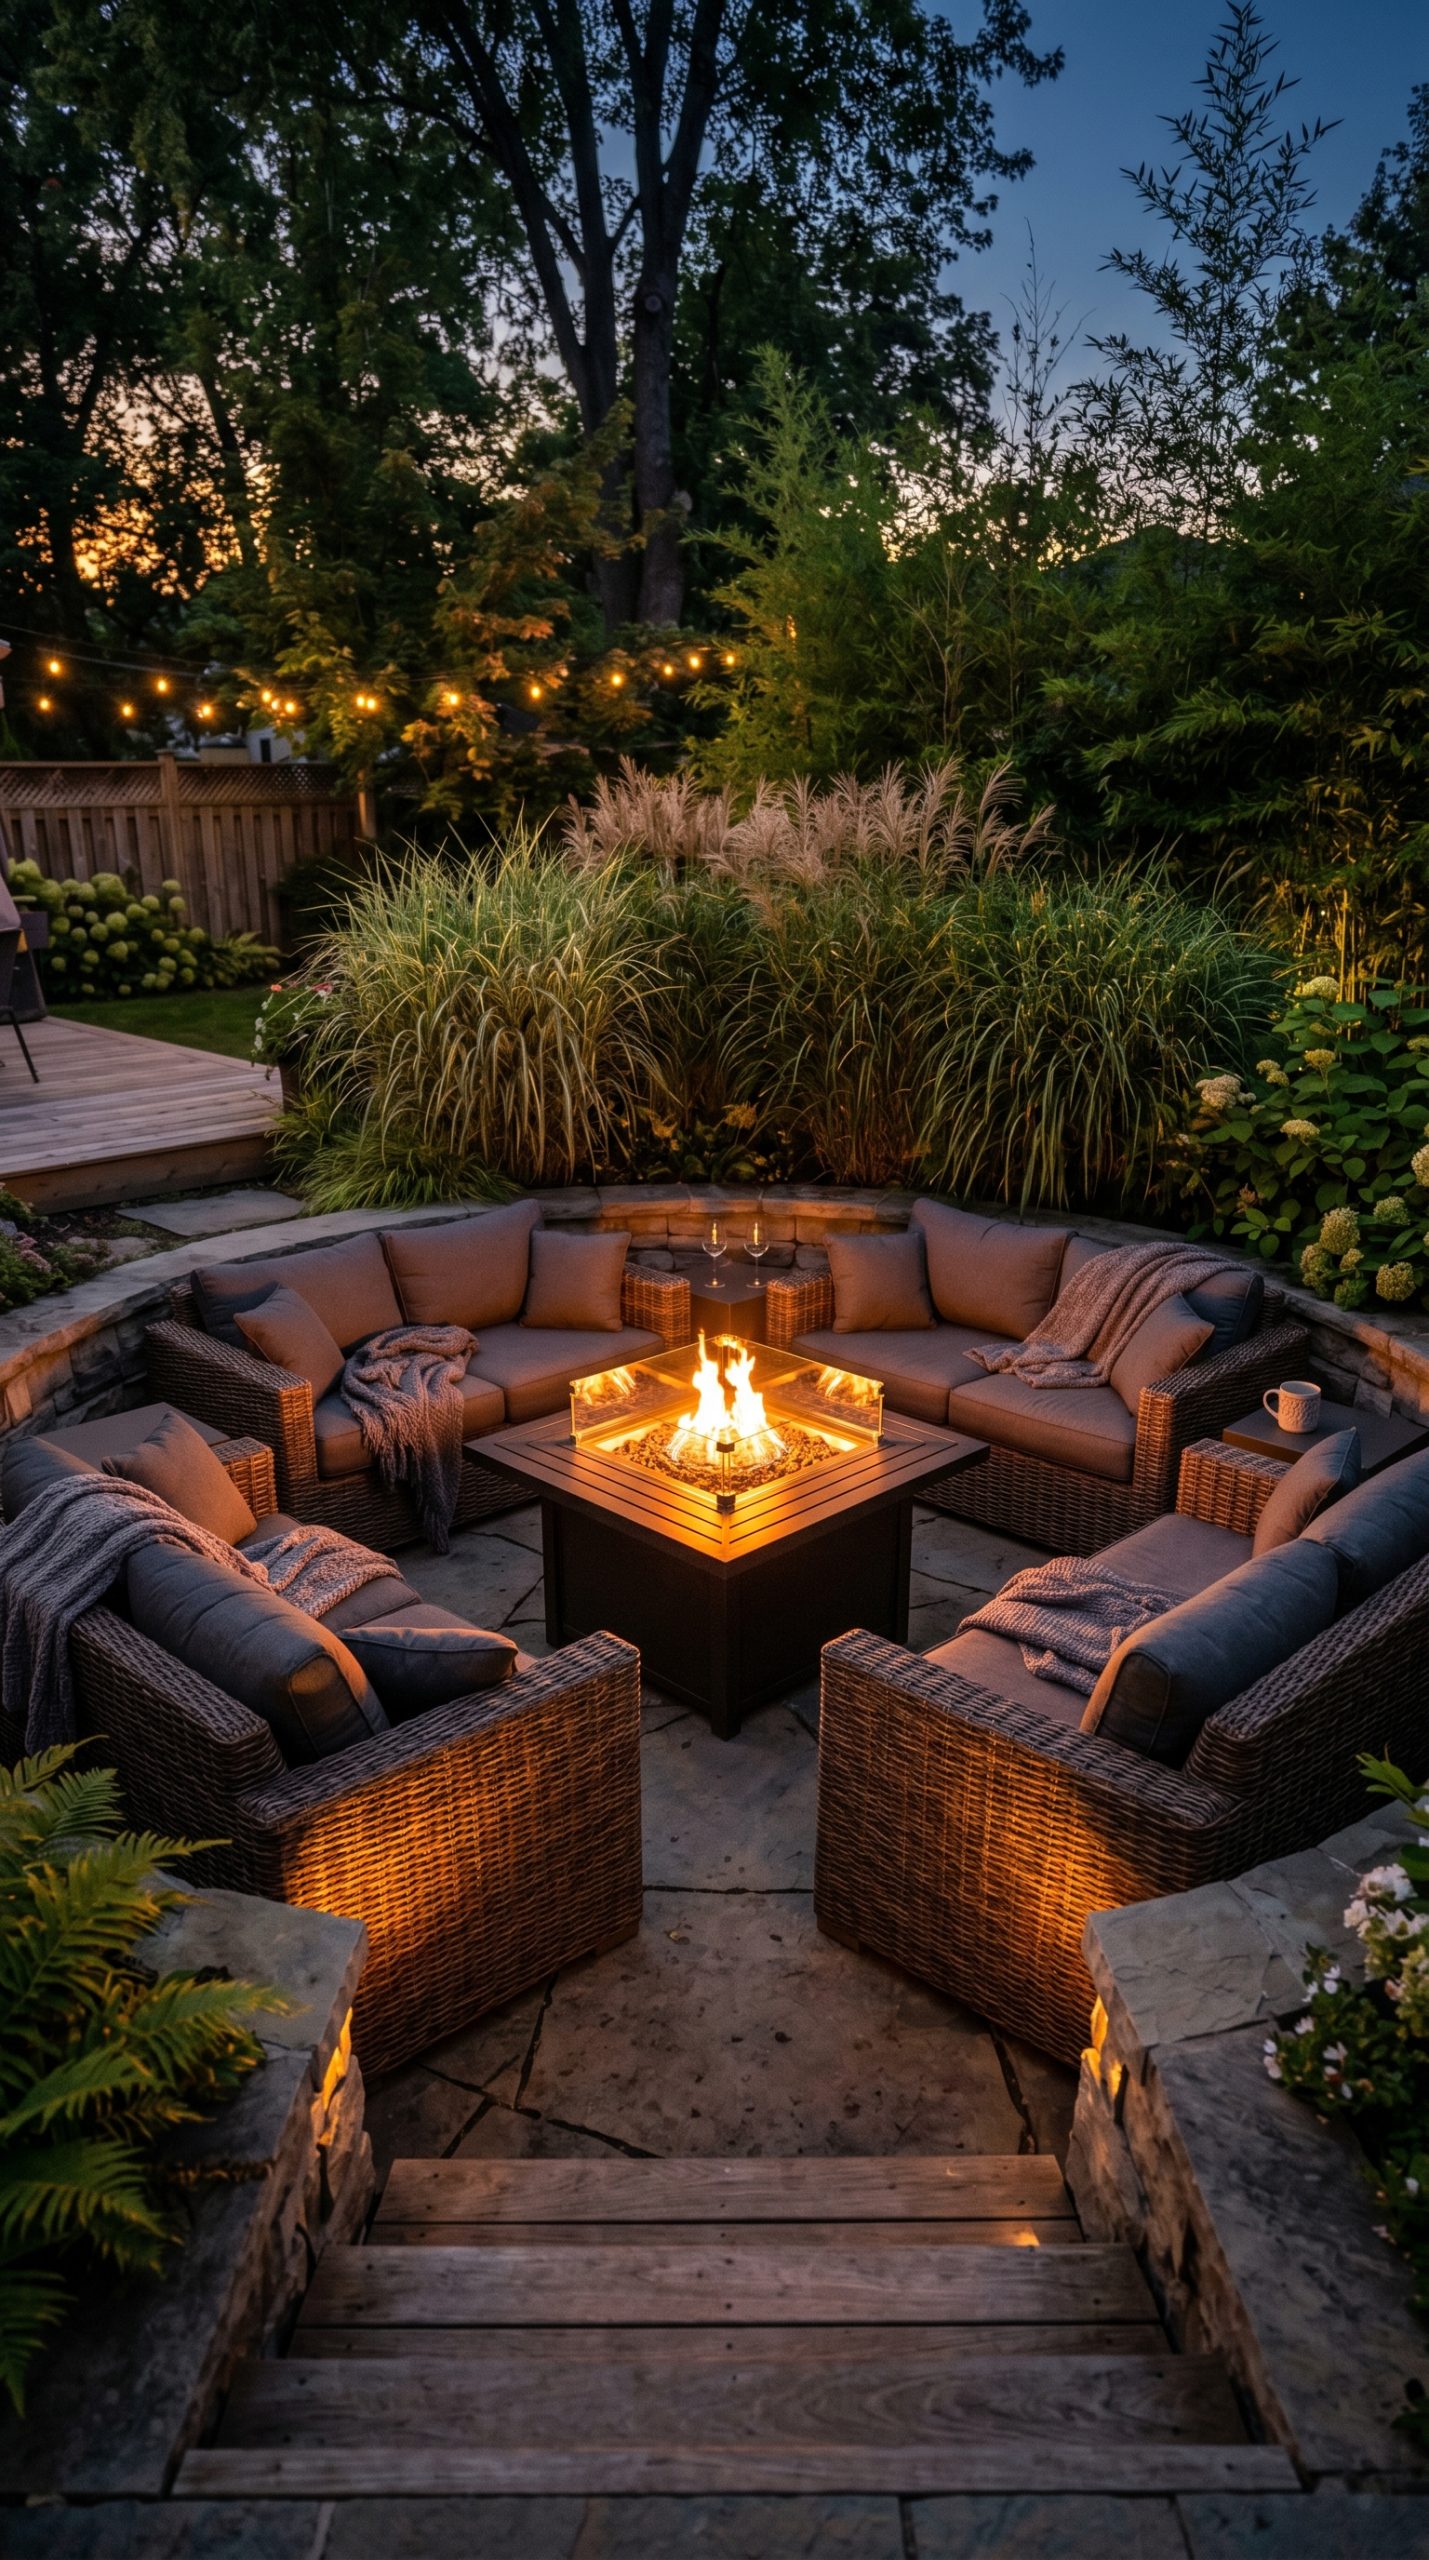
A well-done fire pit area is not just a place to toast marshmallows. It is the spot where people end up sitting the longest, the conversation gets the most interesting, and no one wants to leave. The difference between a fire pit that gets used twice a summer and one that becomes a regular gathering spot comes down almost entirely to the seating setup around it.
Go with a sunken conversation pit if you have the budget and the construction access, or build a raised fire feature with a broad flat ledge that doubles as a perch for drinks and plates. Either way, the seating should form a complete circle or near-circle with no gaps. Deep-seated outdoor sofas and sectionals in all-weather wicker with thick cushions in a warm charcoal, terracotta, or olive fabric make the area feel like an actual room.
A circular or square gas fire table lets you control the flame height and turn it off without mess, which is a practical advantage when you have kids or guests who are not comfortable with wood fire. If you prefer the authentic crackling of real wood, choose a steel or corten steel bowl with a spark screen. Either way, site the fire feature at least 10 feet from any structure and check your local codes.
Designer Advice: Plant tall ornamental grasses or bamboo in raised beds behind the seating to create a natural backdrop. This makes the fire pit feel like a destination rather than a feature sitting in the middle of open lawn.
The Outdoor Movie Theater
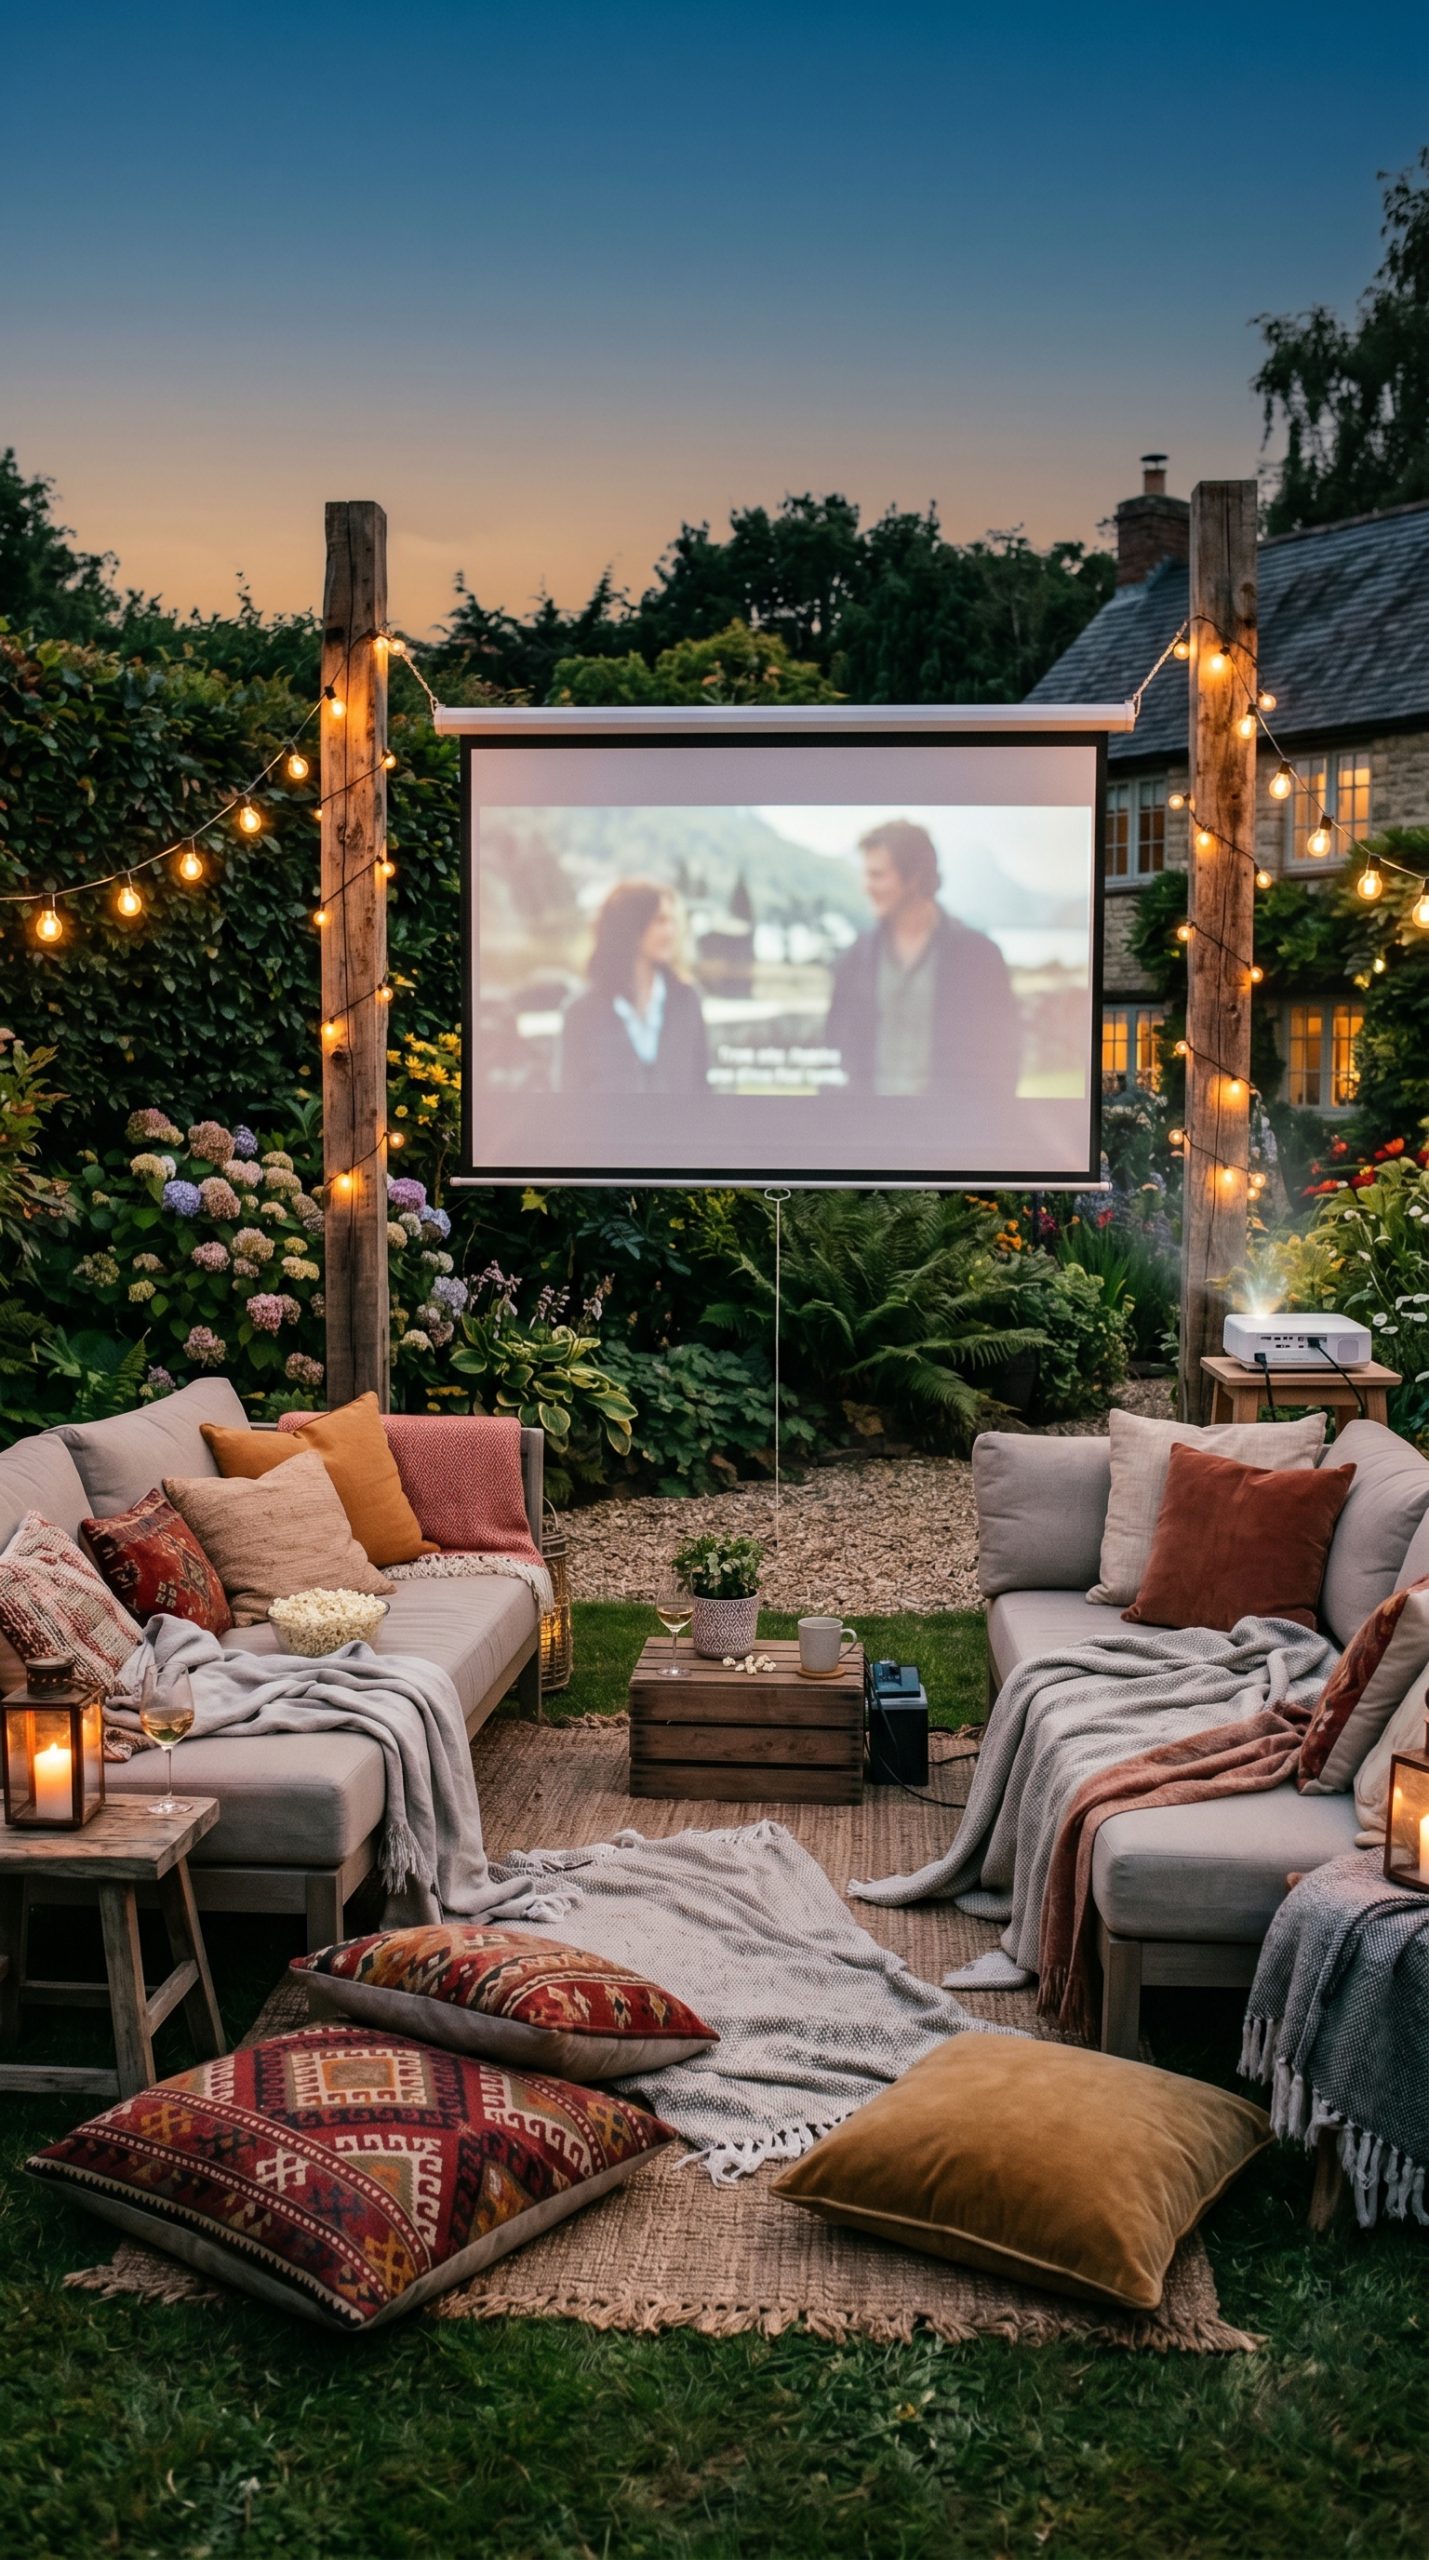
An outdoor cinema setup is genuinely one of the more memorable things you can add to a backyard, and it is more achievable than most people think. You need a projector rated for outdoor use with at least 3000 lumens (4000 or more for areas that are not fully dark), a motorized or pull-down screen mounted between two posts or on a blank exterior wall, and a Bluetooth or wired speaker system that handles the audio properly.
Build a seating area in front of the screen using a mix of options: a couple of outdoor daybeds or deep-seated lounge chairs up close, and large outdoor floor cushions or a picnic-style blanket zone further back for a more casual feel. String lights along the perimeter add ambiance without washing out the screen.
For the surface, a flat section of lawn works well if you have good drainage. A raised deck or patio with the screen positioned at the far end gives the setup a cleaner, more finished look. Keep snacks and drinks at arm’s reach with a rolling bar cart or a built-in side table between the lounge chairs.
Designer Advice: Install the speaker system behind and beside the seating area, not just in front. Even a simple three-point audio setup dramatically improves the movie-watching experience compared to a single front-facing speaker.

The Cocktail Garden
A cocktail garden is a raised bed or bordered section of the yard planted specifically with herbs, fruits, and edible flowers that go straight into drinks. Think mint, thyme, rosemary, lemon verbena, basil, cucumber vines, strawberries, and edible lavender. This kind of garden is both practical and visually beautiful, especially when you pair it with good structure.
Use raised cedar or corten steel planting beds at counter height so they are easy to harvest without bending. Add a small potting bench nearby with hooks for tools, a little sink if plumbing allows, and a shelf for bar equipment. Keep the planting dense enough to look lush, with some trailing plants spilling over the edges for a relaxed, abundant feel.
Illuminate the garden at night with low stake lights along the borders and a warm spotlight or two angled down from above. The contrast of lit foliage against a dark background at night is genuinely beautiful. Choose plants with some texture and variation in leaf shape so the bed looks interesting even when nothing is in bloom.
Designer Advice: Place your cocktail garden immediately adjacent to your outdoor bar area so the harvest-to-glass distance is literally a few steps. This makes it feel like a feature rather than a practical afterthought.
Zone 2: Resort-Style Relaxation
The Infinity-Edge or Lap Pool
If your yard has any elevation change or a meaningful view, an infinity edge pool is worth every dollar of the additional construction cost. The visual effect of water appearing to vanish into the landscape or skyline is genuinely stunning in a way that photographs cannot fully capture. The vanishing edge works by allowing water to spill over one or more sides into a concealed catch basin, which is then pumped back into the pool.
For a more modest lot, a lap pool in a clean rectangular form is the smarter play. A width of seven to eight feet and a length of forty to fifty feet is sufficient for actual lap swimming and still leaves room for a seating ledge at one end. Finish the interior in a dark plaster or pebble surface in charcoal, deep blue, or black for a sophisticated look that photographs dramatically.
Surround the pool with large-format porcelain pavers in a cool grey or warm beige, keeping the coping at the same level as the lawn where possible for a flush, seamless look. Add underwater LED lighting that shifts between warm white and soft blue for evening swimming.
Designer Advice: Position two or three large planters or a low hedge along the sides of the pool rather than cluttering the coping with too many objects. The restraint makes the pool itself the focal point, which is exactly where the attention should go.

The Hot Tub and Spa Grotto
A hot tub elevated to spa status is all about the setting. The tub itself matters less than how it is integrated into the landscape. The most luxurious versions are built-in, flush with a timber or stone deck, surrounded by natural boulder formations, lush plantings, and soft lighting that makes the whole area feel like it was found rather than constructed.
If a built-in spa is outside budget, a premium freestanding hot tub placed on a dedicated platform with a custom surround built from cedar, ipe, or composite decking achieves a similar result. Wrap the structure with tall plantings, bamboo screens, or cedar panels for privacy and enclosure. Add a small wooden bench or outdoor shelf nearby for towels, drinks, and candles.
Lighting around a hot tub should always be warm and low. Recessed deck lights, LED strip lighting under the surround lip, and a couple of low-wattage path lights in the surrounding planting do the job without harsh overhead brightness. A privacy screen overhead made from a louvered pergola or woven shade cloth completes the grotto effect.
Designer Advice: Install a small waterfall or rain curtain feature that flows into the hot tub or alongside it. The sound element transforms the experience from a warm soak into something that genuinely feels like a spa.

The Poolside Cabana
A well-built cabana next to a pool does for outdoor living what a great mudroom does for a house: it makes everything more functional and more comfortable at the same time. The basic version is a shaded structure with a lounge area, a place to hang towels, and a small changing area. The luxury version adds a daybed, a mini fridge, an outdoor fan or misting system, and a half bath.
Build the structure from materials that match your home: a natural timber frame feels warm and organic, while a clean steel and glass structure reads as modern and polished. A thatched or palm roof adds a genuinely resort-like feel that is hard to replicate with any other material. Keep the interior palette light with white, natural linen, and soft sandy tones so it reads as a bright, airy retreat even on overcast days.
Add a ceiling fan or overhead misting nozzles on a smart timer for hot days. A built-in sound system with outdoor-rated speakers mounted in the ceiling of the cabana means music without the visual clutter of freestanding speakers. Hang sheer curtains or woven blinds that can be drawn for afternoon shade or privacy.
Designer Advice: Orient the cabana so the opening faces the pool but is slightly angled away from the direct afternoon sun. This keeps the interior comfortable without requiring a full wall of shade, which would block the view.

The Rain Shower and Garden Bath
An outdoor shower is one of the most underrated backyard additions, and in warmer climates or on properties with a pool, it quickly becomes one of the most used. At the luxury end, an outdoor shower is not just a rinse-off station but an actual rainfall shower experience set within a lush, private garden setting.
Use a large-format rainfall showerhead in brushed nickel or matte black mounted on a solid wall, natural stone boulder, or timber post. Surround the shower area with smooth river stones or large slate tiles underfoot and dense plantings on three sides, large-leaf tropical plants like elephant ear, philodendron, or tree ferns work particularly well for this. The fourth side can be open or screened with a woven privacy panel.
Include both hot and cold water connections if plumbing allows, or at minimum a well-insulated cold-water line. Add a small teak shelf or built-in niche for soap and shampoo, and a nearby hook rack for robes. At night, low ground-level LED lights among the plantings create a dramatic, moody effect.
Designer Advice: Position the outdoor shower on the far side of the pool from the main entertaining area. It creates a natural destination at the end of the property and keeps the wet traffic separate from the dry lounge and dining zones.

The Wellness and Sauna Garden
Backyard wellness spaces have grown well beyond the hot tub in recent years. A dedicated wellness zone can include a barrel sauna, a cold plunge pool, a yoga deck, and a surrounding garden designed for quiet and calm. This kind of space is genuinely transformative if wellness is a real priority in your daily life.
Nordic-style barrel saunas are among the most visually beautiful outdoor structures available, and their round form sits naturally in a garden setting in a way that rectangular buildings rarely do. Choose cedar for the construction since it handles heat and humidity without warping and develops a gorgeous silver-grey patina over time. A wood-fired or electric heater both work well depending on your preference for ritual versus convenience.
Site the sauna near a cold plunge pool or even a simple deep basin or stock tank chilled by a small refrigeration unit for contrast therapy. Surround the whole area with dense, tactile plantings: soft ornamental grasses, ferns, mossy groundcovers, and birch or Japanese maple trees for canopy. Keep pathways natural with gravel or stepping stones rather than formal paving.
Designer Advice: Run a simple outdoor speaker cable to the sauna area so you can play ambient sound from inside. Birds, rain, or a low drone playlist changes the experience completely compared to silence or traffic noise.

Zone 3: Garden and Landscape Drama
The Statement Water Feature
A water feature is one of the few design elements in a backyard that works on multiple senses at once. You see it, you hear it, and on warm days, you feel the subtle drop in temperature it produces in its immediate vicinity. The key to getting it right is scale and placement. Too small in a large yard, and the feature disappears. Too ornate in a minimal garden, and it looks out of place.
For a modern, minimal aesthetic, a sleek rill (a narrow channel of moving water) running along the edge of a terrace or through a planted bed is deeply satisfying and surprisingly affordable to build. A large stone bowl fountain works beautifully in a garden with more traditional or organic planting. A wall-mounted cascade in corten steel, natural stone, or raw concrete reads as architectural and works well against a garden wall or fence panel.
Use aquatic plants like water lilies, papyrus, or horsetail in any feature large enough to accommodate them. They add a living quality to what would otherwise be a purely structural element. LED underwater lighting in warm amber or cool white makes the feature glow at night without looking garish.
Designer Advice: Always use a recirculating pump with a reservoir so the feature runs quietly and efficiently without constant topping up. A timer or smart switch that runs the feature during your usual outdoor hours and turns off overnight keeps energy use sensible.

The Elevated Garden Terrace
A tiered or terraced backyard has a grandeur that a flat yard simply cannot replicate. Even a modest elevation change of two or three feet, handled with well-built retaining walls and thoughtful planting, creates a sense of layered depth that makes the space feel much larger and more deliberate than it really is.
Use natural stone, brick, or board-formed concrete for retaining walls depending on the architectural style of your home. Cap the walls with a wide, flat ledge that doubles as informal seating or a place to rest pots and lanterns. Wide stone steps connecting the levels should be deep enough to step down comfortably and wide enough to feel generous rather than cramped. A step depth of about 14 to 16 inches feels luxurious compared to the standard indoor stair.
Plant the terraces with bold, architectural plants on the upper levels and softer, more flowing planting on the lower. Ornamental grasses, lavender, rosemary, and salvias are reliable choices that look good through most seasons and handle the dry conditions that often come with raised, well-drained beds.
Designer Advice: Install LED step lights on the risers of each stair level. They add a safety element but the primary effect is purely aesthetic, particularly at dusk when the warm glow along the steps looks genuinely beautiful.

The Night Garden with Landscape Lighting
Most people think about how their backyard looks during the day and treat nighttime lighting as an afterthought. Designing specifically for evening use changes everything. A well-lit garden at night can be more beautiful than the same garden in daylight because you control exactly what gets highlighted and what recedes into shadow.
The layered approach works best. Start with path lighting along walkways and steps using low fixtures in bronze, black, or brushed nickel at ground level. Add up-lighting on specimen trees and large shrubs using LED spotlights buried in the planting beds and angled upward. Include wall-washing on boundary walls or fences to create a soft glow that makes the garden feel enclosed and intimate.
Use warm white LEDs (around 2700 to 3000 Kelvin) throughout. Cool white lighting in a garden looks clinical and drains the warmth from the space. Zoning the lighting on separate circuits or using a smart system lets you run just the path lights when you want a gentle glow, or the full scheme when entertaining.
Designer Advice: Avoid overhead flood lights pointing directly down over the seating or dining areas. They flatten the space and create unflattering light for both people and plants. Indirect and directional lighting always looks more expensive than it is.

The Sculpted Hedgerow and Green Architecture
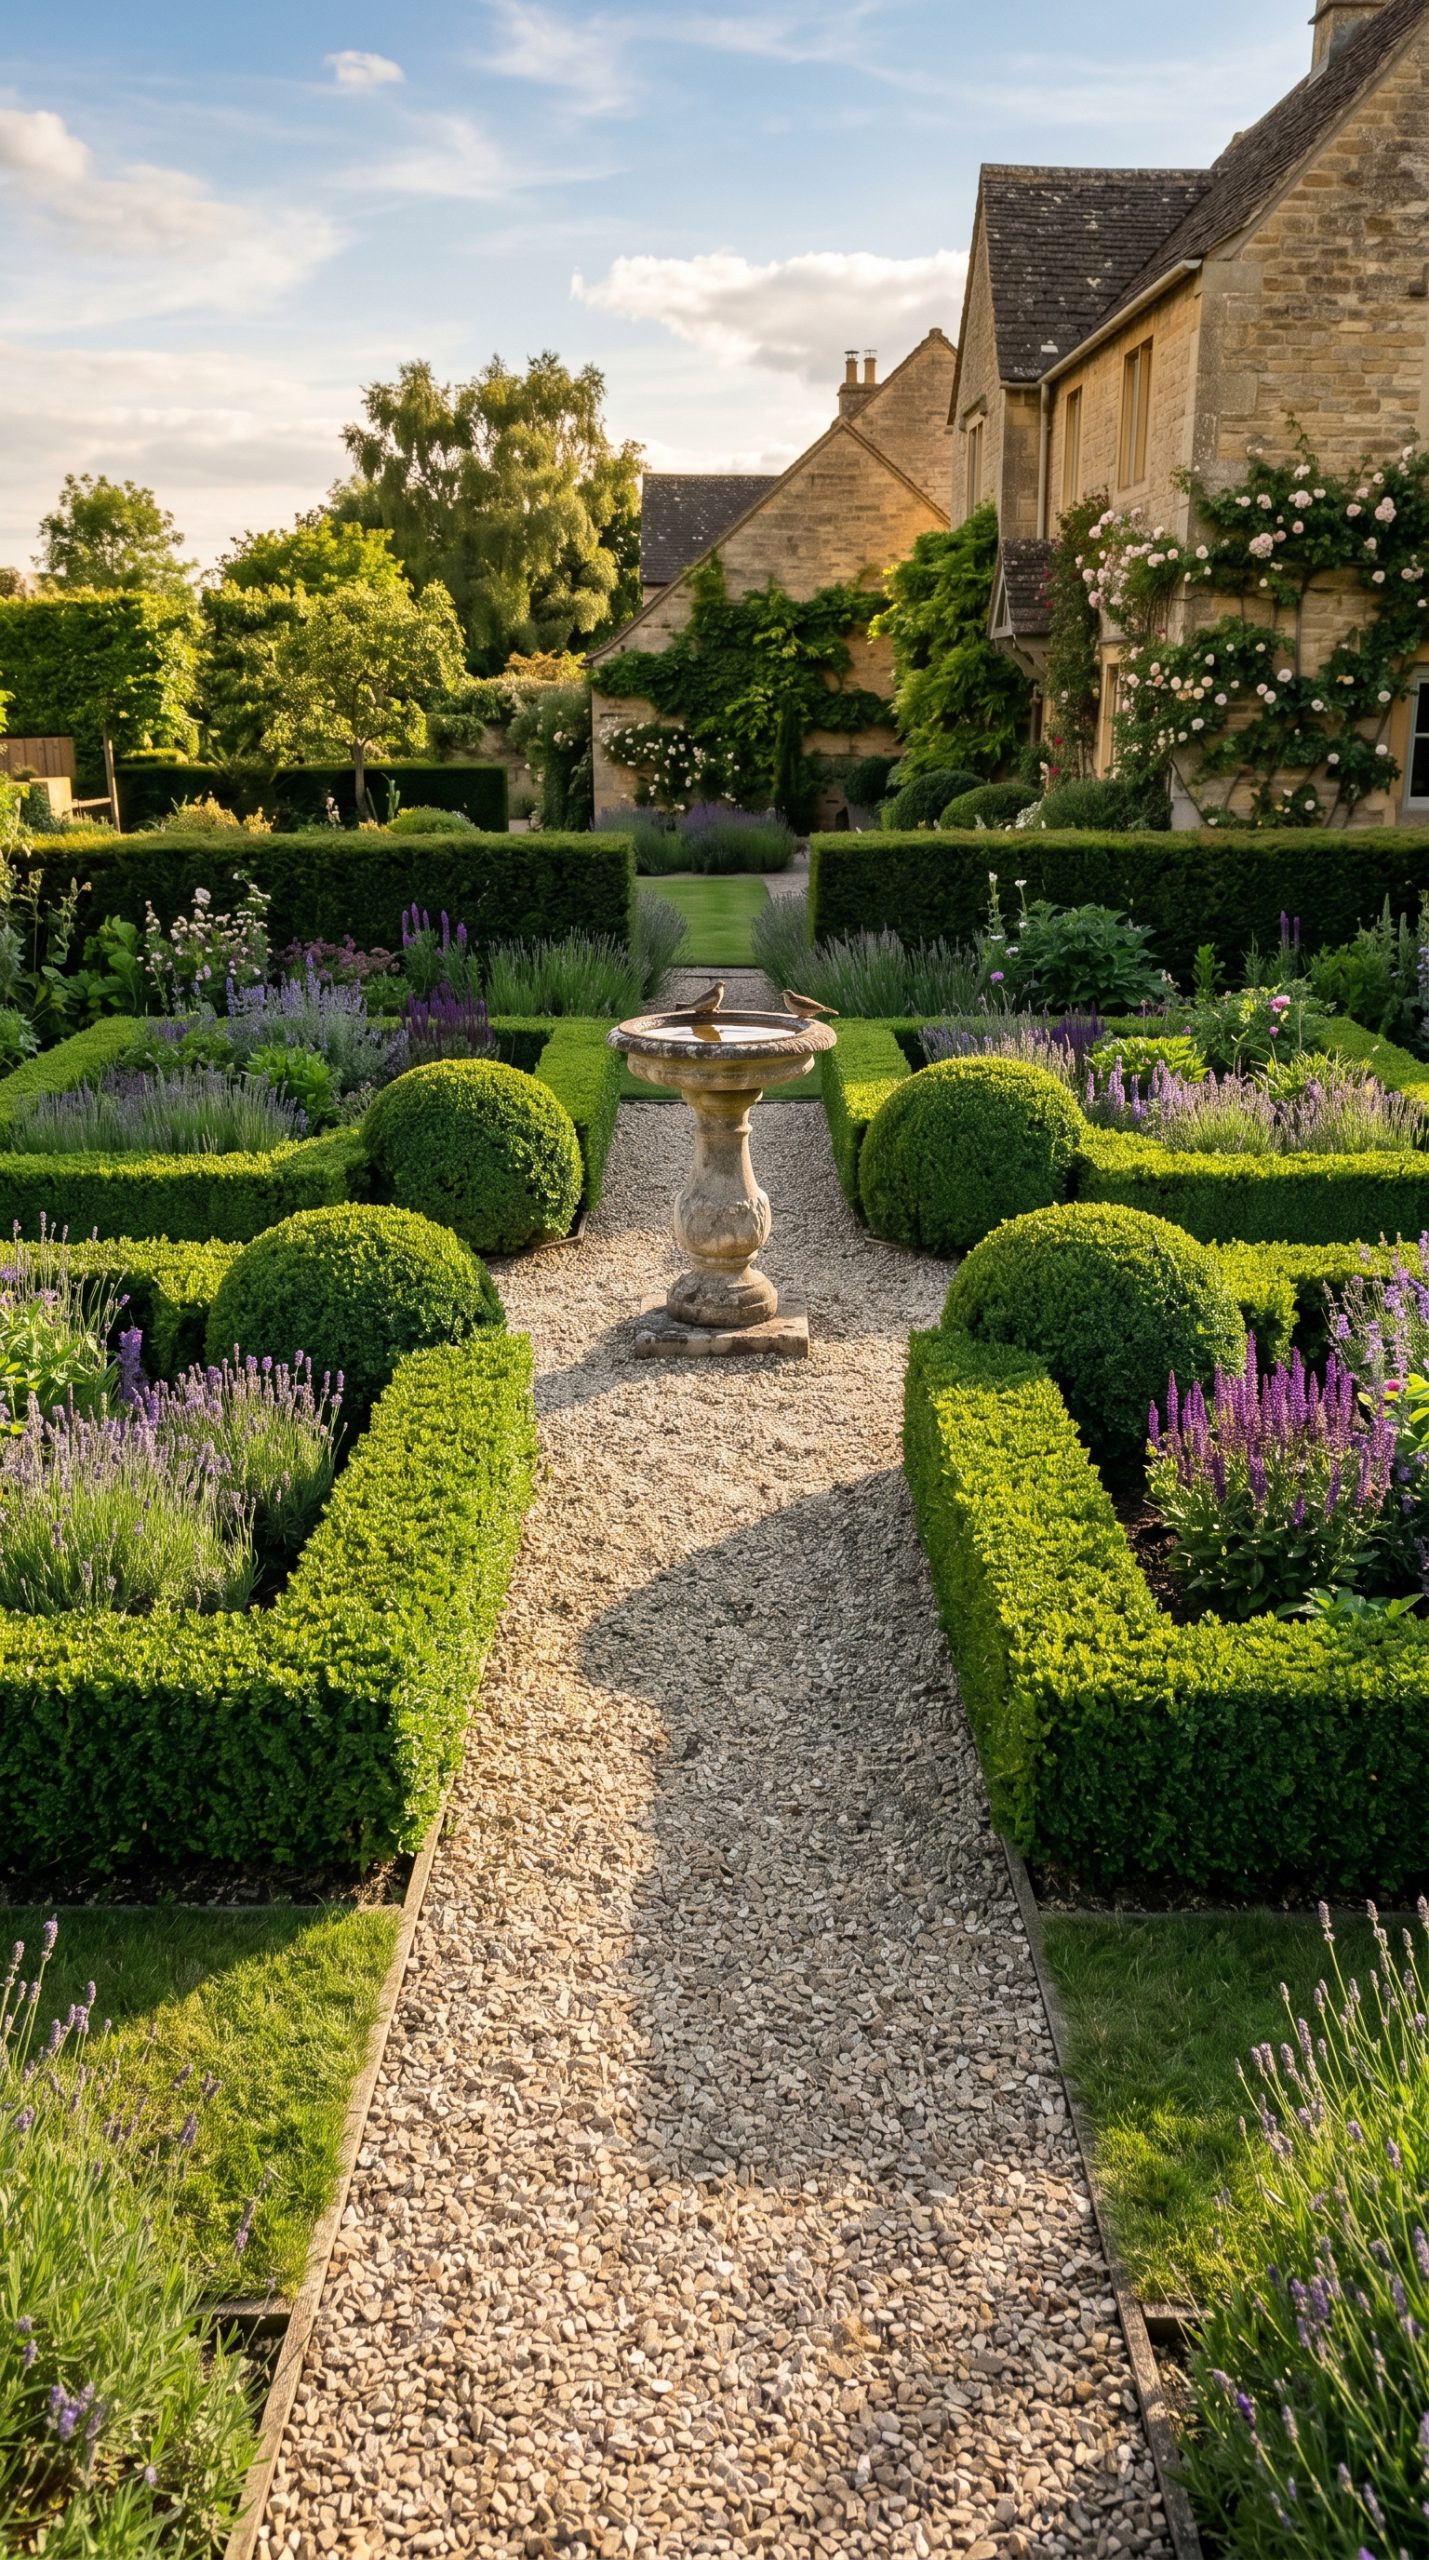
Clipped hedges, trained topiaries, and formal green architecture give a backyard the kind of structure that feels permanent and considered. This is the difference between a garden that looks finished and one that always feels slightly in progress regardless of how much money was spent on plants.
Box (Buxus), hornbeam, yew, and Thuja are classic hedging plants for formal clipping. In warmer climates, Podocarpus, Pittosporum, and Ficus nitida offer the same clean, dense effect. Plant hedges in a straight or gently curved line and commit to twice-yearly clipping to maintain the crisp edge that makes them look good rather than neglected.
Beyond hedges, consider using green architecture as a screen: a pleached lime or hornbeam on stilts creates a floating green panel effect that is genuinely striking. A clipped ball or cone at the corner of a path or at the entrance to a garden zone acts as a natural focal point without requiring a sculpture budget.
Designer Advice: Use hedging to define zones within your backyard rather than just at the perimeter. A knee-height hedge separating the dining area from the lawn, or a taller screen between the pool and the garden, creates structure without walling everything off.
The Cutting Flower Garden
A cutting garden is exactly what the name suggests: a section of the backyard planted specifically to produce flowers you can cut and bring inside. It is a different kind of luxury from most backyard features because the reward is ongoing and renewable. Every week through the growing season there is something new to harvest.
Design the cutting garden in long, straight rows for easy access and maximum planting density. Raised beds work particularly well since they improve drainage and make maintenance simpler. Choose a rotation of annuals and perennials that gives you something blooming in every month of the growing season. Zinnias, cosmos, dahlias, lisianthus, sweet peas, ranunculus, and peonies are all reliable cut flower producers with excellent vase life.
Keep the palette focused to two or three color families so the arrangements you bring inside are cohesive rather than chaotic. A palette of peachy corals, warm whites, and soft burgundies, for example, works across multiple flower types and looks intentional rather than random. Add a simple potting bench at the edge of the cutting garden with room for buckets, snips, and a small collection of vases.
Designer Advice: Plant your cutting garden where it gets at least six to eight hours of direct sun. Most cutting flowers are sun-hungry, and a shady cutting garden is a frustrating investment that will never perform as expected regardless of soil quality or watering.

Zone 4: Shade, Structure, and Shelter
The Louvered Pergola
A louvered pergola is the most practical outdoor structure you can build if you want a space that is genuinely usable year-round rather than just on perfect weather days. The adjustable roof slats allow you to go from fully open to fully closed in about thirty seconds, blocking rain when needed and opening back up for airflow and sun when the weather allows.
Premium louvered pergola systems come in powder-coated aluminum in a range of colours from anthracite grey to warm white, and they can be specified with integrated LED lighting, heating elements, retractable screens, and even built-in gutters that drain rainwater away cleanly. These features make the pergola feel genuinely like an outdoor room rather than a temporary weather shelter.
Choose a size that is generous enough to accommodate your dining or lounge setup with some circulation space around the furniture. A 14×20 foot structure comfortably houses a ten-seat dining table or a large sofa grouping. Mount the pergola to a concrete slab or existing terrace for the cleanest finish.
Designer Advice: If budget allows, install the louvered pergola with integrated side screens on at least two sides. Being able to close the sides in cooler or windier conditions dramatically extends the seasonal use of the space compared to an open-sided structure.

The Glass Box Garden Room
A full garden room with glass walls and a glass or polycarbonate roof blurs the line between indoor and outdoor living in a way no other structure can. It functions as a sun room, a dining space, a winter garden, or a greenhouse depending on how you furnish and plant it. In climates with significant rainfall or cold winters, it is a genuine game-changer for how much time you actually spend in your backyard.
The structure itself should be built from aluminum framing in a slim-profile modern style rather than the heavy Victorian greenhouse aesthetic. Keep the framing as minimal as possible so the glass panels feel expansive. Polished concrete or large porcelain tile flooring with underfloor heating makes the space comfortable year-round. Add opening panels or full bifold doors on one or two sides for cross-ventilation in summer.
Plant the interior with large tropical specimens: fiddle leaf figs, palms, Monstera deliciosa, or bird of paradise. These plants respond well to the bright, sheltered conditions of a glass room and create the indoor-jungle effect that makes the space feel both lush and designed.
Designer Advice: Specify UV-filtering glass or film on the roof panels. Without it, the interior of a glass garden room becomes unbearably hot in summer even with ventilation. UV film also protects plants and furniture from bleaching over time.
The Shade Sail and Canvas Canopy
Shade sails are a lower-cost alternative to pergolas that, when done well, can look just as intentional and considered. The key is in the geometry. A single shade sail strung between two posts looks like an afterthought. Three overlapping sails at different heights, pulled taut at different angles, create something genuinely architectural and interesting.
Choose high-density polyethylene fabric in a tight weave for maximum UV protection and durability. Colours in charcoal, warm sand, or deep terracotta hold up better aesthetically than white or light grey, which tend to look dingy quickly. Stainless steel tension hardware gives the installation a clean, finished look at the connection points.
Pair shade sails with planting that fills in the space around and beneath them: tall grasses, climbing plants on steel cables or timber frames, and dense ground-level planting that makes the shaded zone feel lush rather than bare. The contrast between the geometric sail above and the organic planting below is what makes this approach look like a design decision rather than a practical hack.
Designer Advice: Install your shade sail posts in concrete footings at least 24 inches deep and specify tension fittings with turnbuckles so you can re-tighten the sail seasonally. A loose, sagging shade sail looks terrible and is the most common reason the installation disappoints.
The Wisteria or Climbing Plant Arch
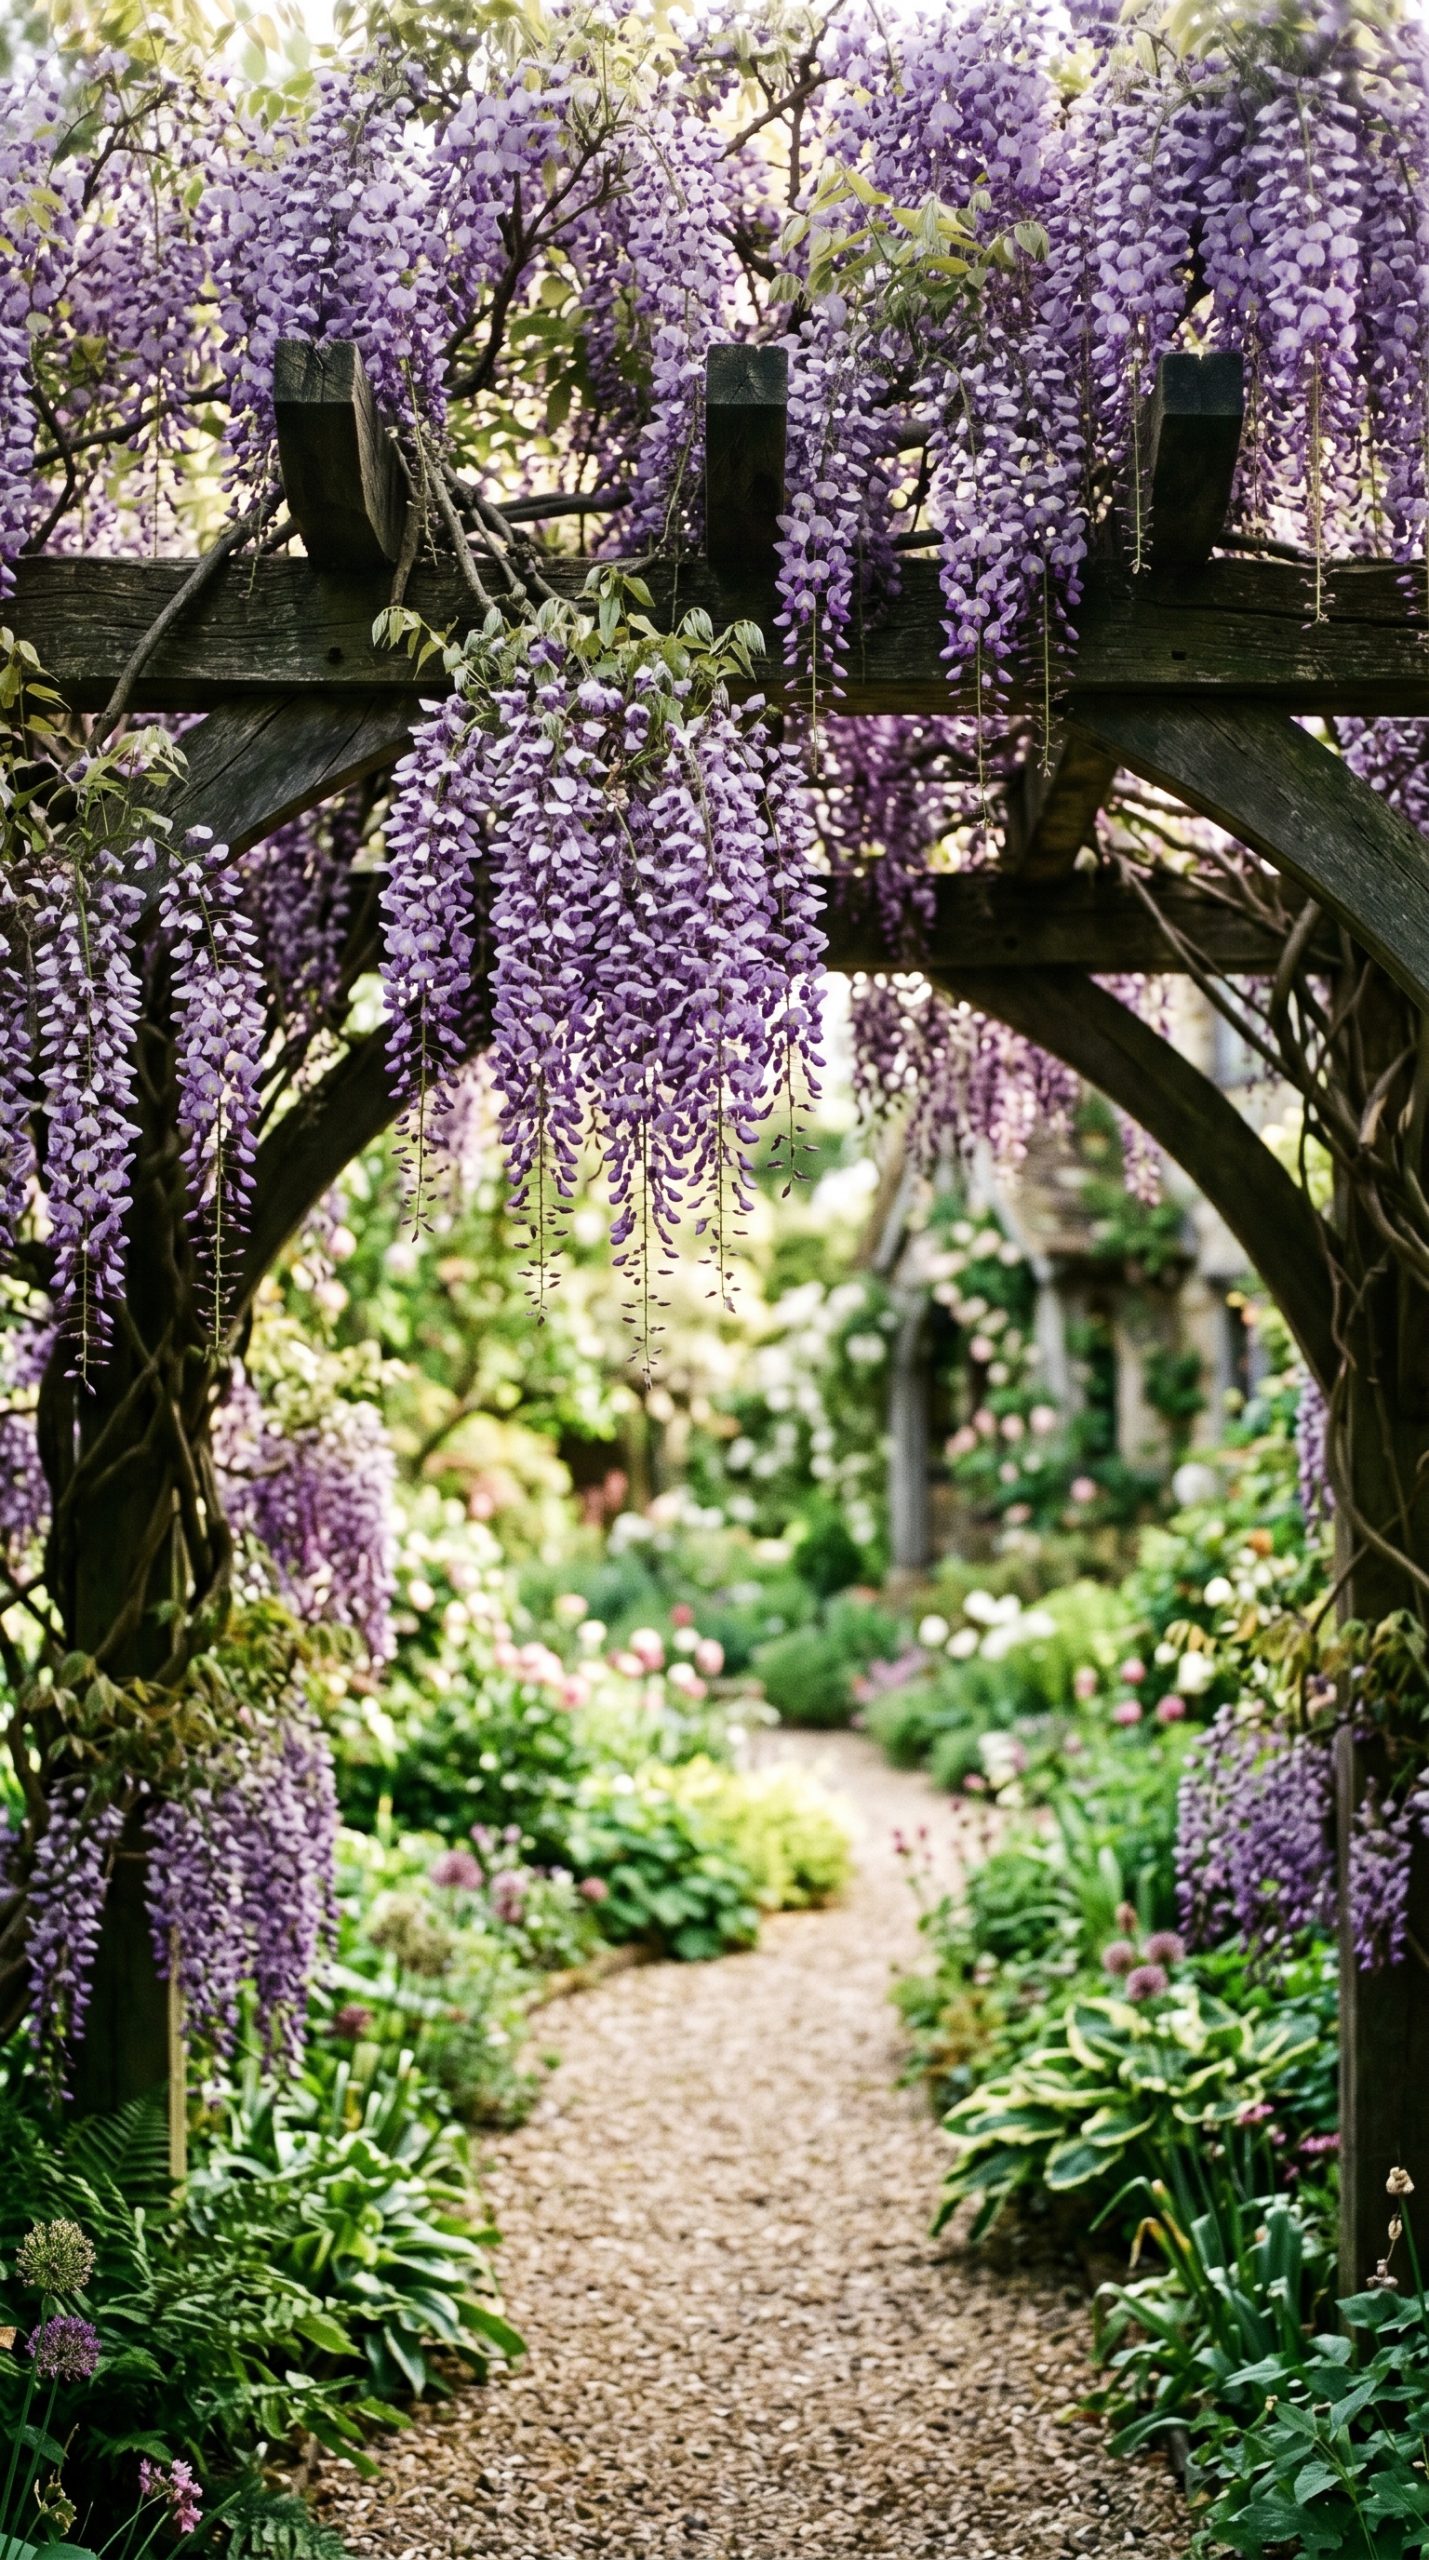
Few things in a garden are as genuinely spectacular as a mature wisteria in full bloom, and building a structure specifically to support one is a long-term investment that pays off magnificently. A sturdy steel or timber archway or pergola walk draped with wisteria sinensis or floribunda in late spring creates a visual statement that is almost impossible to replicate with any other plant.
Plant the wisteria in a sunny position with well-drained soil and be patient. It takes several years to establish, but once it does, a wisteria is essentially indestructible and requires only an annual prune in late summer and again in winter to keep it flowering well and in shape. Feed it with a low-nitrogen fertilizer to encourage blooms rather than leaf growth.
If wisteria feels like too long a wait, climbing roses, jasmine, or star jasmine (Trachelospermum jasminoides) are faster to establish and equally fragrant. A scented climbing plant trained over an arch at the entrance to a garden zone creates a sensory threshold that makes passing through feel deliberate and a little magical.
Designer Advice: Build the structure before you plant. A wisteria or mature climbing rose is essentially impossible to move once established, and retrofitting a structure around a mature plant invariably involves cutting, damaging, or constraining the plant you have worked years to grow.

The Trellis Privacy Wall
A well-built trellis wall covered in climbing plants does several things at once: it creates privacy, adds a living green backdrop to the yard, softens boundary fencing, and provides habitat for birds and insects. The combination of those benefits in a single structure is hard to beat from both a practical and aesthetic standpoint.
Construct the trellis from powder-coated steel panels for longevity and a modern look, or from cedar or hardwood timber for a warmer, more natural feel. Mount it on solid posts set into concrete and install it at the height needed for your specific privacy situation, typically between 6 and 8 feet for most residential yards. Space the trellis 4 to 6 inches away from any boundary fence to allow air circulation and prevent moisture buildup behind the panels.
Plant with a mix of evergreen and flowering climbers for year-round interest. Evergreen choices like Trachelospermum, Ficus pumila, or Virginia creeper provide the solid green coverage. Layer in flowering climbers like clematis, climbing roses, or passionflower for seasonal colour and fragrance.
Designer Advice: Install simple wire eyes and horizontal galvanized wires along the trellis rather than just relying on the trellis panels for support. Wires allow you to train individual plant stems more precisely and create a more even, dense coverage over time.

Zone 5: The Quiet Retreat
The Secret Reading Nook
Every great backyard should have at least one spot that is just for one person. A reading nook built into a garden corner, tucked behind a hedge, or nestled between two large shrubs is one of the simplest luxuries you can add and one of the most consistently used. People who have one rarely go back to not having one.
The structure can be as simple as a curved bench built into a retaining wall with a canopy of climbing plants overhead, or as deliberate as a small open-sided timber shelter with a built-in bench and cushion. Choose weather-resistant outdoor cushion foam rated at least 4 inches thick and covered in a fade-resistant fabric in a colour that complements the surrounding planting.
Place the nook facing a view that is worth looking at, whether that is a water feature, a planted border, or simply a garden bed you have put real effort into. Good natural light for reading is important, so avoid positioning it in full shade, but a dappled spot under a deciduous tree is perfect. A small side table or wide armrest for a cup of tea completes the picture.
Designer Advice: Add a small weatherproof box under the bench for storing a few blankets. This simple addition means the reading nook gets used in the morning when temperatures are still cool and in the evening when the sun drops, rather than just in the warmth of the midday.

The Meditation and Mindfulness Corner
A backyard meditation space is less about any specific furniture or plant and more about the qualities of the spot you choose. It needs to be quiet, reasonably sheltered from wind, and visually settled, meaning no visual clutter, no rubbish bins, no HVAC units. These baseline conditions are more important than any decorative element you could add.
A simple timber deck platform raised just a few inches off the ground gives a defined surface for practice without the formality of a patio. Keep the decking natural in colour, teak, ipe, or bamboo composite all work well. Surround it with soft plantings that move gently in the wind, ornamental grasses, bamboo, or silver-leaved plants like Stachys or Artemisia that respond visually to even a light breeze.
Add a simple water element nearby since moving water has a demonstrated effect on reducing perceived stress and background noise. A small recirculating stone fountain or a simple ceramic bowl with a submersible pump and a few river stones is enough to create the acoustic effect. A single piece of garden sculpture or a smooth river stone as a focal point gives the eye somewhere to rest.
Designer Advice: Plant the perimeter of the meditation space with something fragrant at nose level. Lavender, rosemary, or a low-growing sweet thyme releases scent when brushed and creates a subtle olfactory cue that the body quickly learns to associate with relaxation.

The Kitchen Garden and Raised Bed Potager
A well-designed potager kitchen garden is one of the most beautiful and rewarding things you can add to a backyard. A potager is a French-style kitchen garden that treats vegetables, herbs, and edible flowers as ornamental plants rather than purely functional ones. Rows and beds are arranged in geometric patterns, plants are chosen for their visual as well as culinary qualities, and the overall effect is a garden that is productive and genuinely beautiful to look at.
Build the beds from a durable material that ages well: cedar or redwood timber, natural brick, or corten steel all have strong aesthetic arguments. Keep bed widths at around 3 to 4 feet so you can reach the center from either side without stepping on the soil. Paths between beds should be wide enough to maneuver with a wheelbarrow, around 2 feet minimum.
Plant with a mix of leaf shapes and heights for visual interest: tall staked tomatoes and climbing beans at the back, mid-height peppers and eggplants in the middle, and low-growing herbs and edible flowers like nasturtiums and calendula at the front. The layering creates a lush, full effect even when individual beds are between harvests.
Designer Advice: Install a simple drip irrigation system from the start rather than hand-watering. It takes about a morning to set up, dramatically reduces water use, and means the garden survives a holiday or a busy week without becoming stressed or going to seed.

The Sculpture and Art Garden
Outdoor sculpture and art can make a backyard feel genuinely personal in a way that plants and furniture rarely do. A well-chosen piece in the right position catches you by surprise as you move through the garden, creates a focal point that anchors a planting bed, or marks a threshold between garden zones with something more interesting than a gate or a hedge.
You do not need an art budget to achieve this effect. A single large ceramic vessel, a piece of driftwood, a smooth river boulder, or a commissioned piece from a local ceramicist or metalworker can serve the same function as an expensive gallery sculpture. What matters is scale relative to the surrounding space and the quality of placement.
Position sculpture where it will be seen from a key viewpoint, typically from the main outdoor seating area or from a window inside the house. Leave space around the piece rather than crowding it with plants. A circle of low gravel or a flat stone plinth beneath it frames the work and signals to the eye that it is intentional.
Designer Advice: Choose materials rated for permanent outdoor exposure in your climate. Bronze, corten steel, concrete, and fired ceramics all age well outdoors. Painted surfaces, galvanized metals, and certain woods require maintenance and may disappoint over time if you are not prepared for the upkeep.

The Wildflower Meadow Patch
A wildflower meadow section, even a small one, introduces a kind of biodiversity and natural energy into a backyard that highly managed garden styles simply cannot produce. The movement of long grasses in wind, the bees and butterflies that arrive within weeks of establishment, and the seasonal shift from tight seedheads in spring to full bloom in summer and then to textured seed heads in autumn give the meadow area a living quality that feels genuinely different from any other garden feature.
Prepare the ground by removing existing turf and either raking in a purpose-mixed wildflower seed blend or laying pre-grown wildflower turf for faster establishment. Choose a seed mix appropriate for your region and soil type, a chalk soil mix will include different species from a clay or acidic soil mix. Native species establish most reliably and provide the best ecological benefit.
Keep the meadow area visually clean at the edges with a mown path through or around it. This single detail signals to neighbours and visitors that the area is intentional rather than neglected. A simple mown border distinguishes a designed meadow from an untended patch and is the difference between an asset and a liability.
Designer Advice: Cut the meadow down to about 3 to 4 inches once a year in late autumn after the seed heads have dispersed and remove the cuttings. This single annual maintenance task is all the meadow needs, making it one of the lowest-effort garden features you can create once it is established.

The Hammock Grove
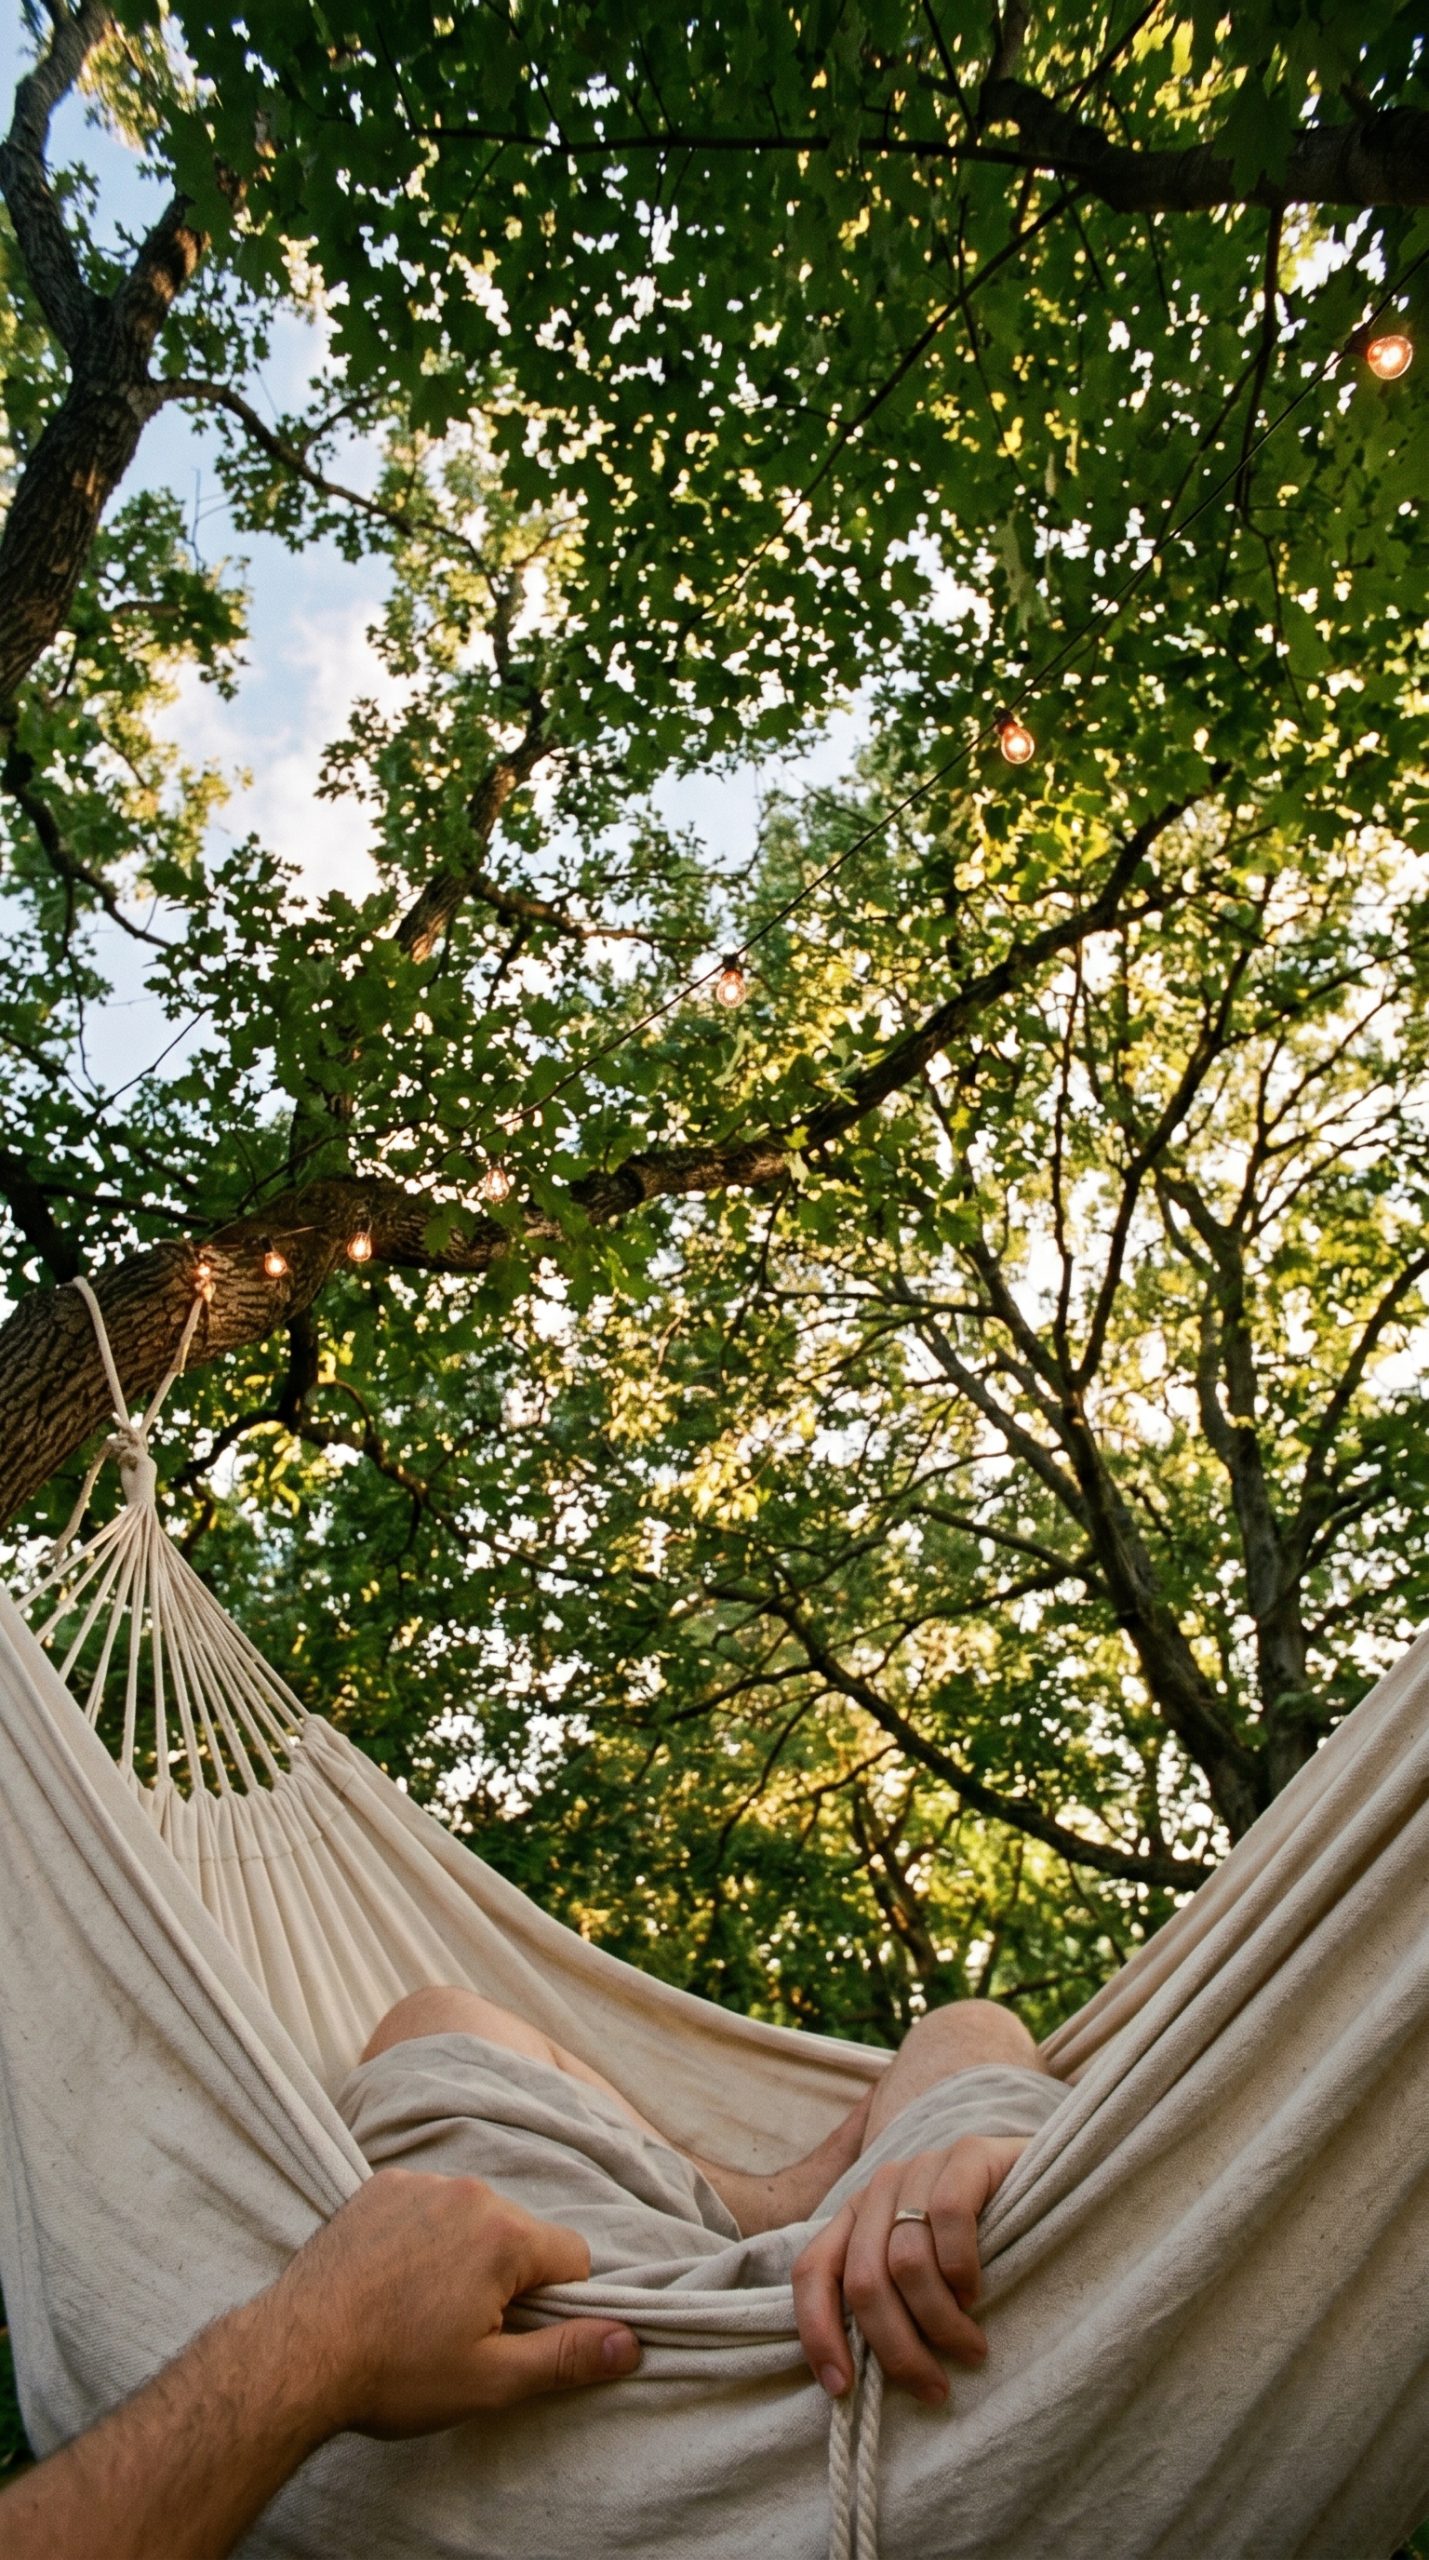
Two or three mature trees in the right positions are all you need to create a hammock grove, and if your trees are already there, this is one of the cheapest luxury upgrades you can make to a backyard. The experience of lying in a quality hammock in a shaded garden on a quiet afternoon is one that most adults rarely give themselves permission to have, and having the setup in place is half the battle.
Choose Brazilian-style fabric hammocks for a colorful, casual feel or muted canvas and rope hammocks in natural white, ecru, or charcoal for a more refined look. A camping-style hammock in ripstop nylon disappears between trees when not in use, which is an advantage in a smaller yard. Install heavy-duty stainless steel eye bolts with a load rating well above what you need, and use hammock straps rather than rope directly on tree bark.
Surround the grove with low groundcover planting that tolerates shade: sweet woodruff, ajuga, native violets, or shade-tolerant ferns all work well. Add a small low table or a flat stone nearby for a glass of water or a book, and string a few simple lights in the tree canopy above for evening use.
Designer Advice: If you do not have trees in the right positions, two solid timber posts set in concrete at 15 to 17 feet apart create a permanent hammock post setup that can be designed to look intentional and architectural rather than makeshift. Cedar or hardwood posts finished with a clear oil look beautiful.
The Lantern and Candlelight Garden
Not every outdoor space needs a sophisticated electrical lighting system. There is something about lanterns, candles, and flame-lit outdoor spaces that no LED approximates, and designing a section of the backyard specifically around soft, warm, moveable light is a simple and genuinely romantic thing to do. This works particularly well for a dining terrace, a reading corner, or a garden path.
Collect a mix of lantern styles in coordinating finishes: brass, hammered copper, matte black iron, or aged zinc. Mix sizes rather than matching everything perfectly. Large floor lanterns alongside medium hanging lanterns alongside small tabletop versions creates a collected, layered effect. Use LED flame-effect candles in any lantern that will be left unattended, and real beeswax or natural wax pillar candles in attended settings.
Hang lanterns at varying heights from tree branches, shepherd hooks pushed into the lawn, or a simple horizontal timber rail between two posts. On a still summer evening, a garden lit only by candlelight and lanterns feels almost otherworldly, particularly if you have done good work on the planting surrounding the lit area.
Designer Advice: Group lanterns in odd numbers, three or five, rather than in pairs or even numbers. Odd groupings look more natural and organic and avoid the overly symmetrical, staged look that makes outdoor spaces feel less like real living spaces and more like set design.

Final Thoughts
A backyard you genuinely love spending time in does not happen by accident, but it also does not require an unlimited budget or a professional design team. What it does require is a little intention: deciding which zones matter most to you, choosing materials that will age well, layering light so the space works after dark, and adding the kinds of details that make outdoor living feel genuinely comfortable rather than just adequately functional.
The 27 ideas in this article are best approached as a menu rather than a checklist. No backyard needs all of them, and most people will connect strongly with five or six ideas and feel indifferent about the rest. Start there. The outdoor kitchen, the cabana, the secret reading nook, whatever it is that made you stop scrolling and actually pay attention, that is the idea worth acting on first. Everything else can follow at whatever pace your time and budget allow.
The best version of your backyard is the one you actually use, and the best upgrade is always the one that makes you want to spend more time outside. Start with one zone, do it properly, and let the rest grow from there.
Frequently Asked Questions
What is the best material for outdoor furniture that lasts?
Teak, powder-coated aluminum, and all-weather synthetic wicker are the top three choices for outdoor furniture that holds up well over time. Teak is the most beautiful and ages to a distinguished silver-grey if left untreated. Powder-coated aluminum is lightweight, rust-proof, and available in almost any colour. Synthetic wicker looks good and handles UV and rain better than natural rattan, which is an indoor material only.
How much does a luxury backyard typically cost to design and build?
Costs vary enormously depending on the scope and your location. A well-designed outdoor kitchen with a pergola and quality furniture typically runs between $20,000 and $60,000. Adding a pool pushes the budget significantly higher, often $50,000 to $150,000 depending on size, finish, and site conditions. A thoughtful landscaping refresh with raised beds, planting, and lighting can achieve a significant upgrade for $10,000 to $30,000. Prioritising the features that matter most to how you actually live is the most effective approach regardless of budget.
What plants work best around a pool?
Choose plants that are low-shedding, non-thorny, and tolerant of the occasional splash of chlorinated water. Good options include ornamental grasses, agaves, bird of paradise, Podocarpus, and evergreen shrubs like Pittosporum or Westringia. Avoid deciduous trees that drop leaves directly into the pool and anything with thorns or spines close to the water edge. Large-leafed tropical plants like elephant ear and philodendron work beautifully in warm climates and create a lush, resort-like atmosphere.
How do I make a small backyard feel more luxurious?
In a small yard, restraint and quality always win over quantity. Choose one or two features and do them properly rather than trying to include everything. A well-built pergola with quality furniture, good lighting, and excellent planting is far more impressive than a cluttered yard packed with features that compete with each other. Vertical planting on walls and fences adds green without sacrificing floor space. Large-format paving in good quality stone or porcelain makes a small area feel more generous than small-unit paving does.
What outdoor lighting setup gives the best effect?
Layered lighting with at least three distinct light sources always looks better than a single type of fixture. Start with path and step lighting at ground level, add up-lighting on trees or architectural plants, and finish with ambient overhead lighting in the dining or seating zone. Use warm white LEDs throughout at around 2700 Kelvin. Put the main entertaining lights on a dimmer so you can drop the level for evening gatherings. Avoid cool white or daylight-temperature LEDs in garden settings because they wash out the warmth that makes an outdoor space feel inviting.
Is it worth building a pergola rather than a freestanding umbrella or shade sail?
A pergola is almost always worth it over the long term if you are planning to use the space regularly. It adds permanent structure and real value to the property, handles wind far better than an umbrella, and can be fitted with heating, lighting, fans, and shading systems that a temporary shade structure simply cannot support. Shade sails are a good intermediate option if budget or planning restrictions make a pergola difficult. Freestanding umbrellas work well for occasional use but are rarely the right long-term solution for a primary outdoor living zone.