Tiny Home Shower Ideas That Actually Make a Small Space Work

Living in a tiny home means making every single square foot count, and nowhere does that pressure show up more than in the bathroom. The shower, in particular, can feel like a design puzzle with no clean solution. How do you fit something functional, comfortable, and attractive into a space that might be smaller than most people’s closets? The good news is that tiny home showers have come a long way, and there are now more creative, practical approaches than ever before.
The secret is thinking beyond the standard square shower stall and instead approaching the space with fresh eyes. The best tiny home showers do more than just get the job done. They feel good to be in. They use light, color, and materials in smart ways. They eliminate clutter without sacrificing convenience. And they fit the personality of the home instead of working against it.
Whether you’re building from scratch, renovating an existing tiny home, or simply looking for inspiration to finally get your bathroom situation sorted, this guide covers ideas across a wide range of styles, budgets, and space constraints. From wet rooms that blur the line between shower and bathroom to outdoor setups that make the most of your surroundings, there is something here for every kind of tiny home lifestyle. Read through, take notes, and get ready to stop dreading your shower and start actually enjoying it.
1. The Full Wet Room Setup
You step into your tiny bathroom and realize the shower curtain keeps billowing into you, the drain is in the wrong place, and the whole thing feels like an afterthought. Sound familiar? The wet room approach flips that experience completely. Instead of carving out a separate shower zone, the entire bathroom floor becomes the shower area, sloped gently toward a central or corner drain.
In a wet room, there are no curbs, no separate enclosures, and no lost inches to a shower pan lip. The walls are fully waterproofed and tiled from floor to ceiling, which gives the space a cohesive, polished look that makes even a tiny bathroom feel intentional. For color, light grays, warm whites, and soft terracotta tones work especially well because they keep things bright without feeling clinical. Large-format tiles in a matte or stone finish are a practical choice since they have fewer grout lines, which means less cleaning and a cleaner visual field.
Lighting in a wet room needs to be thoughtful since everything is exposed to moisture. Recessed LED lights with a waterproof rating handle the job well, and a small heated towel rail mounted near the sink doubles as both function and warmth. For accessories, keep it minimal. A single wall-mounted soap dispenser, a built-in niche for shampoo, and a simple hook for a towel are all you need. The result is a bathroom that feels surprisingly spa-like given how little square footage it takes up.
Designer Advice: Have a professional waterproof your wet room walls and floor before tiling. A failed waterproof membrane is expensive to fix after the fact, and it’s the one area of a tiny home bathroom where cutting corners genuinely costs you.

2. A Corner Shower With a Frameless Glass Panel
You’ve got a bathroom the size of a large suitcase and you’re not sure how to even begin fitting a shower in without making the whole room feel like a storage closet. The corner placement with a single frameless glass panel is one of the most space-effective solutions out there, and it looks considerably better than you might expect.
The idea is simple: tuck the shower into the corner of your bathroom so it only takes up two walls, then use a single fixed or hinged frameless glass panel to define the front edge without blocking light or sightlines. Because frameless glass has no bulky metal framing around it, the visual weight is minimal. The shower is clearly its own space, but it doesn’t dominate the room the way a full enclosure would. Tiles in a slightly darker shade than the rest of the bathroom walls can subtly define the zone without needing physical barriers.
For the shower itself, a rain-style showerhead mounted flush to the ceiling creates a clean look while also distributing water more evenly than a standard wall-mounted head. A built-in niche in the corner wall handles storage without eating into floor space. Choose a simple matte black or brushed brass fixtures for a bit of personality, since the minimal framework of this design gives small details more visual weight. Flooring inside the shower in a contrasting pebble or mosaic tile adds texture underfoot and helps define the zone.
Designer Advice: Size the glass panel to reach at least 36 inches out from the wall. Anything shorter and you’ll end up with splash patterns that reach the toilet and vanity, which defeats the purpose entirely.

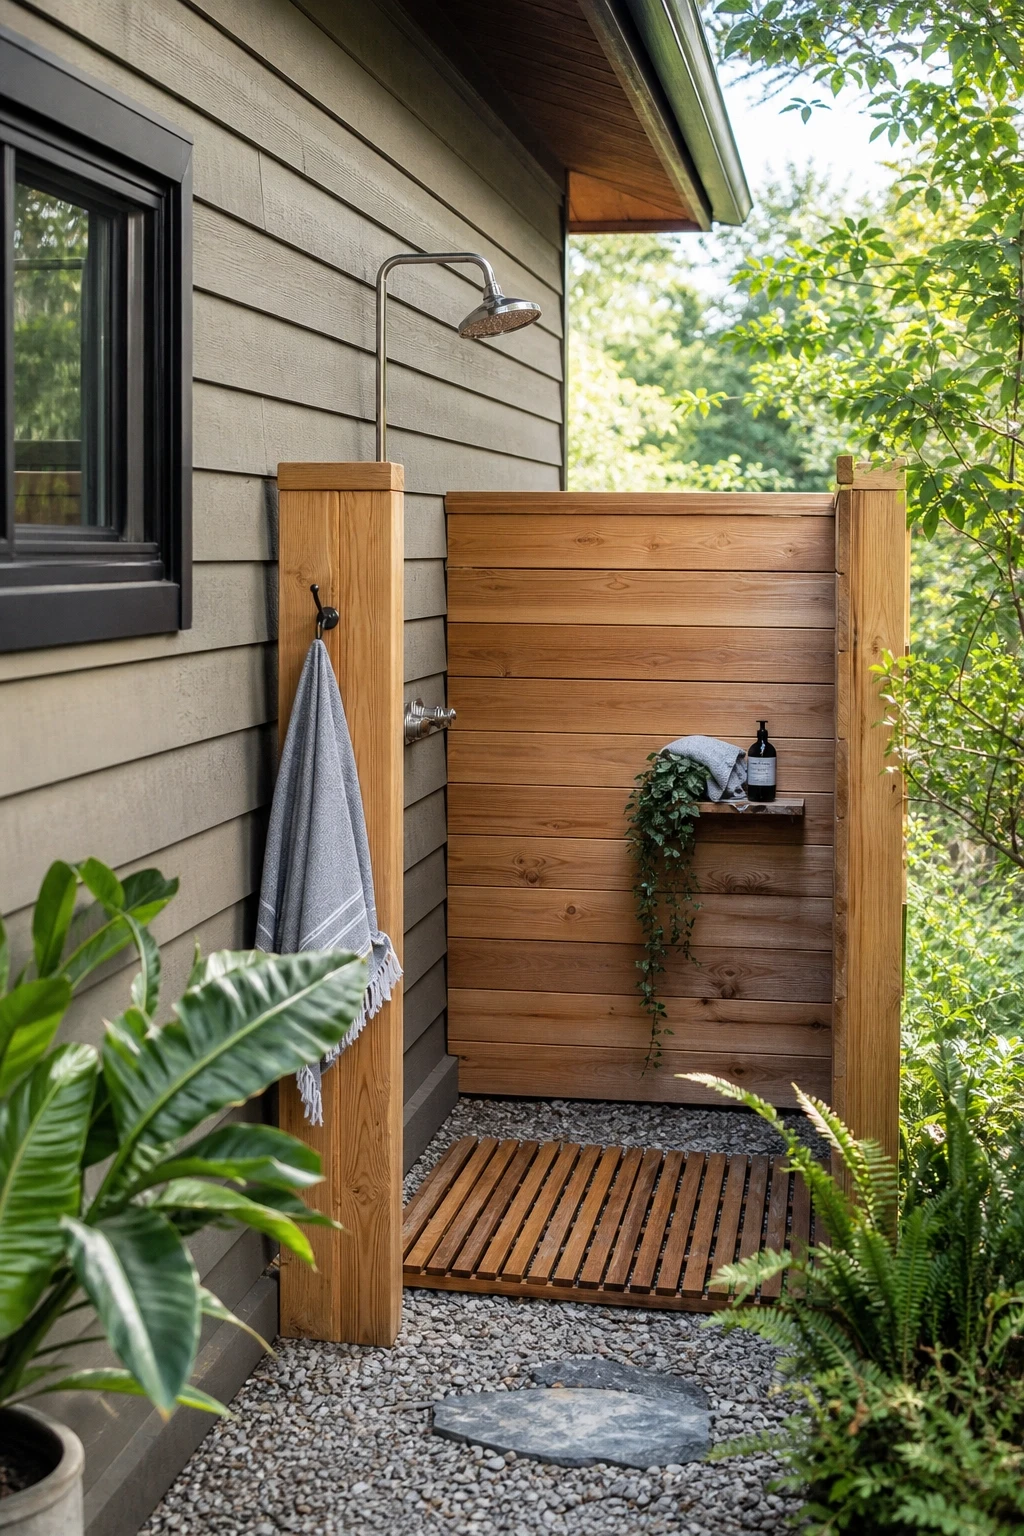
3. Outdoor Shower Attached to the Tiny Home
You’re living off-grid or in a rural area, and the idea of cramming a shower into your already tight interior feels like the wrong call. What if the shower didn’t have to live inside at all? An outdoor shower attached to the exterior wall of your tiny home solves the space problem entirely while adding a feature that genuinely improves your day-to-day quality of life.
The setup is simpler than it sounds. A section of decking or gravel along the exterior of your bathroom wall creates the shower floor, drainage runs either into a greywater system or away from the structure, and a simple privacy screen made from cedar, bamboo, or corrugated metal wraps the space. Hot water can be supplied through the existing plumbing by tapping into the interior line, or you can install a small tankless water heater dedicated to the outdoor shower for quicker access. For the walls, horizontal cedar boards or composite deck panels weather well and develop a beautiful silvery patina over time.
The showerhead can be a simple wall-mounted outdoor unit in stainless steel or brass, both of which hold up well against weather. Add a couple of stainless hooks for towels and a small teak shelf for soap and shampoo, and you have a completely functional shower without losing a square inch of interior space. A canvas or outdoor curtain on a simple rod adds privacy when needed and can be rolled back and tied off when not in use. On warm mornings, this kind of shower beats anything you can fit inside.
Designer Advice: Plant a fast-growing privacy hedge like bamboo or arborvitae along the outside of your shower area. Within a season or two, you get natural privacy that looks better than any fence or screen.
4. The Curved Curtain Rod Trick
You have a perfectly decent shower stall but it feels unbearably cramped the moment you step in, and the curtain keeps sticking to your arm no matter what you do. This is one of the most common complaints in tiny home bathrooms and it has a simple fix that costs almost nothing compared to a renovation: a curved shower rod.
A curved shower rod bows outward by about six to eight inches at the center, which sounds small but makes a meaningful difference when you’re standing inside the shower. That extra space removes the wall-of-fabric effect and gives your elbows and shoulders room to move without the curtain following them around. The rod itself requires no special installation beyond the standard tension or ceiling-mount setup, and it works with any curtain you already own. Pair it with a weighted shower curtain in a light-filtering fabric such as linen or a cotton-poly blend to reduce the cling effect and add a bit of texture to the room.
Color is important here. A shower curtain in a soft off-white, warm sand, or very pale sage green reflects light back into the space and keeps the room from feeling boxed in. Avoid dark, heavy curtain fabrics in a tiny bathroom since they absorb light and make the space feel smaller. Swap the standard curtain rings for matte black or brushed gold ones to add a small design detail that pulls the whole look together. Combined with a fresh set of towels in a coordinating color, the change is genuinely striking for minimal effort and expense.
Designer Advice: Hang your shower curtain rod as close to the ceiling as possible rather than at the standard height. This single adjustment draws the eye upward and makes the ceiling feel higher, which opens up the whole bathroom visually.

5. A Pocket Door to Reclaim Floor Space
Your tiny bathroom door swings in and clips the toilet, or swings out and smacks whoever is walking down the hall. Either way, the door is eating space you can’t afford to lose. Switching to a pocket door, one that slides into the wall rather than swinging open, is one of the most impactful changes you can make to a tiny home bathroom layout.
A pocket door eliminates the swing radius entirely, which in practical terms can free up several square feet of usable floor area. That might not sound dramatic, but in a tiny home bathroom where every inch matters, the difference between a room that works and one that doesn’t often comes down to exactly that kind of margin. From a design perspective, a pocket door also looks cleaner than a standard door because there’s no frame jutting into the space. A simple flush handle in matte black or brushed nickel gives you something to grab without adding visual clutter.
The door itself can be painted the same color as your bathroom walls to make it disappear visually, or finished in a natural wood stain to add warmth and contrast. Frosted glass pocket doors are an especially good choice because they let in borrowed light from adjoining spaces without sacrificing privacy, which can make a small bathroom feel genuinely brighter throughout the day. Just make sure your wall cavity is clear of plumbing and electrical runs before installation, as this is the one technical consideration that sometimes rules out pocket doors in existing builds.
Designer Advice: If a pocket door isn’t structurally possible in your wall, a barn door on a sliding exterior track gives you most of the same space-saving benefits. It won’t disappear the way a pocket door does, but it will eliminate the swing problem and can actually become a design feature in its own right.

6. Vertical Tile to Add Height
Your tiny bathroom tiles are laid in the standard horizontal pattern, and somehow the room feels squatter and shorter than it actually is. The tile orientation you choose has a stronger effect on how a room reads than most people realize, and switching to a vertical layout is one of the easiest ways to make a ceiling feel higher without touching the ceiling itself.
Subway tiles, which are the most common choice in small bathrooms, are typically installed with the long side horizontal. Rotating them 90 degrees so the long side runs vertically instantly pulls the eye upward. This works especially well in shower enclosures and on shower accent walls where the full height of the tile run is visible. For color, stick to lighter tones such as soft white, pale gray, or a warm cream to keep the space from closing in. A contrasting grout color in charcoal or dark gray adds definition without requiring any additional decorative elements.
For a more current take, try a vertically stacked herringbone or a slim pencil tile running floor to ceiling in a natural stone finish. These options add texture and sophistication that a basic subway tile can’t quite match, and they photograph beautifully if you ever want to document your space. Pair vertical wall tiles with a horizontal floor tile in a contrasting pattern to anchor the room and keep the design from feeling one-note. Small hexagon or encaustic cement tiles on the floor add character without competing with the wall treatment.
Designer Advice: Keep tile grout lines tight and seal them properly. In a tiny bathroom, grout lines that are too wide or left unsealed become a maintenance issue quickly and make the whole space look dated faster than almost any other single factor.

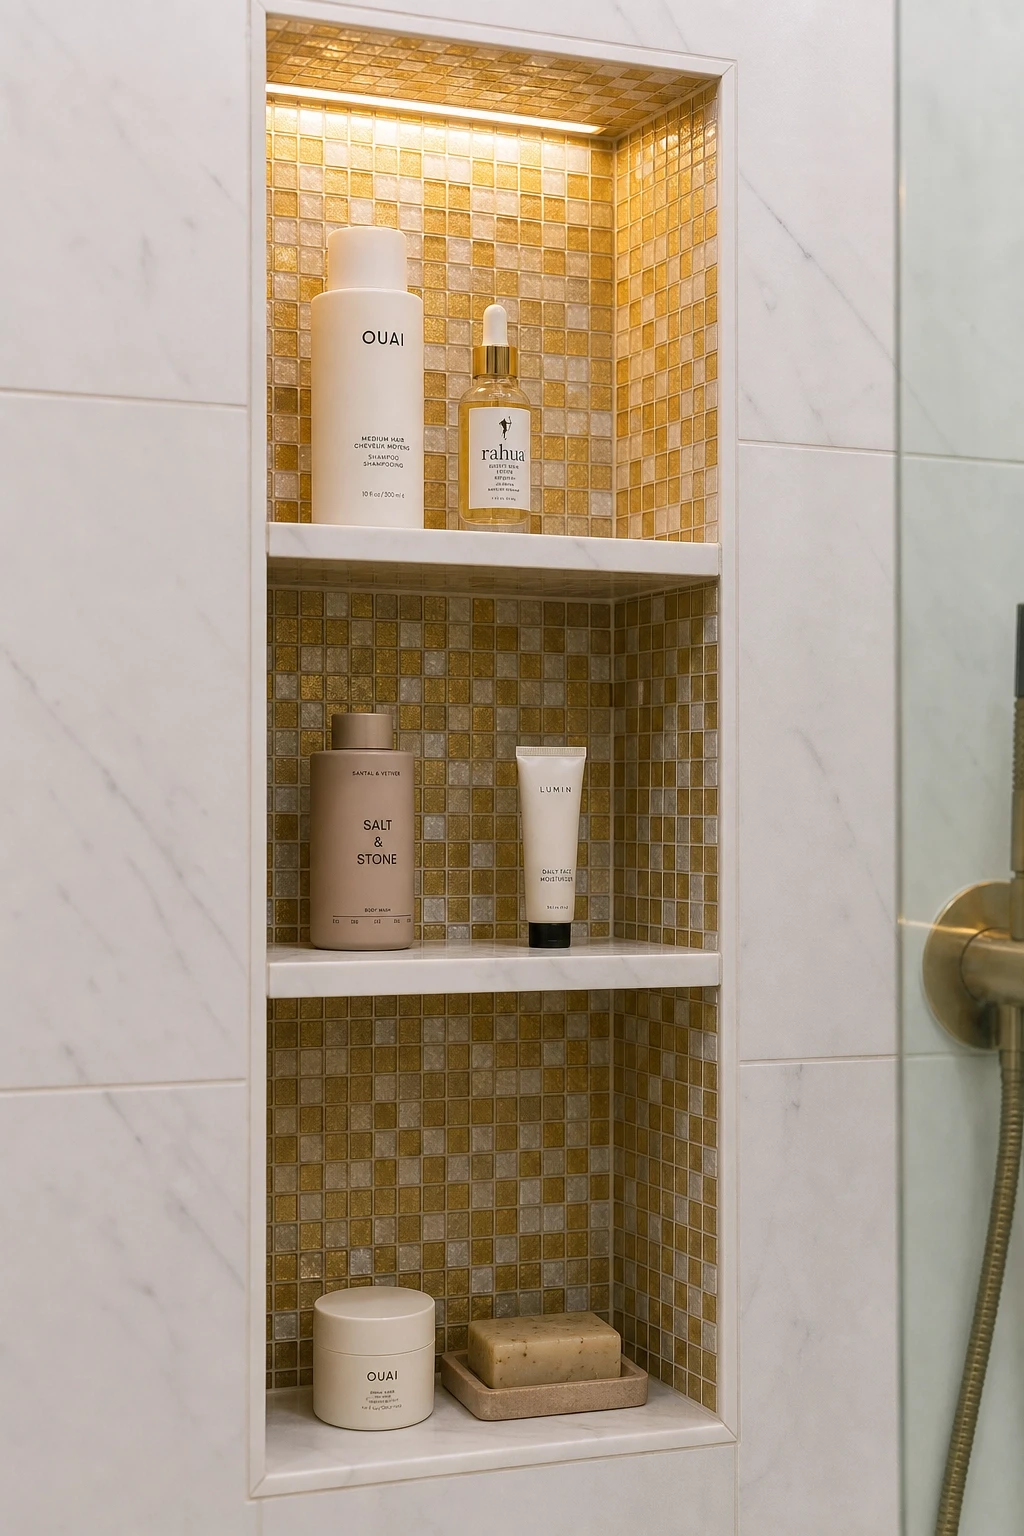
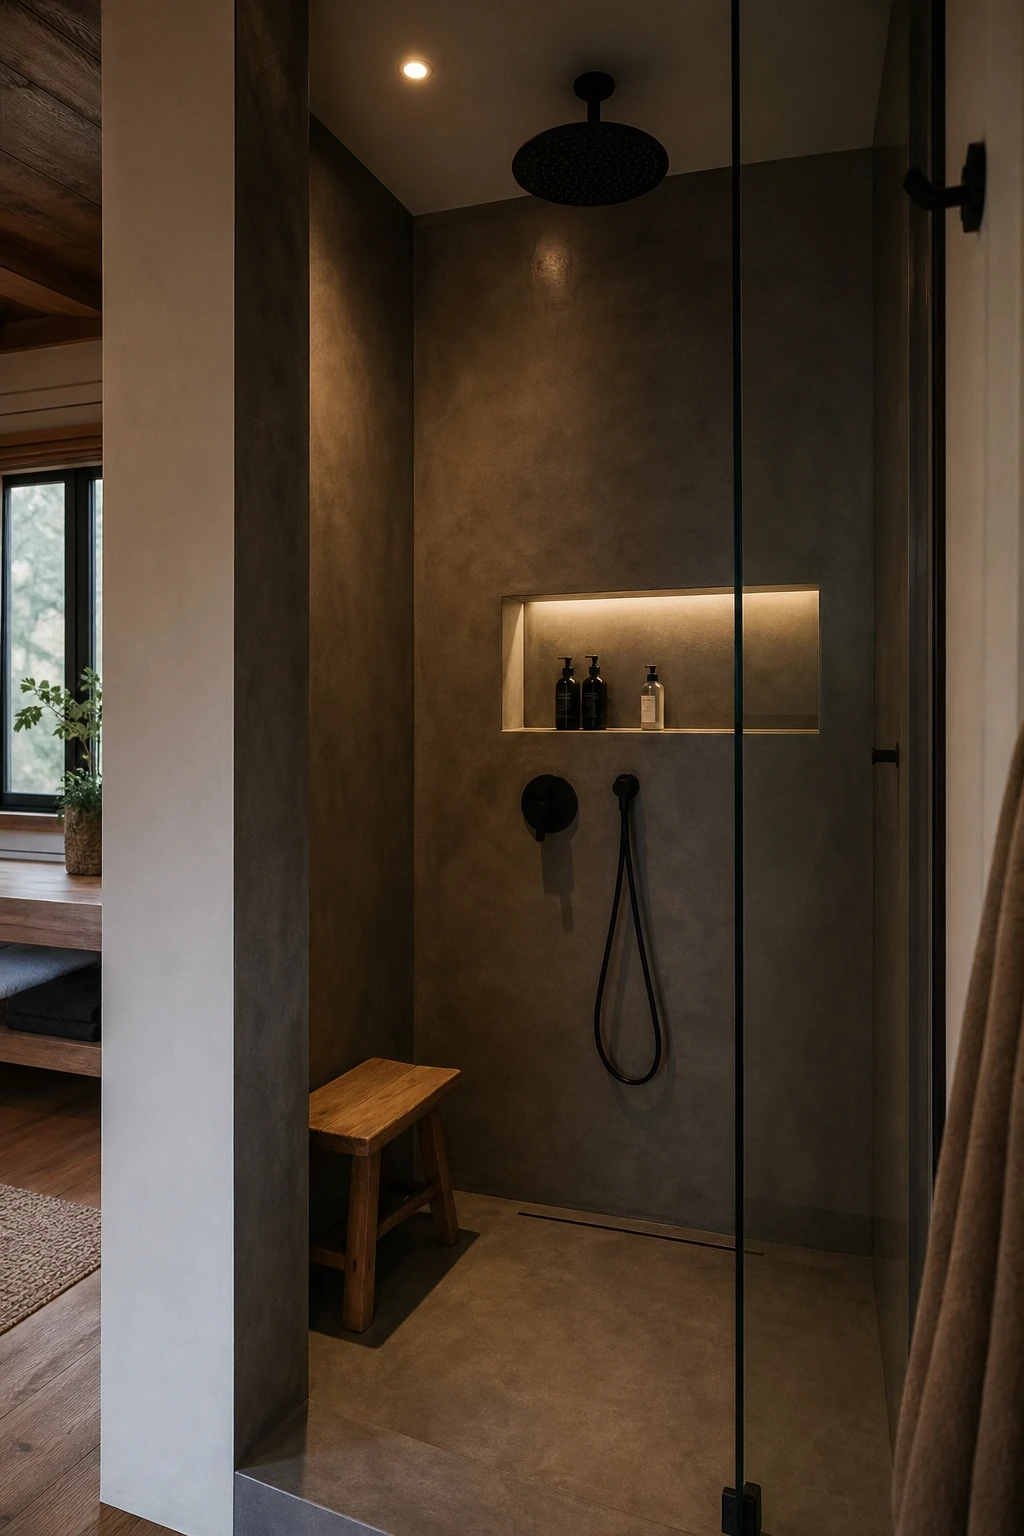
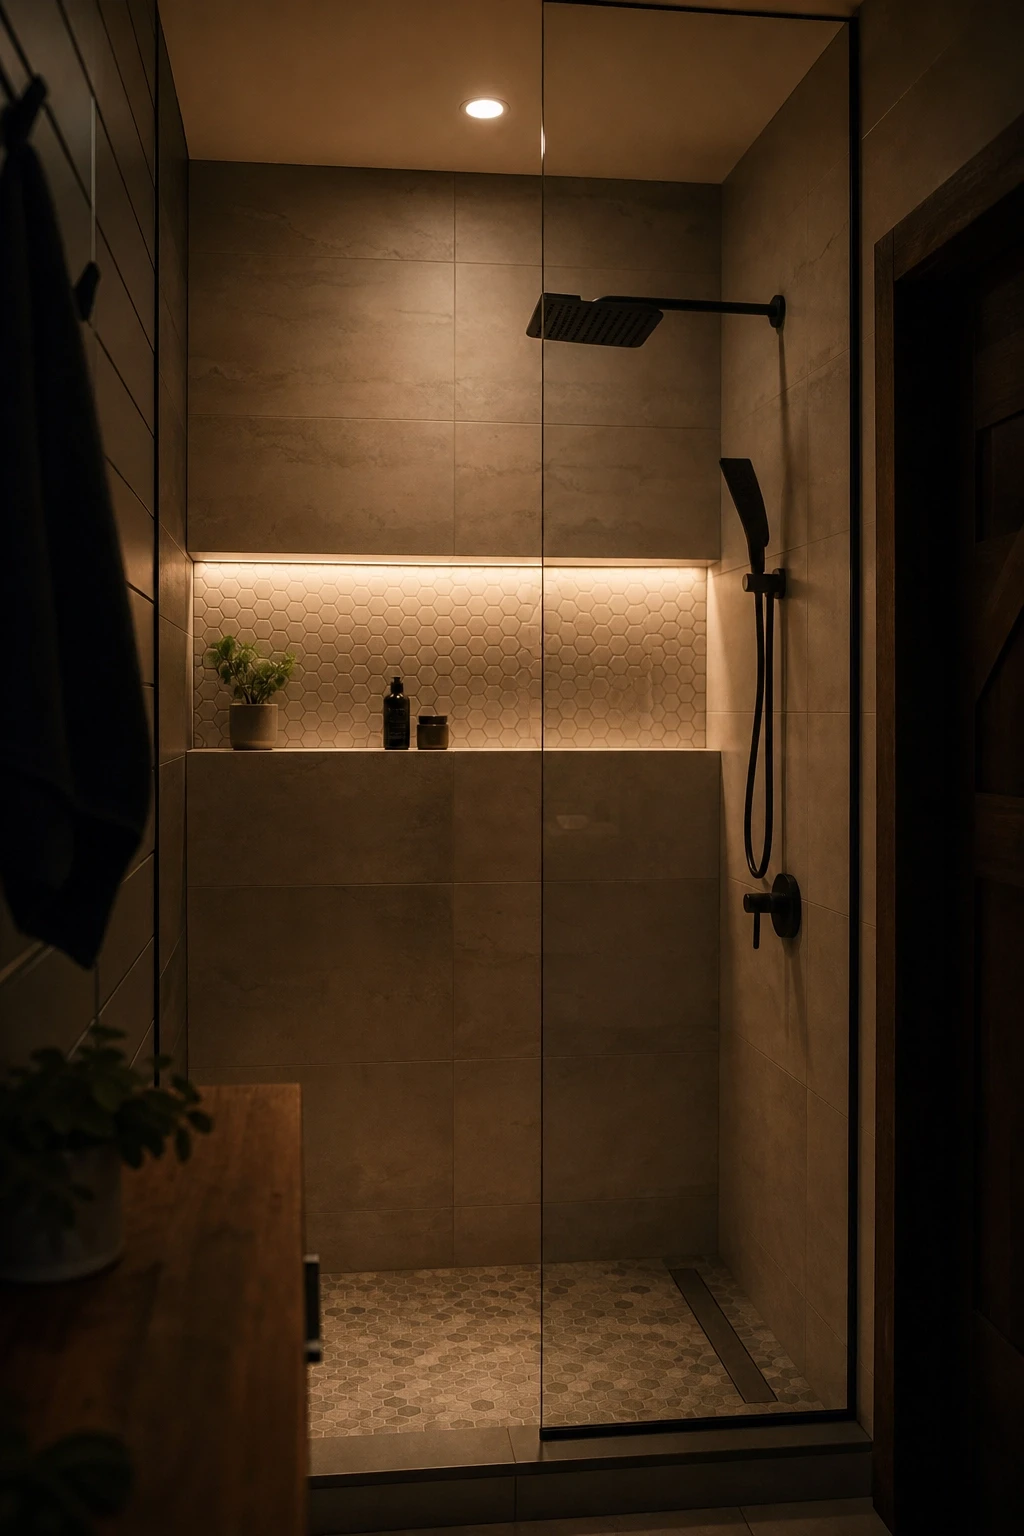
7. A Built-In Shower Niche for Zero-Clutter Storage
Every tiny home shower ends up with bottles lined along the floor, a caddy that falls over at the worst possible moment, and a general sense of chaos that makes the space feel smaller than it is. The built-in shower niche solves all of that in one clean move: a recessed shelf built directly into the shower wall that holds your products flush with the surface, with no intrusion into the shower space itself.
A standard single niche measures about 12 by 24 inches and sits between two studs, so it requires no structural modification to build. Tile the interior of the niche in a contrasting material to your shower walls, such as a mosaic tile or a small-format stone tile, and it becomes a genuine design feature rather than just a storage solution. Vertical niches are increasingly popular because they stack multiple shelves in a narrow strip, giving you separate spots for shampoo, conditioner, body wash, and a razor without the footprint of a wider horizontal niche.
Lighting can be added inside the niche with a small LED strip along the top edge, which creates a warm glow that makes the shower feel more intentional and luxurious. Choose a niche depth of around 3.5 inches, which fits comfortably between standard wall studs and handles most standard-sized product bottles. If your shower already exists and retrofitting a niche isn’t an option, a simple magnetic wall-mounted holder or a corner mounted teak shelf achieves a similar clean look with no construction required.
Designer Advice: Place your niche on a non-exterior wall wherever possible. Exterior walls in tiny homes are often where insulation and waterproofing layers are most compressed, and cutting into them for a niche creates more complexity than it’s worth.
8. A Folding Teak Bench That Disappears
You’ve been thinking about a shower bench because your knees have been giving you trouble, or maybe you just like the idea of having somewhere to rest a foot while you shave. But in a tiny shower stall, a permanent bench feels like sacrificing the one thing you actually need in there: room to stand. The wall-mounted folding teak bench gives you the functionality without the permanent footprint.
Teak is the right material for a shower environment because it’s naturally water-resistant and doesn’t warp, swell, or rot the way other woods do with regular moisture exposure. A folding bench mounts directly to the wall with concealed hardware and folds flat when not in use, adding no more than a couple of inches of wall projection. When you need it, a simple flip and it locks into a horizontal position that supports weight comfortably. Sizes typically run between 15 and 24 inches wide, which is enough to be genuinely useful without dominating the space.
From a design perspective, teak adds warmth and natural texture to a shower that might otherwise feel cold and purely utilitarian. It pairs especially well with white or light gray tile and matte black hardware, the contrast between organic wood grain and clean modern fixtures being a combination that reads as thoughtfully considered rather than accidental. If teak is outside your budget, a folding aluminum bench with a slatted surface is a practical alternative that handles moisture just as well and costs considerably less.
Designer Advice: Sand your teak bench lightly every six months and apply a thin coat of teak oil to keep the wood from turning gray and dry. It takes about twenty minutes and extends the life of the bench by years.

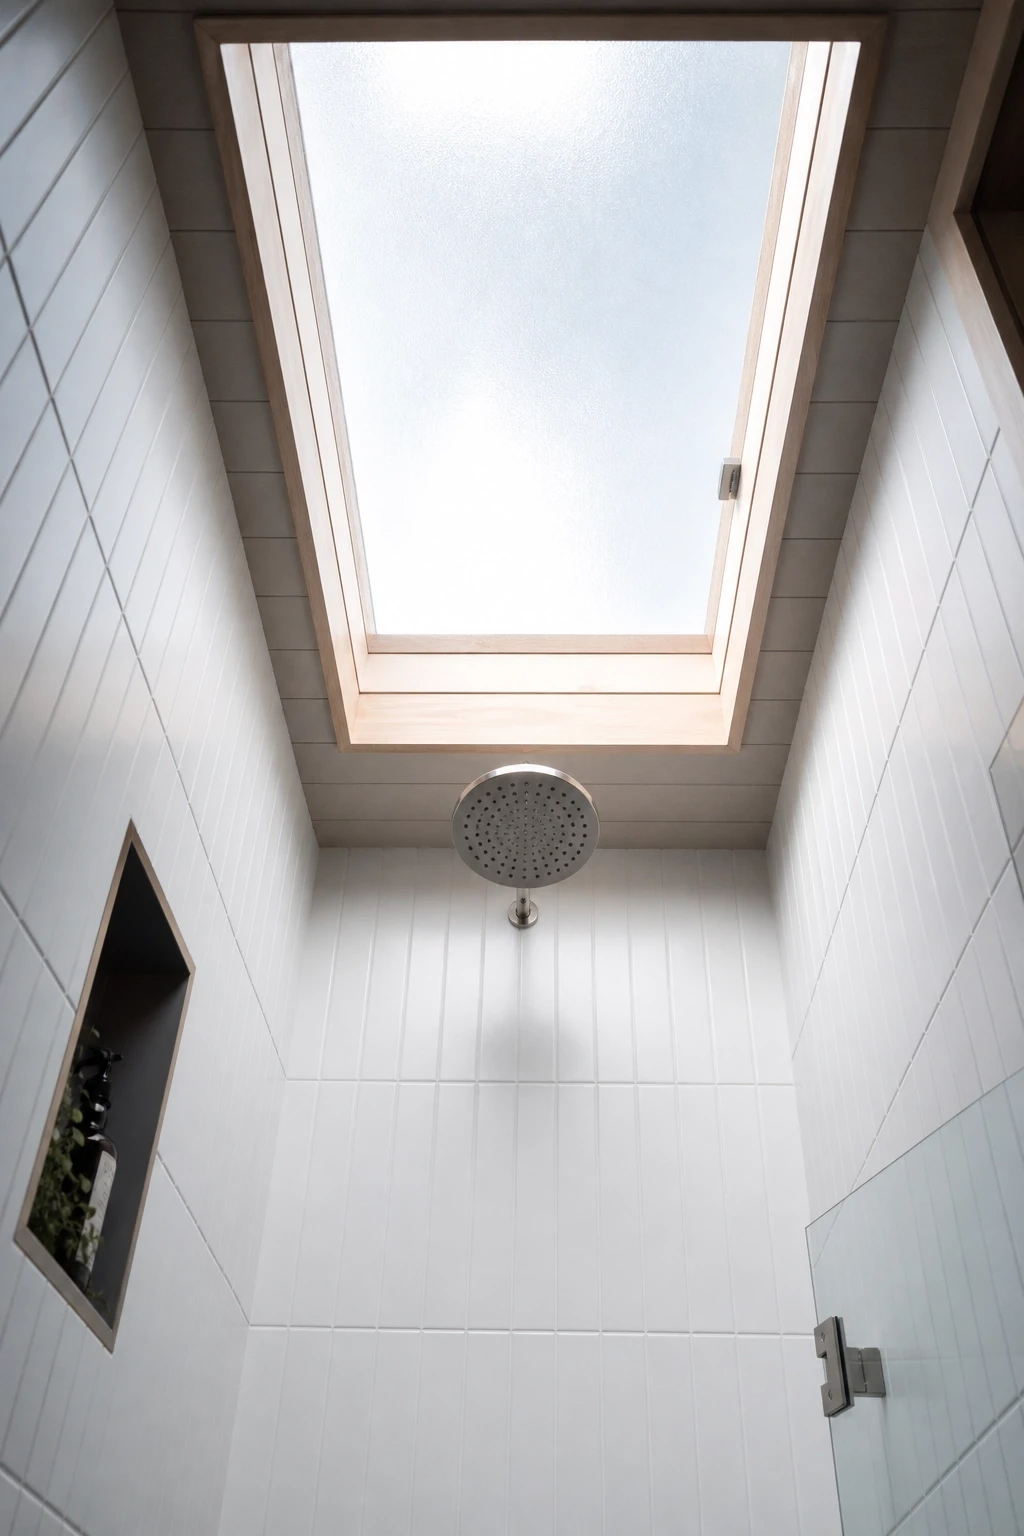
9. A Skylight Directly Above the Shower
Your tiny home shower feels like a cave. The overhead light is doing its best but the space still feels dim and enclosed, and you find yourself dreading it rather than enjoying it. Natural light is the single most powerful tool for making a small space feel bigger, and positioning a skylight directly above the shower area is one of the most impactful things you can do if your roof structure allows it.
A fixed skylight above a shower doesn’t need to be large to make a difference. Even a 16-by-24-inch unit floods the shower with daylight that no artificial fixture can fully replicate. The light coming straight down from above creates a completely different quality than wall-mounted or recessed lighting, filling the space evenly and eliminating the dark shadows that make corners feel cramped. On overcast days the light is soft and diffused. On sunny mornings it’s genuinely invigorating. Use a frosted or diffused glazing option rather than clear glass if privacy is a concern, or if direct sunlight would create glare issues.
From a design standpoint, a shower lit by a skylight almost always looks better in photographs and in person because the light source is flattering and natural. Pair the skylight with simple white or light-colored tiles to maximize the light bounce, and keep wall accessories minimal so nothing competes with the architectural feature you’ve just created. At night, a good recessed LED in a waterproof housing handles the job, but it won’t need to work as hard as it would in a skylight-free shower.
Designer Advice: Have a licensed contractor install your skylight and flash it correctly. Skylight leaks are among the most common sources of water damage in tiny homes, and the cost of a proper installation is significantly less than the cost of repairing a leak that’s had time to spread.
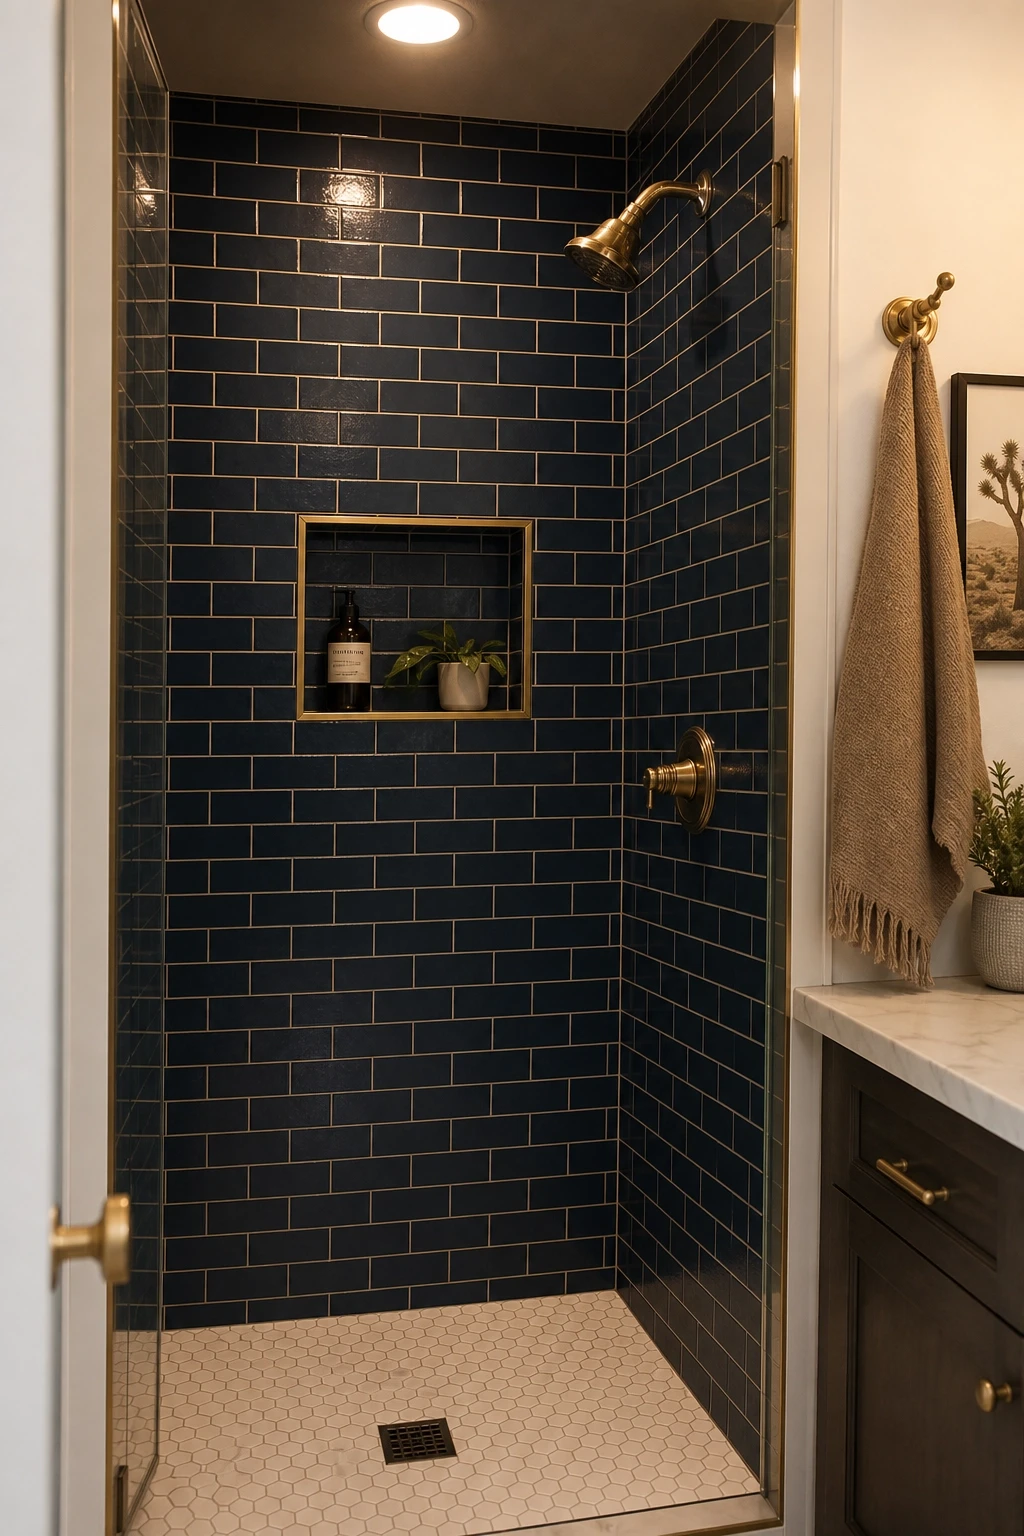
10. A Navy and Brass Shower for a Bold, Small Space
Everyone told you that dark colors in a tiny bathroom would make it feel smaller, so you painted everything white and now the space feels sterile and boring. The conventional advice isn’t wrong, but it isn’t the whole story either. When a tiny shower is done in deep navy with warm brass hardware, the result is something that feels intentional, cozy, and sophisticated in a way that a white-everything approach rarely achieves.
Navy works in a tiny shower because it creates depth rather than distance. The wall appears to recede rather than close in, and the richness of the color draws the eye rather than letting it slide past. Pair navy subway tiles with a white or cream grout to prevent the space from going too dark, and balance the coolness of the blue with warm brass fixtures including the showerhead, the controls, the towel hook, and the niche trim. Brass and navy is a classic combination that has genuine longevity as a design choice and doesn’t feel trendy in a way that dates quickly.
Keep the floor lighter than the walls, a white hexagon or a pale marble mosaic tile keeps the floor from disappearing into the dark walls and maintains the visual separation between surfaces that makes the space readable. A single pendant light in aged brass hung just outside the shower adds warmth to the overall bathroom and pulls the metallic tones throughout the room. Add a navy-and-white striped towel and a small potted plant on the vanity ledge and the whole room comes together without any additional investment.
Designer Advice: Test a large paint sample or tile sample in your actual shower space for at least a couple of days before committing. Tiny shower tiles look completely different at full coverage than they do in a small sample, and color under artificial shower lighting reads differently than it does under a store’s light.
11. A Tankless Water Heater for Continuous Hot Water
You’re mid-shampoo when the hot water gives out, and you finish rinsing in a stream of water that can generously be described as lukewarm. Tiny homes with small tank water heaters run into this problem constantly because the tank simply doesn’t hold enough to support a full shower. The tankless water heater, sometimes called an on-demand heater, solves this by heating water continuously as it flows through the unit rather than storing a finite heated supply.
For a tiny home with a single bathroom, a propane or electric point-of-use tankless heater installed close to the shower delivers consistent water temperature without the lag time of a distant tank. The units themselves are compact, many fitting into a cabinet space no bigger than a briefcase, which means you’re not trading living space for the appliance. Electric units are simpler to install and require no venting, making them especially practical in tiny homes where running a flue is complicated or impossible. Propane units tend to deliver higher flow rates, which matters if you’re running the shower and the kitchen faucet at the same time.
From a design perspective, a small tankless unit can be concealed behind a panel or inside a utility cabinet so it doesn’t intrude on the aesthetic of your bathroom. The practical benefit is significant: not worrying about running out of hot water changes the showering experience in a tiny home more than almost any physical renovation. It’s one of those upgrades that gets appreciated every single day rather than just on the day it’s installed.
Designer Advice: Size your tankless heater based on the flow rate of your showerhead and the incoming water temperature in your region. Undersizing is a common mistake and leads to temperature fluctuations that defeat the purpose of the upgrade.

12. A Japanese-Inspired Ofuro Compact Tub and Shower
You want both a shower and a bathing option in your tiny home, and every conventional bath-shower combo you’ve looked at either doesn’t fit or looks clunky and cheap. The Japanese ofuro concept offers a genuinely different approach: a deep, compact soaking tub paired with a handheld showerhead that allows both bathing and showering within the same small zone.
An ofuro tub is shorter in length than a Western bathtub, typically around four feet, but significantly deeper, usually around 22 to 24 inches. You sit rather than lie down, which allows for a proper soak in a much smaller footprint. Paired with a handheld shower wand mounted at the wall and a simple shower curtain or glass panel, the entire setup functions as both a shower and a soaking bath without needing separate areas for each. The tub itself can be finished in acrylic, fiberglass, or even hinoki cypress wood for a more traditional look.
Surround the tub with simple white or natural stone tiles to keep the aesthetic calm and clean. A bamboo bath mat outside the tub, a wooden stool inside for sitting during the shower phase, and a simple wall-mounted hook for a cotton robe complete the picture. The vibe is genuinely restorative in a way that most tiny home showers simply are not, and the compact size fits into spaces that would never accommodate a standard Western bathtub.
Designer Advice: Fill an ofuro with cooler water than you would a standard bath since the depth means you’re more immersed and the heat has a stronger effect on your body. Around 102 to 104 degrees Fahrenheit is the sweet spot for most people.
13. A Low-Flow Showerhead That Still Feels Good
You’ve been told you need a low-flow showerhead for your tiny home’s water system or your small tank, and you’re dreading what it actually feels like to use one. The image that comes to mind is a weak trickle that requires standing directly underneath to get wet. That is not what modern low-flow showerheads deliver, and the technology has advanced enough that the best ones are genuinely pleasant to use.
High-efficiency showerheads with air infusion technology, sometimes called aerating showerheads, mix air into the water stream to create a fuller, more pressurized feel while using significantly less water than a standard unit. Flow rates of 1.5 to 1.8 gallons per minute are typical, compared to 2.5 gallons per minute for standard heads, and the showering experience is noticeably better than the older low-flow designs. Look for models from brands that specialize in water-efficient fixtures since the engineering in the head design makes a significant difference in how the water feels at the skin.
From a design standpoint, a good low-flow showerhead in a matte black, brushed nickel, or polished chrome finish becomes a small statement piece in an otherwise simple shower setup. The circular rain-style heads look particularly clean and contemporary and take up no more space than a standard model. Wall-mounted units are simplest to install, and most screw onto existing shower arms without any additional plumbing work, making this one of the quickest upgrades you can make to a tiny home shower.
Designer Advice: Check the water pressure in your tiny home’s supply before choosing a low-flow head. Some high-efficiency models need a minimum pressure to perform properly, and in a tiny home with a gravity-fed or low-pressure system, you may need to look specifically for models rated for low-pressure performance.

14. A Reclaimed Wood Accent Wall Behind the Shower
Your tiny home has a warm, rustic character and the plain white tile shower feels completely out of place with everything else. You want the bathroom to feel like it belongs to the same home, not like it was copied from a builder-grade apartment. A reclaimed wood accent wall behind or beside the shower brings the warmth and character you’re after while grounding the whole space in the aesthetic of the rest of your home.
The key to using reclaimed wood near a shower is proper waterproofing and sealant application. The wood itself needs to be kiln-dried to remove any residual moisture, then sealed with multiple coats of a marine-grade or exterior polyurethane before installation. It should not be placed directly inside the shower spray zone, but rather on the wall outside the shower enclosure or on the facing wall visible through a glass panel. In that position it reads beautifully as a backdrop without the constant moisture exposure that would compromise even well-sealed wood over time.
Barnwood planks in varying widths of gray and brown tones work especially well in tiny homes with a farmhouse, Scandinavian, or mountain-cabin aesthetic. The irregular surface texture catches the light differently throughout the day, which adds life and movement to what would otherwise be a flat, static wall. Keep everything else in the bathroom simple and neutral so the wood remains the focal point. A matte black single vanity, a simple oval mirror, and a cotton rope towel hook are all you need to round out the look.
Designer Advice: Install a thin strip of aluminum or stainless trim wherever the wood meets the floor to create a clean transition and prevent the bottom edge of the planks from wicking moisture from the floor. It is a small detail but it makes a real difference in the longevity of the installation.

15. A Prefab Shower Pod for Quick Installation
You’re on a deadline, a budget, or both, and the idea of tiling an entire shower enclosure from scratch feels like a project that will drag on for months. The prefab shower pod is the practical answer. These self-contained units arrive pre-assembled or in a small number of panels that click or seal together, and they can be installed and functional in a day or two rather than the weeks a tiled shower requires.
Modern prefab shower pods have advanced significantly from the flimsy fiberglass units of twenty years ago. High-end versions feature acrylic composite or solid surface panels in a range of finishes including matte stone, brushed concrete, and clean white gloss, all of which look considerably more polished than the standard builders’ unit. The seams between panels are minimal and sealed with a silicone that resists mold and discoloration, which is one of the most common maintenance headaches in a conventionally tiled shower. Built-in niches, corner shelving, and integrated soap dishes are often included in the panel design so you don’t have to add anything separately.
For a tiny home on wheels, a prefab pod also has a structural advantage: it’s self-contained and doesn’t rely on the home’s framing and wall material to support the shower environment the way a tile job does. This makes it a more resilient option for homes that move regularly and experience the vibration and shifting that road travel creates. Choose a unit in a neutral tone and dress it up with great fixtures, a quality showerhead, and a nice curtain or glass panel to make it feel more custom than it actually is.
Designer Advice: Measure your doorways and any narrow corridors between the exterior of your tiny home and the bathroom before ordering a prefab pod. Delivery is one thing. Getting the unit through the door and into position is another problem entirely if you haven’t thought it through first.

16. A Herringbone Tile Pattern on the Shower Floor
Your shower floor is basic and forgettable, plain square tiles in a standard grid pattern that disappear into the background. The shower floor is actually one of the best places to add personality in a tiny bathroom because it’s a contained surface with a clear boundary, which means a bold pattern there reads as intentional rather than overwhelming. The herringbone pattern in particular has a visual energy that elevates even a simple tile into something that looks designed.
Small-format porcelain or ceramic tiles in 2-by-4-inch or 3-by-6-inch sizes are the most common choice for a shower floor herringbone because their size allows the pattern to be readable without requiring a large surface area. Natural stone versions in marble or travertine add a luxurious quality that’s hard to replicate with ceramic, though they do require periodic sealing to prevent staining. For color, a classic white or cream herringbone with a contrasting charcoal grout is an enduringly good combination that reads clean and fresh without ever feeling dated.
The herringbone can also run vertically up the shower wall as an accent strip, creating a continuous visual movement from floor to mid-wall that makes the space feel taller and more dynamic. Keep the surrounding wall tiles simple, a large-format subway or a plain matte porcelain, so the herringbone has room to breathe and be noticed. This is a detail that people consistently comment on, and it costs very little more than a standard tile installation.
Designer Advice: Ask your tile installer to dry-lay the herringbone pattern before committing to the adhesive. On a small shower floor, even a minor misalignment in the pattern starting point can result in awkward cuts at the edges that undermine the whole effect.

17. A Monochromatic All-White Shower
You’ve been trying to decide on colors and materials for weeks and the decision fatigue is real. Sometimes the simplest choice is also the best one, and an all-white shower done well is one of the most consistently satisfying outcomes in a tiny home bathroom. It photographs beautifully, it’s timeless in a way few design choices actually are, and it makes the space feel as large as it possibly can.
The key to an all-white shower that feels rich rather than cold is variation in texture. White subway tiles have a different surface quality than white zellige, which reads differently again from a white large-format porcelain or a white marble mosaic. Mixing two or three white tile textures within a single shower, for example a flat large-format on the main walls, a zellige on the niche interior, and a small mosaic on the floor, creates a layered look that has genuine depth even within a single color palette.
White fixtures in brushed nickel or matte chrome maintain the monochromatic palette while adding material variation through metal. White towels, a white bath mat, and a simple white curtain or frameless glass panel complete the look. Where it’s tempting to add a pop of color, resist the urge. The power of an all-white shower comes from its commitment to a single direction, and a rogue accent color often undermines what makes it work. Add warmth instead through a wooden bath mat, a small plant, or a warm bulb in the vanity light.
Designer Advice: Choose a warm white over a cool blue-white for the dominant tile. In the enclosed environment of a shower, a cool white tile under artificial light can read almost gray and lose the brightness and cleanliness you were going for.

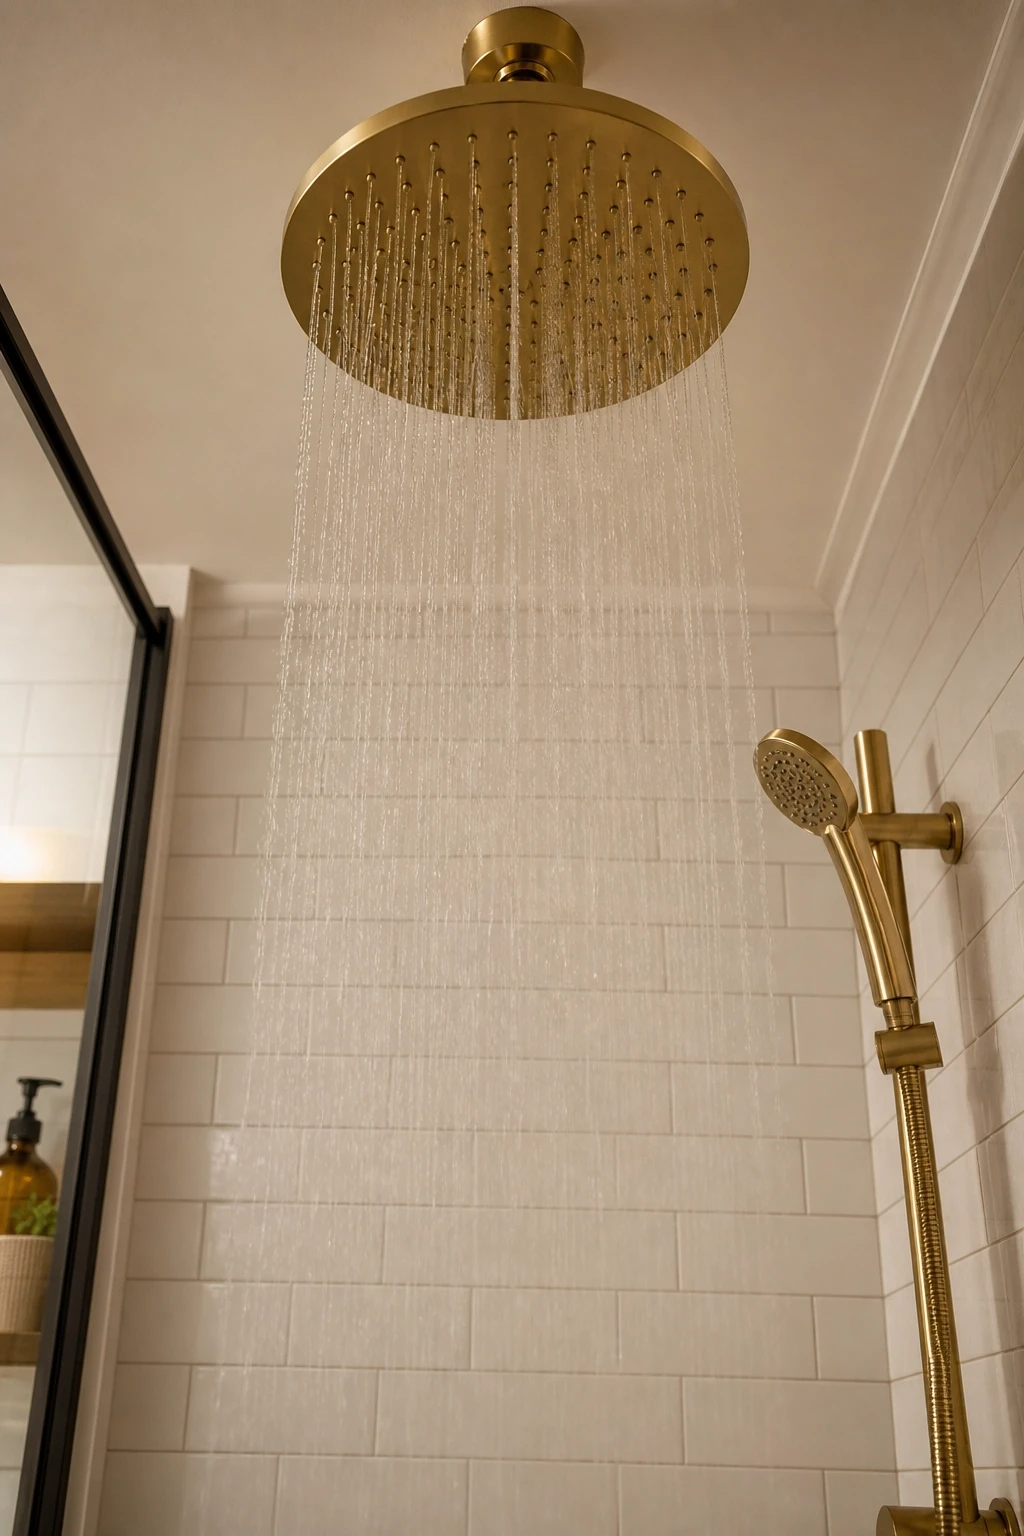
18. A Ceiling-Mounted Rain Showerhead
Your wall-mounted showerhead requires you to angle yourself in a specific direction to get fully rinsed, which in a small shower means doing a slow rotation and hoping you don’t bump an elbow on the glass panel. The ceiling-mounted rain showerhead eliminates this entirely by distributing water from directly above, which is both more efficient and considerably more enjoyable in a small enclosure.
A ceiling-mounted rain head typically measures between 8 and 12 inches in diameter and delivers water in a wide, even spray that covers the body without requiring any movement. In a tiny shower where maneuvering is limited, this is a practical upgrade as much as an aesthetic one. The plumbing runs up through the wall and across to a ceiling-mounted arm, which can be done during a renovation or sometimes retrofitted through a panel in an adjoining wall or ceiling cavity. A professional plumber is the right person for this job since the routing needs to be properly supported and waterproofed.
From a design perspective, a ceiling-mounted rain head makes a shower feel intentional and considered in a way that wall-mounted heads simply don’t. Choose a finish that matches your other fixtures. Matte black is bold and contemporary. Brushed gold is warm and current. Polished chrome is clean and classic. In a tiny shower where there are fewer surfaces competing for attention, the showerhead becomes a genuine focal point, so it’s worth choosing one that earns that attention.
Designer Advice: Pair your ceiling rain head with a separate handheld shower wand on a slide bar. The rain head handles the main showering experience, while the handheld takes care of rinsing, cleaning the shower walls, and washing hair without getting the rest of you soaked.
19. A Green Plant Wall Inside the Shower
Your tiny home bathroom feels clinical and lifeless, and no amount of neutral tile or matching towels quite fixes it. Living plants are one of the most reliable ways to bring warmth and energy into a small space, and the shower is actually an excellent environment for a specific group of them. Creating a small plant wall or a mounted planter display inside or just outside the shower enclosure brings the outside in and transforms the whole feel of the room.
Tropical plants that thrive in humidity are the right choices here. Golden pothos trails beautifully and tolerates low light. Air plants, tillandsias, require no soil and can be mounted directly on a piece of driftwood or a piece of wire mesh attached to the wall. Ferns such as the Boston fern or the maidenhair fern love the steam environment and grow quickly in it. Spider plants are nearly impossible to kill and produce trailing offshoots that fill in a space quickly and generously. These species handle the temperature variation and humidity of a shower environment better than most houseplants.
Mount a simple teak or powder-coated steel planter rack on the wall outside the spray zone, or use a series of small hanging terracotta pots at varying heights to create a layered green display. The color contrast between deep green foliage and white or gray tile is striking and genuinely beautiful. It also improves the air quality in your tiny home bathroom, which tends to have less ventilation than a full-size bathroom.
Designer Advice: Mist your shower plants lightly between shower days to maintain humidity around the roots, especially if your tiny home is in a dry climate where the air outside the shower is significantly less humid than the air inside it during use.

20. A Sliding Barn Door for the Shower Enclosure
You love the aesthetic of your tiny home but the swing door on your shower enclosure keeps hitting the toilet, the vanity, or both, and it makes every shower feel like a spatial negotiation. A sliding barn door adapted for shower use solves this without a renovation and actually adds a design element that most tiny home bathrooms are missing.
Shower-specific barn doors use tempered safety glass panels in a frosted, rain-glass, or clear finish mounted on a top-hung stainless steel track that’s rated for wet environments. The door slides to one side rather than swinging, which means zero clearance is needed in front of the shower opening. The hardware, the track, the rollers, and the handle, comes in the same finishes as standard shower fixtures so you can match your existing matte black or brushed nickel easily. Installation is a weekend project for someone comfortable with basic carpentry and following instructions, or a two-hour job for a contractor.
From a design standpoint, a barn door on a shower enclosure is unexpected in the best way. It gives the tiny bathroom a focal point and a detail that feels custom and considered. Pair it with simple wall tiles, a consistent fixture finish throughout the room, and a couple of plants to complete a space that feels genuinely put together rather than assembled from whatever was available.
Designer Advice: Opt for a bottom guide rail in addition to the top track. Without it, the glass panel can swing slightly at the bottom when opening and closing, which over time creates wear on the track system and can make the door feel loose and imprecise.

21. A Concrete Shower for an Industrial-Modern Look
You want a tiny home bathroom that looks nothing like the predictable white tile setups you see everywhere, and you’re drawn to something rawer and more architectural. A concrete-finished shower, whether poured in place, applied as a micro-cement overlay, or achieved with large-format concrete-look porcelain tiles, delivers an industrial-modern aesthetic that is genuinely striking in a small space.
Micro-cement is the most practical approach for most tiny home showers since it can be applied over existing surfaces without major demolition. A professional applies multiple thin layers, each one smoothed carefully, and the result is a seamless surface with no grout lines that looks like polished concrete but performs better in a wet environment once sealed properly. The color range goes from pale ash gray to deep charcoal, with warm greige tones in between that work well with wood and brass accents.
Concrete-look porcelain tiles achieve a similar aesthetic at a lower cost and with simpler installation. Large-format tiles, 24-by-48 inches or similar, minimize visible grout lines and make the surface read closer to a true seamless finish. Pair either version with matte black fixtures, a simple wooden stool or bench, and a large round mirror outside the shower enclosure. The rawness of the concrete is balanced by the warmth of wood and the precision of black metal, creating a finished look that feels genuinely designed.
Designer Advice: Seal micro-cement showers with a quality penetrating sealer both before and after grouting, and plan to reseal once a year. Micro-cement is porous by nature and without proper maintenance it stains, particularly around the drain where product residue accumulates.
22. A Colorful Mosaic Feature Wall
Your tiny home has personality everywhere except the bathroom, which somehow ended up beige and forgettable. You’re not afraid of color and you want the shower to actually make you smile when you step in. A mosaic feature wall on the shower’s back surface is the most direct way to bring color, pattern, and genuine visual delight into a small shower space.
Mosaic tiles in glass, ceramic, or natural stone come in sheets of small individual pieces that allow for almost unlimited pattern options: geometric repeats, abstract arrangements, gradient color washes from deep to light, or more complex figurative patterns if you’re ambitious. For a tiny home shower, a single feature wall is enough. The other three sides can be a simple coordinating solid tile in a neutral or a tone pulled from the mosaic palette. This keeps the pattern from becoming overwhelming while still giving the shower a genuine centerpiece.
Color choices should reflect the light conditions in your shower. In a naturally well-lit space, saturated blues, greens, and terracottas all work beautifully. In a shower with less natural light, glass mosaic tiles in warm golds, soft aquas, and cream tones reflect what light there is and keep the space from going flat. Installing small LED lighting at the top of the mosaic wall adds drama at night and makes the glass tiles sparkle in a way that is completely out of proportion with the effort required to achieve it.
Designer Advice: Order at least 10 to 15 percent more mosaic tile than your measurement requires. Mosaic sheets from different production batches can vary slightly in color, and having surplus from the same batch means you can make repairs in the future without a visible mismatch.

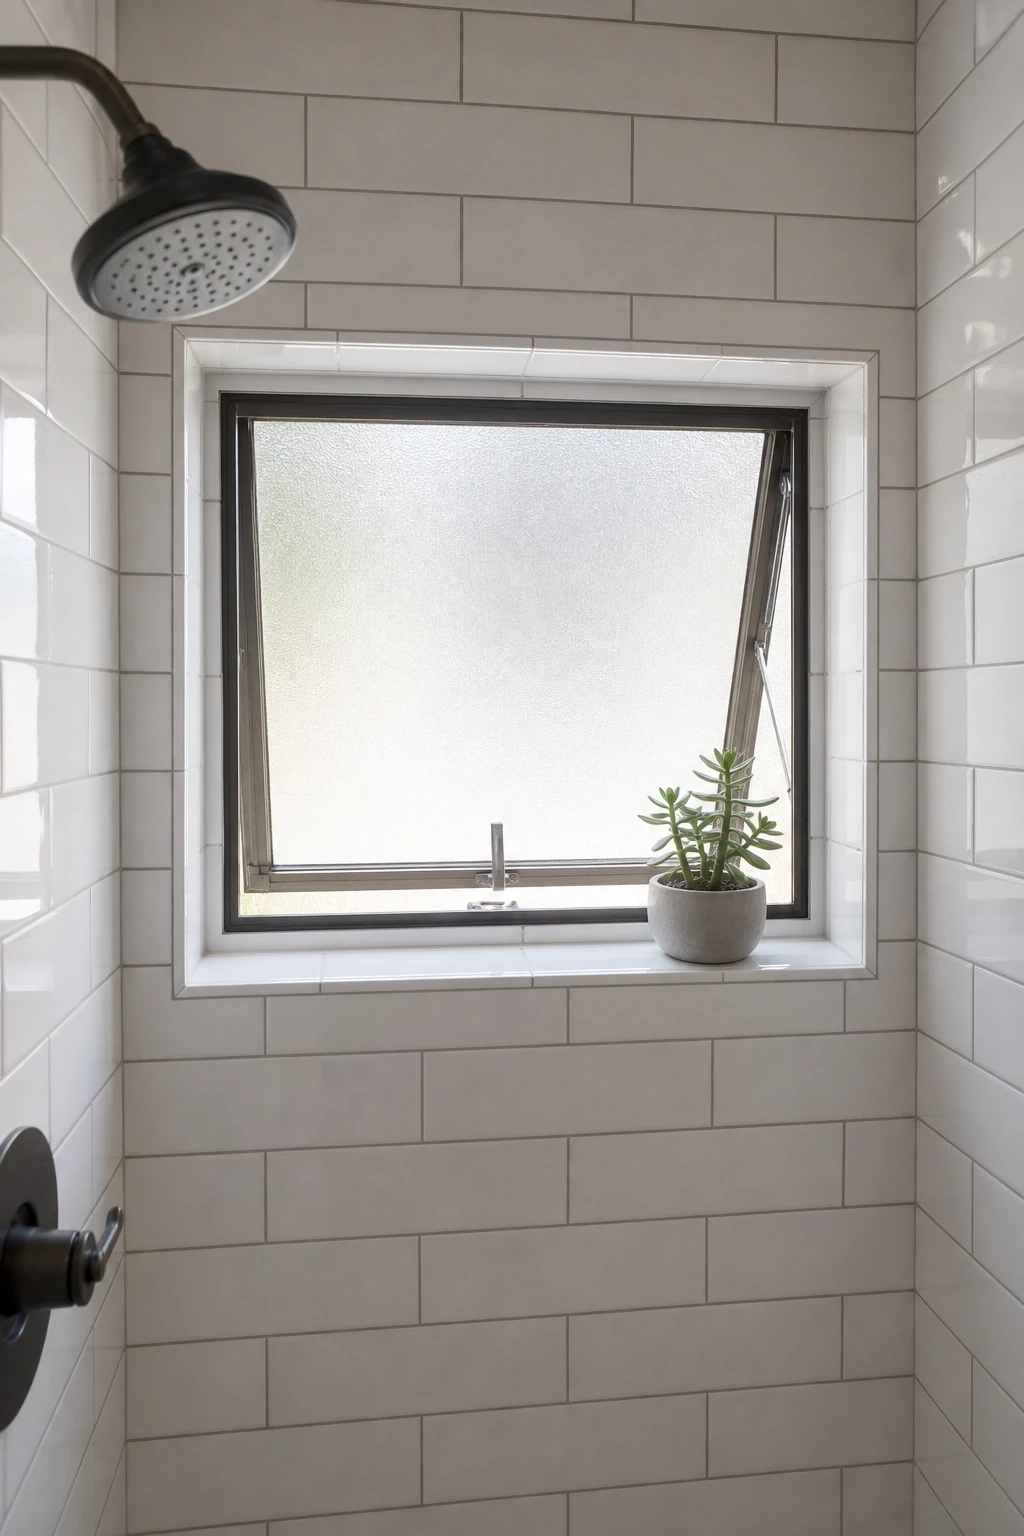
23. A Tiny Shower With a Window Inside It
Your bathroom has a window that used to sit next to the shower but your renovation plans put the shower right where the window is, and now you’re not sure whether to move the window or give up the natural light. The answer that most designers land on for tiny homes is: keep the window inside the shower and work with it rather than around it.
A shower window works well when it’s properly detailed. The window frame and sill should be tiled with the same material as the shower walls so there is no exposed wood or drywall that would be damaged by moisture. The window itself should be double-glazed with a casement or awning-style opening mechanism that can be operated from inside the shower. Frosted or textured glazing handles privacy, and an awning-style window can be left open slightly during the shower to improve ventilation without letting in rain.
Natural light falling through a window directly inside a shower is a genuinely luxurious quality. It changes the feel of the space hour by hour as the light outside changes, which no artificial lighting system fully replicates. Surround the window with a simple tile frame that extends a few inches on all sides to make it look intentional and architectural. A small potted succulent on the windowsill inside the shower adds a living element and benefits from the regular light and humidity without requiring much care.
Designer Advice: Install a proper window in a shower only if you can achieve a watertight tile installation around the full perimeter of the frame. Any gap between the tile and the window frame is a water entry point that will cause damage over time. It is one of those details where precision is non-negotiable.
24. A Compact Shower With Smart Lighting Layers
Your tiny home shower has one overhead light and it’s either too harsh or too dim depending on the time of day, and neither setting feels particularly good. Lighting in a small shower is often an afterthought but it has an outsized effect on how the space feels and how well it actually functions. Layering two or three types of light creates flexibility that a single fixture simply cannot provide.
The base layer is a recessed ceiling light or a flush-mounted waterproof fixture that provides general illumination. This handles the functional needs: being able to see what you’re doing, checking that you’ve rinsed all the shampoo out, and not slipping on the floor. The second layer is a softer ambient source, often achieved with an LED strip running along the bottom of the shower niche or along the floor edge where it meets the wall. This creates a warm glow that is invisible as a source but dramatically changes the mood of the space when the overhead is dimmed or switched off.
If your shower is enclosed in glass and you can see it from the rest of the bathroom, a backlit mirror or a warm-toned vanity light outside the enclosure contributes to the overall bathroom light environment even while you’re showering. Dimmable fixtures are the right choice throughout since they give you control over the atmosphere without needing multiple separate switches. For a truly considered tiny home shower, a simple smart bulb in the overhead fixture lets you adjust color temperature from warm to cool depending on whether you’re waking up or winding down.
Designer Advice: Always specify IP65-rated waterproof fixtures for any light inside a shower enclosure. Anything lower than IP65 is not rated for the moisture environment of a shower and will fail prematurely, sometimes creating a safety hazard in the process.
Wrapping It Up
Designing a shower for a tiny home is about working with what you have rather than wishing for more space. The best tiny home showers are not compromises. They are deliberate choices that reflect the personality of the home and the priorities of the person who lives in it. Whether that means a clean, all-white wet room that maximizes every inch, an outdoor shower that takes the pressure off the interior entirely, or a deep Japanese soaking tub that offers something most tiny homes never even attempt, there is a version of this that works for your space.
The ideas in this guide span a wide range of budgets, skill levels, and aesthetic preferences because tiny home living is not one-size-fits-all. Some of these are weekend projects. Some require a contractor. Some cost less than a hundred dollars to implement and some require a real investment. What they share is intentionality, the quality of having been chosen carefully rather than settled for.
Start with the one idea that excited you most when you read it. Make that change. Then see how it affects how the whole space feels. Good design tends to build on itself, and a shower that you genuinely like being in is a better starting point for everything else in your tiny home than you might expect.
Frequently Asked Questions
What is the minimum size for a tiny home shower?
Most building codes recognize 32 by 32 inches as the practical minimum for a shower stall, though 36 by 36 inches is considerably more comfortable for most adults. If you’re working with less than 32 inches in either dimension, a wet room setup where the entire bathroom floor serves as the shower area may be a better approach than trying to fit a traditional enclosure.
Can I have a full shower in a tiny home on wheels?
Yes, many tiny homes on wheels have fully functional showers. The key considerations are weight, water supply, and drainage. A fiberglass or prefab shower pod is lighter than a tiled enclosure and more structurally suited to movement. You’ll also need to decide whether you’ll rely on a fresh water tank, a hookup connection, or both, and ensure your grey water drainage complies with the local regulations wherever you park.
How do I stop a tiny bathroom from feeling too cramped?
The most effective strategies are maximizing natural light, using light-colored or reflective surfaces, eliminating clutter through built-in storage, and choosing fixtures that mount to the wall rather than sitting on the floor. A frameless glass shower enclosure, a wall-mounted toilet, and a floating vanity all free up visible floor space, which makes a room read as larger even when the actual square footage hasn’t changed.
What tiles are best for a very small shower?
Large-format tiles in matte or honed finishes work well because they reduce the number of grout lines, which makes the surface feel more continuous and less busy. Vertically oriented subway tiles are a classic small shower choice because they draw the eye upward and make ceilings feel higher. Mosaic tiles work beautifully as an accent surface but can feel visually busy when used on every wall in a very small shower.
How do I keep a tiny home shower clean with minimal effort?
The biggest maintenance wins come at the design stage. Choose larger format tiles with tight grout lines sealed with an epoxy or penetrating grout sealer. Avoid natural stone on the floor unless you’re committed to regular sealing. Install a squeegee hook inside the shower and use it after every shower to push water off the walls, which dramatically reduces soap scum and mold growth. A good ventilation fan that runs on a timer after you leave the bathroom handles humidity before it becomes a mold problem.
Is it worth hiring a professional for a tiny home shower installation?
For waterproofing, plumbing connections, and anything involving the shower drain, yes, it is almost always worth it. These are the elements that cause the most expensive damage when they fail, and they are also the least forgiving of small errors. Surface elements like tiling, painting, installing fixtures, or mounting accessories are areas where a confident DIYer can save real money with careful preparation and patience.