Tiny Home Bathroom Looks That Actually Pull Their Weight

There is a particular kind of frustration that comes with a tiny bathroom. You walk in, you bump an elbow against the wall, the shelves are overflowing, and the whole space just feels like an afterthought. A lot of tiny home bathrooms end up that way, not because the owners don’t care, but because small bathrooms get skipped in the design conversation. People focus on the kitchen, the living room, the bedroom, and the bathroom gets whatever is left over. That approach shows, and not in a good way.
The good news is that tiny bathrooms in tiny homes are actually one of the most rewarding spaces to design. Because the square footage is so limited, every single choice matters and has a visible impact. A well-chosen mirror can make the room feel twice as wide. The right tile can add a metre of visual height to a low ceiling. A thoughtful storage solution can clear the counters completely. These are not expensive renovations. Most of the ideas in this article are practical, budget-friendly, and achievable on a weekend.
What you will find here is not just a list of visual tricks. This article organizes ideas by what they are actually solving. Whether your problem is lack of storage, a dark cramped feeling, a bathroom that looks dated, or one that simply has no personality, there is a section for you. Each idea walks through colour, furniture, lighting, texture, and accessories together so you can see how the whole picture comes together. By the end, you will have a clear direction for your own space, no matter how small it is.
Making It Feel Bigger Than It Is
1. Go Full Monochrome With One Grounding Colour
One of the fastest ways to make a tiny bathroom feel larger is to stop breaking it up with too many colours. When walls, floors, tiles, and fixtures are all pulled from the same colour family, the eye has nowhere to stop. It travels across the space without interruption and the room reads as bigger than it actually is. This does not mean everything has to be white. Deep sage green, warm putty, soft terracotta, or dusty blue all work just as well, as long as they stay consistent.
Furniture-wise, choose a floating vanity in a matching or complementary tone rather than a freestanding cabinet that blocks floor space. Wall-mounted storage in the same colour as the walls will practically disappear into the background. For lighting, a simple recessed ceiling light keeps the clean look intact. You can add a single warm-toned wall sconce above the mirror for some atmosphere without disrupting the palette. Finish with a woven cotton mat, a single plant, and matching accessories in ceramic or matte stone.
Designer Note: Pick your monochrome base first, then choose grout in the same shade. Contrasting grout lines cut up the tile pattern and shrink the visual field.

2. Run the Same Tile From Floor to Shower Wall
Continuing the same tile across the floor and up into the shower wall is one of those design decisions that looks like it should cost a lot but actually just costs some planning. When the tile pattern flows uninterrupted from one surface to another, the transitions disappear. The room stops feeling like several small surfaces stitched together and starts feeling like one cohesive space. In a tiny home bathroom, that cohesion is worth more than almost any individual fixture upgrade.
Large-format tiles work particularly well here because they also reduce grout lines, which gives the whole surface a smoother, more open appearance. A 300x600mm tile in a matte warm grey or cream will cover both surfaces confidently without looking overwhelming. Keep the vanity light in tone, perhaps a pale wood floating shelf with an integrated basin, to maintain the open feel. Overhead lighting should be flush-mounted and directional so it washes down the tile evenly. Add a simple cotton shower curtain in a near-matching neutral if you prefer fabric over glass.
Designer Note: Use a large-format tile even if the room feels too small for it. The fewer grout lines there are, the bigger the room looks.

3. Use a Full-Length Mirror or Mirror Wall Panel
Mirrors are not a new trick, but there is a difference between placing a small mirror above a sink and actually committing to the idea. A floor-to-ceiling mirror panel, or a wide frameless mirror that spans the entire width of one wall, will genuinely change how the bathroom feels. It doubles the light, creates a reflection of whatever is across from it, and makes the room feel about double the size. The trick is choosing the right placement. Put it opposite a window or a well-lit wall for maximum effect.
If a full mirror wall feels like too much, a large rectangular frameless mirror from countertop to ceiling above the vanity achieves most of the same effect. Pair it with a vanity that has clean horizontal lines rather than ornate detailing so the whole wall reads as one calm plane. For lighting, install LED strip lighting behind the mirror or along its edges for a soft, even glow. This is significantly better for task lighting than a single overhead bulb and adds a sense of depth at the same time.
Designer Note: Choose frameless or slim-frame mirrors. A thick decorative frame draws attention to the mirror as an object rather than letting it do its spatial work.

4. Hang the Shower Curtain From Ceiling Height
Most people hang shower curtains at the standard 180cm height, which is where the rod goes by default. But if you move the rod up to the ceiling, or as close to it as possible, the curtain draws the eye upward and the bathroom instantly feels taller. This is such a simple swap and it costs almost nothing, just a longer curtain and a few extra drill holes. The impact, though, is genuinely noticeable, especially in bathrooms where the ceiling feels low and the walls feel close.
Choose a curtain in a light, semi-translucent fabric rather than a heavy solid panel. Linen-look polyester in off-white, cream, or pale stone lets some light through and keeps the room feeling airy. Avoid dark curtains in tiny bathrooms unless the rest of the room is very light because they absorb light and compress the space. For the rod, a simple matte black or brushed brass ceiling-mount rod looks intentional and modern. Keep the rest of the accessories simple and let the height of the curtain do the visual work.
Designer Note: Buy a curtain 30 to 40cm longer than standard so it pools lightly at the floor. This elongates the room even further and looks deliberately luxurious.

Smart Storage That Stays Out of the Way
5. Build a Recessed Niche Into the Shower Wall
A recessed shower niche is one of the best storage solutions for a tiny home bathroom because it takes up zero floor or counter space. It sits inside the wall itself, holds shampoo, conditioner, soap, and a razor without any visible clutter, and it looks like it was designed that way from the start. If you are doing any kind of renovation or building from scratch, this is worth including in the original plan. If you already have a finished bathroom, some recessed niches can be added between existing wall studs.
For the niche itself, tile the interior in the same tile as the surrounding shower walls for a seamless look. Alternatively, use a contrasting tile inside the niche, a small mosaic, a different colour, or a glossy finish, to make it a quiet design feature. Keep the niche at a comfortable height for daily use, around chest to shoulder height. Lighting a niche from above with a small LED strip will make it feel polished and intentional. Avoid keeping too many products in it. A curated four or five items look tidy; a crowded niche defeats the purpose.
Designer Note: A niche with a contrasting tile inside becomes a feature rather than just a shelf. Pick a tile with a subtle pattern or a glossy finish to add texture without adding bulk.

6. Mount Shelves Above the Toilet
The wall space above the toilet is almost always wasted in tiny bathrooms, and it should not be. A pair of floating shelves or a slim ladder shelf mounted above the cistern adds significant storage without touching the floor. You can keep spare towels, toiletries, candles, a small plant, and everyday essentials all within easy reach while keeping the counters and floor completely clear. This is one of the most cost-effective storage upgrades available and works in any bathroom style.
For the shelves themselves, natural wood in a light or medium tone adds warmth to what can otherwise be a cold, tiled space. Keep the depth shallow, around 20 to 25cm, so the shelves do not protrude too far into the room. Paint the wall behind them in a slightly deeper shade than the rest of the room to create a gentle feature wall effect without a dramatic commitment. Style the shelves with a mix of functional items and one or two small decorative pieces so they look considered rather than just utilitarian. A trailing plant like pothos or a small succulent works well here.
Designer Note: Limit shelf decor to three to four items per shelf. More than that tips over into clutter and defeats the purpose of clearing the counters.

7. Choose a Vanity With Integrated Drawer Storage
In a tiny home bathroom, the vanity is doing two jobs at once. It needs to hold the sink, and it needs to hold a significant chunk of your storage. A floating vanity with a deep drawer or two beneath the basin is far more functional than a pedestal sink with no storage at all. Pedestal sinks look elegant but they leave everything on display, and in a small bathroom, exposed clutter has nowhere to hide. A drawer-equipped vanity solves that problem at the source.
When choosing a vanity for a small space, look for one with clean, flat-front drawer faces rather than raised panelling. The simpler the front profile, the lighter the vanity looks visually. A wall-mounted floating unit also exposes the floor beneath it, which is one of the most effective tricks for making a small bathroom feel bigger. Choose a finish in pale wood, white, or soft grey and pair it with a countertop basin in matte white ceramic for a clean, uncluttered look. Brushed brass or matte black tap hardware adds a finishing detail that lifts the whole vanity without overwhelming it.
Designer Note: Install a small drawer organiser inside the vanity drawer before filling it. Keeping the interior tidy makes the whole room feel more ordered, even when the drawer is closed.

8. Use a Mirrored Medicine Cabinet Instead of a Plain Mirror
A mirrored medicine cabinet does everything a flat mirror does, reflects light, makes the room feel bigger, and serves as a focal point above the vanity, but it also hides a complete set of daily essentials behind its door. Toothpaste, skincare products, medications, razors, all of it disappears behind a reflective surface. The counter stays clear. The room stays calm. This is a particularly valuable swap for tiny home bathrooms where every inch of counter space matters.
Modern medicine cabinets have come a long way from the recessed chrome boxes of the 1980s. You can find flush-mount options in slim black frames, warm wood surrounds, and even arched or oval shapes that feel more like a design choice than a storage solution. Choose one that is as wide as your vanity, or close to it, for the best visual proportion. Inside, add small organisers, magnetic strips for metal tools, or adhesive hooks on the inside of the door to maximise the cabinet depth. With good placement and a warm light fixture just above or beside it, this becomes one of the hardest-working spots in the room.
Designer Note: If possible, choose a medicine cabinet with interior LED lighting. The light inside makes finding small items easy and adds a polished, hotel-quality feel when the door is open.
Colour and Texture That Do the Heavy Lifting

9. Try Limewash Paint for a Soft Textured Wall
Limewash paint has made a significant comeback in interior design and it is genuinely well-suited to tiny bathrooms. Unlike flat paint, limewash has a naturally mottled, layered quality that adds depth to a wall without adding visual weight. It catches light differently at different angles, which means the wall looks interesting and dimensional even without any decor on it. In a small bathroom where you cannot fit much furniture or artwork, that wall texture does a lot of the atmospheric heavy lifting.
Limewash works beautifully in warm neutral tones: aged white, sandy beige, dusty clay, soft terracotta, or warm putty. Pair it with simple matte black or unlacquered brass fixtures to let the paint be the focal point. Keep the tile simple, a plain subway or large-format neutral, so the wall and tile do not compete. For lighting, a warm Edison-style globe or a soft ambient ceiling fixture suits the organic, aged character of the limewash beautifully. Finish with a jute or cotton bath mat, a linen hand towel, and a simple ceramic soap dish.
Designer Note: Limewash is moisture-tolerant but not waterproof. Use it on walls away from the shower or bath splash zone. For wet areas, choose a limewash-effect tile instead.

10. Go Dark and Moody With Deep Wall Colour
Dark colours in small rooms feel counter-intuitive, and that is exactly why most people avoid them. But in a tiny home bathroom, a deep, moody wall colour can actually work in your favour. Dark walls push the boundaries of the room visually inward, which creates a sense of enclosure that feels cosy and intentional rather than claustrophobic. When done well, a dark bathroom feels like a spa room, intimate, calm, and surprisingly spacious.
The colours that work best here are deep forest green, charcoal, navy, inky blue-grey, or warm chocolate brown. Pair the dark wall colour with light grout on any tile, light-coloured fixtures, and as much reflective surface as possible, mirrors, glossy tiles, chrome or brass accents. Lighting becomes especially important in a dark bathroom. A well-placed backlit mirror or a pair of warm wall sconces flanking the mirror can transform the mood entirely. Keep accessories minimal, a white cotton towel, a single plant in a dark pot, and one or two brass or copper accents to warm the palette.
Designer Note: Dark bathrooms need more deliberate lighting than light ones. Plan your lighting before committing to the wall colour so you know the room will be functional as well as atmospheric.

11. Use Patterned Floor Tile as the Star of the Room
In a tiny home bathroom, you are working with very limited wall and counter space, which means the floor is one of the few surfaces with enough area to make a real design statement. A patterned floor tile, whether it is a classic black and white encaustic, a bold geometric, a Moroccan star pattern, or a painterly abstract print, immediately gives the room a personality and a focal point without adding anything to the walls or taking up any floor space.
The key to making this work in a small bathroom is to keep everything else simple. White or light walls, plain fixtures, minimal accessories, and let the floor do the talking. Choose a pattern with at least some white or light background so the floor still feels bright rather than heavy. For furniture, a white pedestal or floating vanity in a simple style keeps the focus on the floor without fighting it. Overhead lighting should be bright and even so the pattern is always fully visible. A single plant in a plain white pot completes the look without distracting from the tile.
Designer Note: Use a plain tile of the same background colour as your patterned tile for the shower floor if you have one. This maintains the visual flow without making the shower feel too busy.

12. Layer Natural Textures for a Warm, Earthy Feel
One of the most common mistakes in tiny bathrooms is relying entirely on hard, glossy surfaces. Tiles, porcelain sinks, chrome taps, and glass all reflect light well and clean easily, but they can make a small bathroom feel cold and clinical. Layering in natural textures, wood, rattan, linen, jute, stone, woven cotton, breaks up that coldness and gives the room a warmth that no paint colour alone can achieve.
You do not need a lot of surface area to introduce texture. A small teak stool beside the shower, a woven rattan basket for towels, a linen hand towel hung on a simple wooden peg rail, a small terracotta pot on a corner shelf, these are all small additions that add up to a genuinely warm, lived-in atmosphere. For the vanity, a pale oak or walnut finish adds natural warmth that white paint simply cannot replicate. Keep the fixtures in an unlacquered brass or matte black finish to complement the earthy palette rather than compete with it.
Designer Note: Even in a wet area, a small teak or eucalyptus wood stool or rack can work beautifully. These woods are naturally water-resistant and add warmth where plastic or metal would feel sterile.

Layout and Fixture Choices That Free Up Space
13. Swap the Shower Curtain for a Glass Panel
If your tiny home bathroom currently has a shower curtain, replacing it with a fixed or hinged glass panel is one of the single most impactful swaps you can make. A shower curtain, even a beautiful one, divides the room and creates a visual barrier. A glass panel, particularly a frameless or thin-framed one, lets the eye travel through the entire bathroom without stopping. The shower becomes part of the room rather than a separate box inside it, and the whole space reads as larger.
Frameless glass panels are the most elegant option but also the most expensive. Semi-frameless options with a slim matte black or brushed brass frame offer most of the visual benefit at a lower price point. If your shower is very small, a fixed glass panel along one side is often enough to open up the space without requiring a full enclosure. Keep the glass clean as water spots and soap residue are much more visible on glass than on a curtain. A good squeegee mounted on the shower wall makes this effortless.
Designer Note: Use a shower panel with a built-in magnetic or minimal-contact door seal rather than a traditional rubber seal. It keeps the look cleaner and reduces mould buildup around the frame.

14. Install a Wall-Mounted Toilet to Free the Floor
A wall-hung toilet is one of the more significant investments on this list but also one of the most rewarding in terms of visual impact. Because the cistern is concealed inside the wall and the bowl is mounted at height with nothing touching the floor, the bathroom floor is completely unobstructed. That unbroken stretch of floor is one of the clearest signals that a room is open and spacious. It is a detail that reads immediately, even to people who cannot articulate why the bathroom feels bigger.
From a practical standpoint, a wall-hung toilet is also much easier to clean around since there is no base or pedestal to work around. It can be adjusted to a comfortable height during installation, which is a bonus. The in-wall cistern takes up about 10 to 12cm of depth from the wall, which is worth accounting for in a very small bathroom. Pair it with a simple push-button flush plate in matte black or brushed chrome to keep the wall surface clean and minimal. The toilet pan itself should be a simple rimless design for both hygiene and clean aesthetics.
Designer Note: The in-wall cistern frame also allows you to set the toilet height during installation. For shorter users, setting it slightly lower than standard makes a noticeable everyday difference in comfort.

15. Choose a Corner Basin to Reclaim Breathing Room
In a bathroom where every centimetre counts, a corner basin is worth serious consideration. Traditional basins take up a full wall width, or at least 50 to 60cm of it, which in a tiny bathroom leaves very little room for anything else. A corner basin sits diagonally across a corner, occupying space that was otherwise dead, and frees up the straight wall runs for storage, towel rails, or simply breathing room.
Corner basins come in a range of styles from compact triangle-shaped pedestals to elegant wall-mounted diamond-shaped bowls. For a tiny home bathroom, a wall-mounted corner basin with a small shelf underneath is the most practical option. It clears the floor beneath it, provides a bit of storage, and sits flush with the corner so it does not protrude into the room. Pair it with a corner mirror cabinet above it for additional storage and a proportional, intentional look. Fixtures in a consistent finish, all matte black, all brushed brass, or all chrome, tie the corner station together neatly.
Designer Note: Corner basins work best when the plumbing is already near a corner. If it is not, the cost of moving pipes may outweigh the space benefit. Check with a plumber before committing.

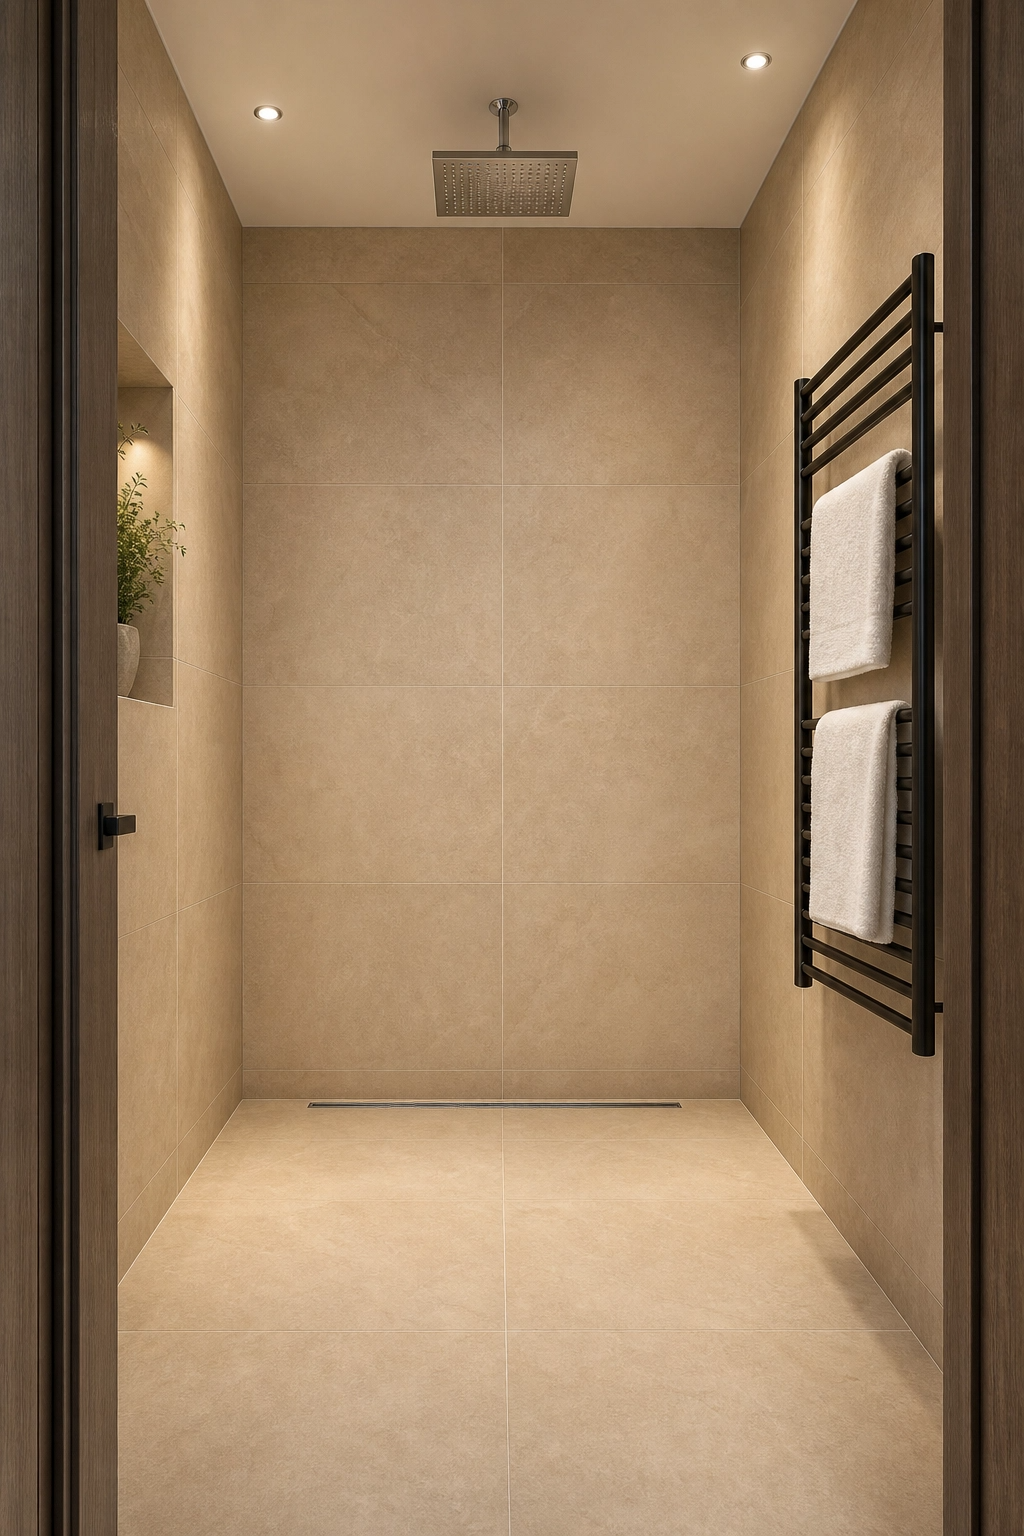
16. Replace the Bathtub With a Wet Room or Walk-In Shower
In a tiny home bathroom, a full-sized bathtub is often the single biggest space drain. It takes up roughly a third of the floor area, it limits where other fixtures can go, and in many small homes, it is rarely used for actual baths. Converting that tub footprint into a well-designed walk-in shower, or better yet, a full wet room where the entire floor drains and there is no enclosure at all, can completely transform how the bathroom feels and functions.
A wet room in particular is the ultimate small bathroom solution. With no shower tray, no frame, and no enclosure, the entire floor becomes the shower floor and the room gains its full square footage back. The floor simply slopes gently toward a central or wall drain. Use large-format non-slip tiles throughout, keep the colour consistent with the rest of the bathroom, and add a rainfall shower head mounted flush to the ceiling for a hotel-quality feel. Install a single wide towel warmer on the opposite wall and the transformation is complete.
Designer Note: A wet room requires excellent waterproofing. This is one project where it is worth investing in a professional tanking job rather than attempting a DIY approach. Poor waterproofing leads to structural damage that costs far more to repair.
Personality and Finishing Touches
17. Hang Wallpaper on Just One Feature Wall
Wallpaper in a tiny bathroom sounds like a lot, and covering all four walls with it would be. But a single feature wall, typically the wall directly behind the vanity or toilet, can hold a wallpaper beautifully without overwhelming the space. One bold, well-chosen wallpaper panel adds pattern, colour, personality, and a sense of designed intention that no plain paint can match. It is the kind of detail that makes the room feel like someone thought carefully about it.
The best wallpapers for tiny bathrooms are those with some scale to the pattern. A large leaf print, an abstract watercolour design, or a classic wide stripe can all work well. Small, busy repeat patterns tend to feel crowded in a tight space. Choose a moisture-resistant or specifically bathroom-rated wallpaper since steam and humidity will eventually lift a standard wallpaper off the wall. Keep the three remaining walls in a plain colour pulled from the wallpaper palette so the feature wall reads as intentional rather than accidental.
Designer Note: Use a peel-and-stick removable wallpaper if you are renting or want a lower-commitment option. The quality of these has improved significantly and many are convincingly realistic.

18. Add a Heated Towel Rail as Both Function and Feature
A heated towel rail is one of those upgrades that seems indulgent but is actually one of the most practical things you can add to a tiny home bathroom. It keeps towels dry between uses, eliminates the damp smell that builds up in small poorly-ventilated bathrooms, and provides a gentle background warmth that makes the space considerably more comfortable in colder months. And because it is wall-mounted, it takes up zero floor space.
From a design perspective, a towel rail in the right finish does double duty as a statement piece. A wide curved rail in brushed brass or matte black makes a strong visual impression while staying entirely functional. For a tiny bathroom, choose a rail that is proportional to the wall it sits on. A 60cm wide rail on a 90cm wall looks intentional; the same size rail on a 2-metre wall looks like an afterthought. Mount it at a comfortable arm height, usually around 120 to 130cm from the floor, so reaching for a towel is effortless. Add two or three quality cotton towels in a consistent colour and it becomes one of the most refined details in the room.
Designer Note: Electric towel rails are far easier to install than hydronic ones in a renovation since they do not require connecting to a central heating system. A simple GPO (power point) connection is all they need.

19. Bring in a Single Statement Plant
Plants in bathrooms are not a new idea but they remain one of the most effective ways to add life, colour, and freshness to a space that can otherwise feel hard and functional. In a tiny home bathroom, a single well-chosen plant is better than several small ones scattered around because it reads as an intentional design decision rather than a random addition. The goal is one plant that actually belongs in the room, suits the light conditions, and is large enough to register as a feature.
The best choices for low-light bathrooms with humidity are pothos, peace lily, snake plant, heartleaf philodendron, or a small Boston fern. For bathrooms with a window and reasonable natural light, a fiddle-leaf fig in a corner or a trailing tradescantia can look genuinely beautiful. Put the plant in a pot that matches the room’s colour story. A matte terracotta pot suits earthy, warm palettes. A white ceramic cylinder suits clean, minimal rooms. A dark glazed pot suits moody, dark bathrooms. The pot matters as much as the plant.
Designer Note: If your bathroom has very little natural light, use a grow light disguised as a regular bulb in the ceiling fixture. Most plants will do fine on 10 to 12 hours of grow light per day.

20. Use Scent as a Design Layer
This is one of the most overlooked elements in bathroom design and one of the most powerful. Scent is the first thing you notice when you walk into a room, before you consciously register the colour, the tile, or the furniture. A tiny home bathroom that smells like eucalyptus and cedar, or warm vanilla, or clean linen, immediately feels more luxurious and considered than one that just smells like a bathroom. It is the easiest finishing touch there is and the most sensory impact per dollar spent.
The options for bathroom scent are wide. A reed diffuser on a corner shelf or window ledge works consistently without any effort. A small scented candle in a glass jar adds both scent and warm light when lit. Solid perfume stones or a ceramic aroma diffuser are minimal and decorative at the same time. Choose a scent that matches the character of the room. Earthy, green bathrooms suit botanical scents like eucalyptus, mint, or fern. Warm, moody bathrooms suit amber, cedar, or sandalwood. Light, fresh bathrooms suit linen, citrus, or white tea.
Designer Note: Avoid synthetic air fresheners, plug-ins, and spray aerosols in a well-designed bathroom. The chemical smell undercuts the care you have put into the space. Natural wax candles, essential oil diffusers, and reed diffusers in quality fragrance oils are worth the small price difference.

21. Create a Spa Shelf With Intentional Accessories
A small floating shelf styled with care does more for a tiny home bathroom than almost any renovation. The point of a spa shelf is not storage. It is atmosphere. A tray with a candle, a small plant cutting in a bud vase, a stone soap dish, and a neatly rolled hand towel communicates that the room is looked after and considered. It gives the eye a place to rest on something beautiful rather than scanning bare walls or cluttered counters.
Place the spa shelf at eye height on the wall that you look at most often when in the bathroom. Keep it to five to seven objects maximum and resist the urge to fill it. The space between objects matters as much as the objects themselves. Choose a palette for your shelf accessories that matches the room’s colour story: all warm tones, all cool tones, or all neutrals. A mix of textures, ceramic, wood, stone, glass, linen, adds richness without colour clash. Refresh the shelf seasonally with one or two new elements to keep it feeling current.
Designer Note: Style the shelf in odd numbers. Three objects, or five, always looks more natural and balanced than even groupings. This is a basic styling principle that applies to every shelf in the house.

22. Add Warm Lighting With a Dimmable Fixture
Lighting in tiny bathrooms is almost always an afterthought, and it shows. A single harsh overhead light is fine for function but does nothing for atmosphere. In a tiny home bathroom where space prevents you from adding much in the way of furniture or decor, lighting is one of the most powerful mood tools you have. A dimmable warm-tone ceiling fixture paired with a backlit mirror or a wall sconce gives you two different experiences in the same room, bright and practical in the morning, warm and relaxing in the evening.
For the overhead fixture, choose a recessed or flush-mount fitting with a warm white bulb at around 2700K. This colour temperature is closest to natural candlelight and is the most flattering for skin tones, which matters in a room with a mirror. Add a wall sconce or a backlit mirror at face height for task lighting that actually works. If budget allows, a dimmer switch on both circuits is worth every cent. The ability to take the room from 100 percent brightness to 30 percent changes the entire feel and makes the bathroom a place you actually want to spend time in.
Designer Note: Avoid cool white or daylight bulbs in bathroom mirrors. They wash out skin tones and make the room feel clinical. Stick to warm white (2700K to 3000K) for a bathroom that flatters.

23. Frame the Mirror in Wood or Brass for a Finished Look
A builder-grade mirror or an unframed rectangle above a vanity is functional, but it is missing one of the easiest upgrades available. Adding a frame to an existing mirror, or replacing it with a framed version, gives the vanity wall a finished, considered look that changes the entire character of the room. A frame adds weight, warmth, and personality without taking up any additional space. It is the difference between a bathroom that looks decorated and one that looks like it is still waiting to be finished.
The most versatile frame materials for a tiny home bathroom are natural oak or walnut for a warm, organic feel, matte black metal for a modern edge, and brushed brass for a touch of quiet glamour. Match the frame finish to at least one other fixture in the room, a tap, a towel rail, a cabinet handle, so it reads as part of a deliberate design language rather than a random addition. For proportion, choose a mirror that is about two thirds the width of the vanity below it, or wider, never narrower, as a too-small mirror looks undersized and disconnected.
Designer Note: You can frame an existing plain mirror yourself using a peel-and-stick mirror frame kit. These are widely available, take about an hour to install, and make an immediate visual difference at a fraction of the cost of a new framed mirror.

24. Use Peel-and-Stick Tiles to Refresh Dated Surfaces
Not everyone in a tiny home has the budget or the landlord’s permission for a full tile renovation. Peel-and-stick tiles have improved dramatically in quality over the last few years and are now a genuinely credible option for refreshing dated or ugly existing tiles without any permanent alteration. They apply directly over existing tile, grout lines and all, and when done well with the right product and pattern, the result is convincing. This is an especially useful option in tiny bathrooms where the tile is the biggest visual surface.
The patterns that work best are simple ones: a plain large-format look, a clean subway pattern, or a simple geometric. Highly complex patterns are harder to line up perfectly and any misalignment is more noticeable in a tiny room. Choose a colour that is neutral and timeless rather than trendy so the investment lasts longer. Apply the tiles on a completely clean, dry surface for the best adhesion and use a grout pen in the matching colour along the seams for a seamless finish. Done carefully, this can take a bathroom from looking tired to looking considered at a fraction of renovation cost.
Designer Note: Peel-and-stick tiles work best on flat, smooth existing tiles. Textured or heavily glazed tiles may not provide enough adhesion. Test one tile in a corner for 48 hours before committing to the whole surface.

25. Add a Peg Rail for Towels and Daily Essentials
A simple Shaker-style peg rail mounted on the wall is one of the most functional and aesthetically pleasing things you can put in a tiny bathroom. It holds towels, robes, bags, and any number of hanging accessories without requiring cabinetry, shelves, or floor space. It is also one of those details that reads as thoughtfully chosen rather than purely utilitarian. A row of simple wooden or ceramic pegs on a painted rail has a calm, considered quality that feels very much at home in a well-designed small space.
Mount the peg rail at a height that suits the tallest person using the bathroom, typically around 150 to 170cm from the floor. In a very small bathroom with limited wall space, even three or four pegs make a significant difference. Paint the rail the same colour as the wall so it reads quietly, or choose a contrasting colour to make it a feature. Natural wood pegs in birch or oak are warm and versatile. Ceramic knobs in white or a hand-glazed finish are more decorative and suit cottage or earthy bathroom styles particularly well.
Designer Note: Add a small hook at a lower height, around 90cm, for children using the bathroom or for hanging a small bag or washcloth at a more accessible level.

26. Use a Skylight or Solar Tube to Bring in Natural Light
In tiny home bathrooms, particularly those in windowless interior locations, natural light is either very limited or entirely absent. Artificial lighting can compensate for function but it cannot replicate the quality of daylight. A skylight, or where a skylight is structurally not possible, a solar tube, brings daylight directly from the roof into the room without requiring any exterior wall alteration. The difference in how a bathroom feels with real daylight filtering in from above is significant and worth the investment if the structure allows for it.
Solar tubes are a particularly practical option for tiny homes because they have a small footprint, typically 25 to 35cm in diameter, and can channel daylight through several metres of internal structure via a highly reflective internal tube. They install in a day and cost considerably less than a full skylight. In a tiny bathroom, even a modest amount of natural light makes the room feel fresher, cleaner, and more open. Pair it with light-coloured surfaces to maximise the reflection and you will be surprised how much a bathroom can change with real daylight.
Designer Note: Some solar tube models include an LED light kit that activates at night, using the same diffuser. This gives you consistent, soft lighting in the same location at all hours.

27. Style the Counter With Restraint and Intention
The most underrated finishing touch in any tiny home bathroom is the counter itself. Most bathroom counters are a cluttered collection of products, toothbrushes, hand wash, and things that have nowhere else to go. But a counter that is styled with restraint and intention looks completely different. It looks calm, controlled, and considered, like the person using the bathroom has thought about what belongs on the surface and what does not. This costs nothing to change.
Start by removing everything from the counter and then only put back what is used daily. Everything else goes inside a drawer, cabinet, or under the sink. What remains on the counter should be arranged on a small tray. A ceramic or stone tray corrals the items so they read as a grouping rather than scattered objects. Inside the tray: a hand wash in a beautiful pump bottle, a soap dish or small bar of soap, and perhaps one small plant or a tea light holder. That is it. The tray does the styling work and the restraint does the rest. In a tiny bathroom, the counter speaks louder than any other surface because it is always in direct view.
Designer Note: Decant hand wash, shampoo, and other products into matching refillable bottles. Mismatched commercial packaging is the single biggest source of visual noise on any bathroom counter.

Wrapping It Up
Tiny home bathrooms are not a compromise. They are a design challenge, and like most challenges, the constraints are what make the results interesting. When you cannot sprawl, you have to be intentional. When you cannot add more, you have to make better choices with what is there. That discipline produces bathrooms that feel far more put-together than much larger rooms that have been lazily filled.
The ideas in this article are organized around what they solve rather than what they look like, because good design in a small space always starts with a problem. Too dark? Ideas 22 and 26. Not enough storage? Ideas 5, 6, 7, and 8. Dated surfaces? Ideas 11, 24, and 23. No personality? Ideas 9, 10, 17, and 19. Work through the sections that are most relevant to your bathroom and apply two or three ideas at a time rather than trying to do everything at once.
The best tiny home bathroom is not the one with the most ideas applied to it. It is the one where every choice feels deliberate, where nothing is wasted, and where the room does its job beautifully even within its limits. Start with what bothers you most, solve that first, and go from there. The results will surprise you.
Frequently Asked Questions
What is the best colour for a tiny home bathroom to make it feel bigger?
The most effective approach is a monochrome palette in a light to mid tone, where the wall colour, tile, and fixtures all stay within the same colour family. This removes the visual interruptions that make a room feel segmented. Soft warm whites, pale sage, dusty putty, and muted terracotta all work well. If you prefer a darker room, a deep wall colour with plenty of reflective surfaces and strong lighting can also feel spacious rather than cramped when executed correctly.
Can I add storage to a tiny bathroom without doing a full renovation?
Absolutely. Some of the best storage solutions for tiny bathrooms require no structural work at all. A mirrored medicine cabinet replaces a flat mirror and adds hidden storage behind it. Floating shelves above the toilet mount with just a few screws. A peg rail is a single afternoon project. A corner basket or a ladder shelf freestanding beside the toilet all add meaningful storage without touching a single tile or wall cavity.
Is wallpaper safe to use in a tiny bathroom?
Yes, with the right product. You need to specifically choose a moisture-resistant wallpaper that is rated for bathrooms, or use a standard wallpaper with a clear moisture-barrier top coat applied after installation. Avoid putting wallpaper in direct water splash zones like directly beside the shower or bath. For a feature wall behind the vanity or toilet, moisture-resistant wallpaper is a very safe and effective option that adds immediate personality.
How do I make a tiny bathroom feel warmer without spending a lot?
Natural materials do this work better than anything else. Add a jute or cotton bath mat, hang a linen hand towel, place a small wooden stool or teak rack, and introduce a single plant in a terracotta pot. A warm-toned light bulb at 2700K instead of a cool white one will also make a significant difference instantly. These additions together cost very little and completely change the feel of the room from cold and clinical to warm and lived-in.
What should I keep on the bathroom counter in a tiny home?
As little as possible. Ideally, your counter holds daily-use items only, collected on a small tray: a hand wash in a refillable pump bottle, a soap dish, and perhaps a small plant or candle. Everything else, skincare products, toothbrushes, extra supplies, should be stored inside a cabinet, drawer, or medicine cabinet. The less on the counter, the calmer and more spacious the whole room feels. If it is not used every single day, it does not belong on the counter.
What is the difference between a wet room and a walk-in shower, and which works better in a tiny bathroom?
A walk-in shower has no door or curtain but does have a defined tray or threshold and usually a partial glass panel to contain water. A wet room has no enclosure at all. The entire floor is waterproofed and slopes toward a drain, and the shower head can be placed anywhere. In a truly tiny bathroom, a wet room is the better choice because it removes every physical barrier and gives the room its full square footage. The trade-off is that wet rooms require professional waterproofing to do safely and correctly.